Share |

Wednesday, April 28, 2010

Thanksgiving Point Tulip Festival 2010

Every year at this time, I see the billboard while driving down the freeway. And every year, I always say I am going to go to the Tulip Festival at Thanksgiving Point. Well I finally made it this year! We were treated to a visit by my Uncle Glen {my mom's brother} and his wife, Laurel. So it was the 2 of them, Peyton and myself, my mom, and Lindsi {my sister-in-law} and her daughter Malia. The park is really pretty. It's massive. I had no idea that it wasn't directly connected to Thanksgiving Point. But it is down the road a ways. At the same time was the Dutch Festival, so the park was busy. A lot of people were there. I got some pretty cute pictures of the girls! I also got a some pictures of the beautiful flowers. I admit there weren't as many as I expected in my head, so I was a little disapointed, but the park itself is really pretty, so I didn't mind. Oh, and because the weather was actually nice this year and not freezing like it has been in the years past, I got a little color even! It's pretty much already gone, but this is pretty good for me.
If you have never gone, make it a point to go! It's a really beautiful park!
I think the picture above is my favorite from that day.


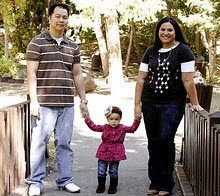
This is my mom's brother, Glen and my cutest niece, Malia. {She's my only niece, but she is so cute!!!!}


Peyton came up with the little pose above on her own. She went and sat back to back with Malia and then turned around with that cute look on her face! It was pretty funny. We got a good laugh at it!


Anything her big cousin, Malia did, Peyton was sure to follow!

The Italian Gardens were absolutely beautiful! I want that fountain in my back yard :D. {It would be really hard because I have a town home!}
Isn't this picture so cute!
There was such a large variety of tulips through out the whole park.

This fountain was Peyton's favorite part of the whole park! She was soaking wet when I was finally able to get her away from it!

This is only a small portion of the pictures I took. I thought they turned out pretty good for my old point and shoot. I can't wait to scrapbook them.

Tuesday, April 27, 2010

Birthday Present - Springtime Wreath and Birthday Card


I am pretty blessed. I love my daughter and husband with all my heart and I am so lucky to have them! I also get to work with some of my best friends! My friend Cori {she is also my boss!} had her birthday at the beginning of the month and I have been a slacker in giving her birthday present to her. I have been meaning to buy the tacky tape to hang up pictures to go along with her present, but have neglected to do so. But I am just going to give her her present tomorrow anyway. So here it is! I made her this little springtime wreath. It was pretty simple and total project time is only about an hour {probably less if I hadn't been watching Vampire Diaries at the same time!} All supplies but the circle cutter, Glue Dots and ribbon are Stampin' Up!

I used the circle cutter to cut out the wreath shaped circle. I first cut a 6" Circle and then cut a 5" circle inside of it. I saved the middle for another project and used the ring shape to be my wreath. Here is the one thing with this - Cardstock isn't the most durable material. So I would suggest to use chipboard or something more sturdy {i.e. foam} but it was what I had on hand at the time and I wasn't planning on it being too heavy anyway. If I would have added any more weight, I wouldn't have been able to use the cardstock.

Here are the list of supplies used:
  • Stampin' Up! - Sweet Pea Designer Series Patterned Paper, Whisper White cardstock, Rhinestone Ice circle brads, Bigz XL Flower Folds die for Big Shot, Scallop Circle punch, Boho Blossoms punch
  • EK Success - circle cutter
  • Glue Dots - Craft and Pop Dots
  • Target Dollar Spot - baby blue silk ribbon
Here are a few close ups. Sorry the lighting is so bad. I took the pictures this evening. I will try to take some in the morning to replace these ones.


Here is Cori's birthday card supplies:
  • Stampin' Up! - Baha Blue and Whisper White cardstock, Chocolate Chip and Old Olive classic ink, Scallop Circle and 1" Circle punch, Scallop Trim border punch, Rhinestone brad
  • American Crafts - Dear Lizzy and The Goods patterned paper, Dear Lizzy fabric paper, Greenhouse plastic flower
  • Wilton - paper doilies
  • Marcella by K - "to You" letter stickers
  • Imaginisce - Center Kisses - gem flower
  • Glue Dots - Pop Dots, Mini and Craft Glue Dots
  • My Minds Eye - Lush Pink gem sticker
  • My Stash - brown gingham ribbon

Here is a closeup of the card:

As I have said numerous times, I love American Crafts! And I love Dear Lizzie! I am sad that I am almost out of my stash of her paper! I am looking forward to her next line coming out this summer! I am sure I will end up stocking up on it too! I know I say this all the time, but this is one of my favorite cards! I love the paper doilies! Purchased from Walmart in the wedding section. I think I paid $2 for a small package of 20. And then I got the next size up and got the same amount in that package for $2 too.

Too make the flower, I cut the middle of the doily out and wrapped it behind the twisted fabric paper flower. I did 2 of these.

Can't get enough of the tiny banners showing up on everyone's projects! So I took the paper from Dear Lizzy and just cut a few of the triangles out leaving some of the white cardstock portion to keep the pieces together and in a line. Then I just used mini glue dots behind the triangles to hold them on the card. So simple and so fun at the same time!

Hope you guys like the projects!

P.S. I finally purchased Princess And The Frog for Peyton today. She has already watched it twice! Looks like it's going to be a tossup between that and Alice In Wonderland {the Disney animated version} everyday as to which one to watch!

P.S.S. I am obsessed with Glee! Hadn't watched it until 3 episodes ago and now it is my new favorite show! LOVE it!

Wednesday, April 21, 2010

Bonjour card

Ever have an idea in your head and just have the hardest time trying to actually get it down on a project like you see it in your head? That's basically what happened with this card. I knew already that I wanted to do the flower made of the different circles. And I knew I wanted to use this black and cream polka dot patterned paper. But Getting the card to actually turn into a card was a lot more difficult.

So here are the results. I love the colors together though and I love the black and cream polka-dot patterned paper. If I could I would use it on everything :D.

And here are the supplies used:

My Little Shoebox

  • pink heart, green strip, black and cream polka-dot

Stampin' Up!

  • Very Vanilla and Melon Mambo cardstock
  • Carte Postal stamp set
  • Basic Black, Old Olive, Melon Mambo classic ink
  • Linen Thread
  • Scallop border punch
  • Tempting Turquoise jewel brad

Glue Dots

  • Craft Glue Dots
  • Pop-Up Glue Dots

My Stash

  • Turquoise ribbon
  • Turquoise button

Note:I hand cut the circles for the circles and leaves for the flower

So this card is simple for me. I am usually pretty gaudy. But once I got this far, I realized I liked it and it was simple to make.

Hope you guys like it too!

P.S. My daughter was hanging out in my craft room when I was making this and told me "Thank you Mommy, thank you!" She thought I was making the card for her. Looks like I need to make her some cards she can play with that she can tear apart and pretend to give out to invite her imaginary tea party guests! It was pretty cute! She still thinks it's hers. So funny! Oh, to be 2 again!

Monday, April 19, 2010

You Make Our House A Home layout


I am so loving the brand My Little Shoebox. I hadn't heard of it until I saw some of their new paper on twopeasinabucket.com. I knew I had to buy some! So I searched the valley here in Salt Lake to find a craft store or scrapbook store that carried it. I found it at one of my long favorite stores, Paper Creations about 3300 South and 1300 East. It is a store that I have been going to for quite some time. But now that we live on the Southwest side of the valley, it's just so far away. So I don't get to go there much anymore. It still remains though one of my favorite scrapbook stores.

Hi Paper Creations, if you are reading :D. I {heart} you!

They didn't have the new lines in when I visited, but they had this darling houses line and the turtles and trees line that is in my Cascade Springs layout.

I have another cute project that is in the works that also features MLS papers. I love how fun the paper is. And as I have said before, I am a sucker for cute birdie patterns! {Hence my blog!}

Here are the supplies I used for this layout:

  • My Little Shoebox - patterned Paper, journal Spot, transparency layovers
  • Bazil Basics - black metallic cardstock
  • Scenic Route - black letter stickers and monogram Sticker
  • American Crafts - white letter stickers
  • Stampin' Up! - Circle Scallop punch, Scallop border punch, linen thread, black silk thread
  • Glue Dots - craft Glue Dots, ribbon line, pop Glue Dots
  • My Stash - 1/16" hole punch, black pen


When these pictures where taken of Peyton, she was tired, missed her nap and just wanted to color. But gradually she warmed up to Niki - the photographer - and smiles did eventually start to appear. I know, hard to believe from the picture above. The thing is, the pictures of Peyton not smiling are some of my most favorite. When she plays, she is all smiles. But she can be very serious at moments and very aware of her surroundings. These times are my favorite. So I think that is part of why I love this picture so much!
Hope you all like it!

Saturday, April 17, 2010

All Girl layout


I know I have said it before, but don't you just love love love the Dear Lizzy line from American Crafts! I so do! I check Elizabeth Kartchner's blog on a regular basis {her link is down in my favorite blogs list}. She has a great sense of style and a great eye for design. Plus her line is filled with such fun things!

This link will take you to her post with the link to the twisted flower tutorial:

http://elizabethkartchner.blogspot.com/2010/04/links.html

Here is the list of supplies used:

  • Patterned Paper - Dear Lizzie for American Crafts; My Minds Eye, S.E.I., Stampin' Up!, Imaginisce {All cardstock solids are the reverse side of the patterned paper from American Crafts}
  • Fabric Paper - Dear Lizzie for American Crafts {Could you just die!!!}
  • Felt flower and birder - Dear Lizzie for American Crafts
  • Pearl flourish - Prima
  • Punches - Martha Stewart Butterfly and Lace border; EK Success Five Petal flower; Stampin' Up! Boho Blossoms and Scallop Circle
  • Chipboard - American Crafts
  • Brads and Jem stickers - Stampin' Up! clear and yellow jems; Imaginisce blue jem; My Minds Eye Lush pink sticker jems; 7 Gypsies silver flower and brad
  • Classic Ink - Stampin Up! Chocolate Chip
  • Stamps - Autumn Leaves journal circle; Stampin' Up! vintage Labels
  • Misc - paper doily, black pen


Lots of fun stuff used on this layout! I was on Liz Kartchner's blog and she had a link to American Crafts where she did a video tutorial on how to make the twisted flower with her fabric paper. So when I watched it, I knew I needed to try it out for myself. It was a little tricky at first, but I think it turned out so cute! The rosettes you see everywhere. They took me a while to figure out but I think I finally have it down. I made a reverse rosette with the fabric paper in the top left hand corner above the photo that you gather from the middle of the circle instead of the outside. Super easy! The fabric flower that is next to the twisted flower, I just took the adhesive backing off the fabric paper, run a stitch through each piece and then pull so it ruffles into the flower shape. I did something similar to make the ruffle under the picture. I am not crazy about it and that is why I put the ribbon there to try to break it up a bit. But I did purposely fray the ends of the ruffle to give it a fun look. I hand cut out the the label with the butterflies {I love this stamp!}

Hope you guys like it!

Sunday, April 11, 2010

For You Flower and Butterfly card

I got this scallop square die for my Big shot quite some time ago but had yet to use it until today. To make it into the card shape, I just cut out two pieces, scored the top piece, glued the top sections together and then also held it together with the gorgeous silk ribbon from Stampin' Up! {the Bigshot die is also Stampin' Up!} I absolutely love the baroque patterned paper from Fancy Pants. I also used it on a layout with some owls and trees that are part of the collection.

Handmade flowers are all over the scrapping world right now. So many people have gorgeous ideas and give awesome tutorials on how to make them! I found a YouTube video {I haven't been able to find since} that showed some cool techniques for getting the paper to be more pliable. So I figured I would explain it here since I can't give you all the link.

  • I used the Scallop Circle, Five-Petal flower and Boho Blossoms punches. The Scallop Circle is the base and you can't see it. So really any circle shape will work. I punched out 1 Scallop Circle and about 8 Five-Petal flowers. Then I cut out one set of Boho Blossoms.
  • After the desired punches are punched out, take your crimper out and run each piece through several times, switching the direction.
  • Next, take the end of a stylus or something flat like a bone folder and get out the crimps that you don't really want to show. You will notice that since you crimped each piece so much that the paper will flatten back really easily {though not completely - you wont notice though once it's all finished}. The reason you are doing that is because crimping it breaks up the fibers and makes the paper a lot easier to manipulate. You can also do this by spraying paper with water. The downside to that is if you use paper you have inked. Crimping it instead prevents the ink from running.
  • Now I took the ball end of my stylus - because it's long and skinny and wrapped the petals around it in a down direction. You can use a pencil or something similar as well.
  • Play around with the petals. There are tons of looks you can do {you can switch it just as easily to wrap the petals up instead}. I also folded each petal just a bit in the middle. So many choices here.
  • Take the Boho Blossoms flowers that you punched and layer them from smallest to largest.
  • Then start layering the Five-Petal flowers under the Boho Blossoms and then the Scallop Circle.
  • I held mine all together with the brads in the center. You can use Glue Dots too - or a combination of both. I think I would recommend a combo of both because sometimes just a brad will still allow the flower layers to move and the petals may not stay the way you like. On another flower I made where I staggered the petals, they ended up all going on top of each other so you don't really see each layer head on. Glue Dots will help prevent that from happening.

I liked the look of the Boho Blossoms in the middle because I felt like it made it look a little more like a real flower {I know, I know, real flowers aren't green and white polka-dots :D}.

Here are the supplies used:

  • Patterned Paper - Fancy Pants Baroque pattern; Stampin' Up! Always Artichoke polka dot DSP; My Minds Eye brown polka dot scallop strip {note: I cut off the strip from a piece of paper that didn't even match the colors of this card! The strip is where My Minds Eye puts its logo. I just used the part that wasn't written on!)
  • Cardstock - Stampin' Up! Confetti, Kraft and Baha Blue
  • Classic Ink - Stampin! Up! Chocolate Chip
  • Stamp Set - Stampin' Up! Vintage Labels
  • Ribbon - Stampin' Up! Chocolate Chip silk
  • Dies - Sizzix Bigshot for Stampin' Up! - Sqare Scallop, Embosslits Die Beautiful Wings,
  • Punches - Stampin' Up! Boho Blossoms and Scallop Circle; EK Success Five-Petal Flower
  • Misc. Tools - Crop-O-Dile used to punch the holes at the top for the ribbon to go through; small scissors to cut out label.

Saturday, April 10, 2010

You're My Cheesey Girl layout

Right now I have a few favorite tools and products that I haven't gotten enough of lately:

  • Martha Stewart - butterfly punch
  • Stampin' Up! - Pinking Hearts border, Scallop Trim border, Scallop border, Scallop circle and bird punches. Chocolate Chip classic ink. Linen Thread.
  • Glue Dots - pop dots, ribbon line, mini dots.
  • Maya Road - leaf pins
  • Heidi Swapp - mini jewel sticker lines
  • BasicGrey - all my old stash of patterned paper
  • American Crafts - Anything!
  • my black pen
Bet you have noticed these products showing up over and over again in my layouts. I have really been trying to go through all of my old paper too. I have such a large stash and I just need to use it all.

I have been having fun using these rolled flowers on as many projects as possible. They are super easy to make and look so cute!

For a long while, I have been making large banners for a few years for various holidays and occasions. But as I am sure all of you are too, I've been seeing mini ones showing up on scrapbook pages and cards. Couldn't wait to try out the technique! I added my own little twist though and also used my scallop circle punch. Just fold the scallop circle in half and use your 1/16" circle punch and you have a cute new look for banners. Can't wait to try this on the large scale!!!

This picture of Peyton was taken when she was about 8 months old. We took her to this small local farm for fall photo opps. Some of the pictures turned out super cute - just like this one - and some turned out just as priceless but Pey was so not happy. But this picture is just too cute! I love the fact that when Peyton used to smile really big and her eyes would disappear {got it from her daddy :D}. We would just say cheese and the big grin would come out! I'm so glad we caught it on camera as much as we have because I want to always remember it!!!!

Here is the list of supplies I used:

  • Patterned Paper - Making Memories 12x12 Audrey Scallop Ledger, 12x12 Hillary Stamp Shape; BasicGrey Mellow; Sassafrass; Creative Imaginations; American Crafts Blue Skies Sunny Days
  • Ribbon - Making Memories orange and cream striped; Stampin' Up! Chocolate Chip Satin ribbon and linen thread
  • Letters - Basic Grey Figgy Pudding stickers and Mellow die cuts; Rusty Pickle Cap'n Jack
  • Punches - Stampin' Up Scallop Trim border, Pinking Hearts border, Extra Large Two-Step Bird, Scallop Circle; Martha Stewart butterfly
  • Embelishments - Heidi Swapp jewel line stickers; Imaginisce leaf pins, Stampin' Up Tempting Turquoise circle jewel brad; American Crafts Greenhouse felt flowers
  • Clear Stamp - Fancy Pants Bella Brush
  • Classic Ink - Stampin' Up Chocolate Chip
  • My Stash - brown brads in middle of twisted flowers
  • Glue Dots - pop, ribbon line, mini and craft
  • black pen

Here are some close ups


So as I have been crafting tonight, I have been watching old movies on cable. I watched Karate Kid II {love the theme song:D} and Porkies - which I have never seen until tonight! I so had a crush on the kid from Karate Kid when I was little! Not to sure why now, but boy did I think he was cute! Porkies was really funny and so disgusting at the same time! I know now why my parents wouldn't let me watch it when I was little! Loved it though!
Happy Scrapping Everyone!
Leana

Friday, April 9, 2010

Webster's Pages - I'm In Love!

I was on the Paper Crafts Magazine Blog tonight and found a post that I must have missed. It was on hair accessories made by using scrapbook supplies. And one of the photos was for a company called Webster's Pages. I haven't heard of them before, so I had to check them out and I so love what I have seen! Everything is shabby and so so so so cute! They also have a blog: Click here to visit it. It hasn't been updated since January though. The company website {and blog} are listed in my favorite sites and blogs to the right. You can also click here to access their site. Here are some of the fun things I found while on their site:


Pink Tutu trim


Postcards From Paris paper kit


Life's Lullaby trim - Could you just die!!


Vintage Sparkler's

Scalloped Splarklers


Really though, could you just die! I so can't wait to get my hands on some of these products! And this is just the tip of the iceberg! There is so much more. I was out of the papercrafting loop for a bit and while I was out, so many wonderful things came crawling up and I had no idea. So now when I see something I love, I kind of go a little crazy! :D. Don't we all!

Look for posts using this brand, because I will be using them soon!

Happy Scrapping!

Leana

Oh, and I added the brand website and blog to my favorite lists to the right for future ref!

Cascade Springs layout


Last summer my husband and I took our daughter up the American Fork Canyon. We had a lot of fun driving the Alpine Loop and visiting Cascade Springs. we actually went down the back way on an old dirt road just west of the Loop. It took us out into Midway and into Heber. And then we went over to Park City and down Parley's Canyon. Backing up just a bit to when we were at the Alpine Loop, we explored the little trail just a bit and had a blast just watching Peyton discover all there was to see. She loved the water and the fish and the pathway and the bridges and the plants and the animals and the flowers and the......

Pretty much from the beginning I could tell that Peyton was going to be really independent. Yes, she is 2 and all about doing things her way, but for Peyton, she started developing this independence from about 6 months or so. She was a baby and now is a toddler who knows what she wants and wants to get it done herself! I love watching her always try to do new things. And I try to always be there to help her if she can't do something on her own. But I love seeing her so excited and satisfied when she can accomplish something on her own. She is really big into putting her own socks on right now. It's pretty cute! And then she of course goes directly for the shoes. Sometimes she even gets them on the right feet :D. What can I say but that I am a proud Mama!

This layout was a lot of fun to make. I had some super cute paper from My Little Shoebox. I knew exactly the pictures I wanted to use when I got it. The paper captures the fun spirit of the day in the canyon that my family spent. And it also captures my daughter's spunkiness that becomes more and more evident every day.

Here is the supply list:
  • My Little Shoebox - all patterned paper, transparency lady bug, bird and flowers, journal and heart diecuts
  • BasicGrey - large white scallop border cardstock, circle gemstone border sticker
  • American Crafts - orange plastic flowers, pink Thickers
  • Stampin' Up - Scallop Trim border punch, Chocolate Chip brush tip marker, "Love You" sentiment stamp
  • Heidi Swapp - green tiny gemstone stickers
  • My stash - pink crate paper

Here are a few things to note: to make the crate paper flower, the outside layer and middle layer are long strips folded in half. I fan folded them and then used glue dots to hold to the "Love You" sentiment. The inside layer is folded in half twice. Super easy to make!!! And crate paper is super cheap. It's left over from my daughter's birthday party which makes it even more affordable.

Next thing, If you look closely to the top left side of the picture of my husband and daughter you will notice the scallop trim border. To make the design continue around a corner, the punch has a lineup guide on the punch to allow you to create the corner. It's a little tricky, but I figured it out. I also did this same thing on the pink square behind both pictures on the tip right corner. Now that I know how to do it, I want to keep doing it on other projects!!

Here are a few more pictures for you to see closer up.


Happy Scrapping Everyone!

Leana