Share |

Wednesday, March 31, 2010

February Card Exchange


A big group of friends and I get together as much as we can and do card exchanges. So it's the typical card exchange style - for however many people participate, you make that many of the same card. Then you end up with one of each card from everyone else. I think we had 11 or 12 people participate this time. What we also do though is once all the cards are done get together somehow. In the years since we have done this we have gone from someone hosting it at their house to going to dinner to going to a movie and dinner, and this last time we ended up just going to dinner. It's always a lot of fun though regardless of how we get together to exchange them!


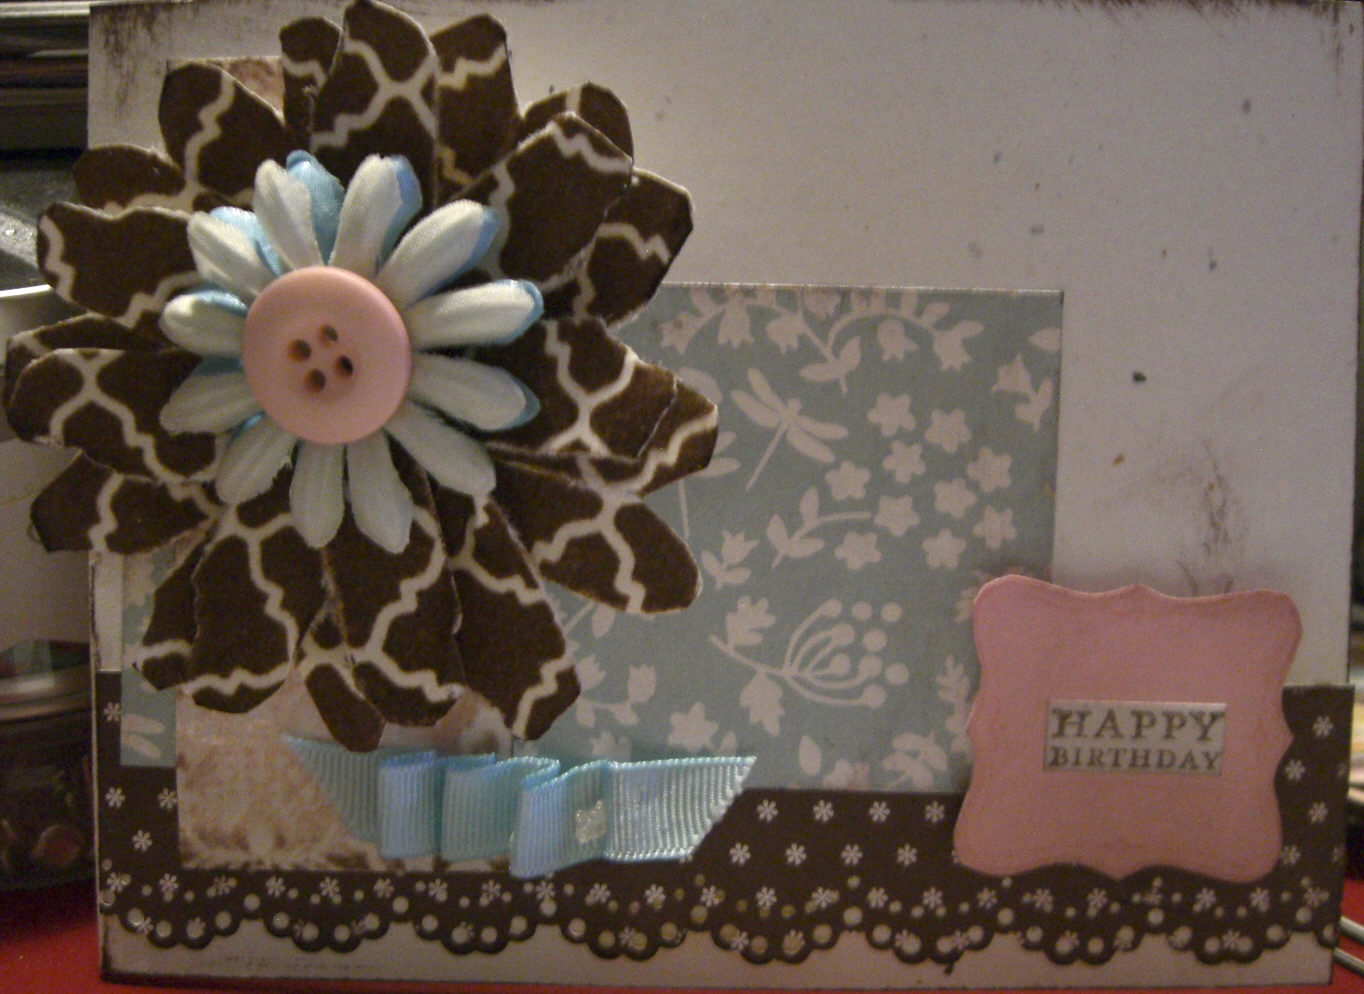
So here is the story of my 2 cards. Yep, made both of them, instead of just the one. I made the top card first and felt sort of bad that it was so small. So then I decided I had to make another. Hence the one on the one right above was created. Both cards are 3x3. I can't help it, I am loving smaller cards right now! I totally go through phases, and right now I am in a mini card phase! I can't help it. They are just so cute and little. Love love love them!!!

Here are the supplies for the Best Wishes card: {all Stampin' Up! but patterned paper and ribbon}

  • Cardstock - Soft Suede, Whisper White
  • Patterned Paper - BasicGrey Recess line
  • Classic Ink - Old Olive, Bashful Blue
  • Stamp Set - Eastern Bloom
  • Punch - Scallop Trim border
  • Hardware - Hodgepodge Hardware brand and photo turn
  • Ribbon - twine, American Crafts orange polka dot,
  • Adhesive - glue stick, pop dot, glue dot
Here are the supplies for the You're Special card: {all Stampin' Up but the stamp set}
  • Cardstock - Soft Suede, Very Vanilla
  • Patterned Paper - Sweet Pea DSP stack
  • Classic Ink - Old Olive, Chocolate Chip
  • Stamp Set - American Crafts
  • Punch - Circle, Scallop Circle, Scallop Trim border
  • Brad - Hodgepodge Hardware - Styled Vanilla
  • Ribbon - Soft Suede polka dot grosgrain

Two funny things to note. One, the red cup in the background of the Best Wishes card is my stocking stuffer from my hubby :D. Mmm!! Starbucks! And the cup is such a beautiful shade of red. Two, you can sort of see my Diet Coke in the background. He he he. It's my addiction! It was coffee for a bit, but it has changed to be Diet Coke over coffee for sure. But caffeine anyway is always good to me.

Happy Scrapping!

Leana

Think I Have It Figured Out!

Hope you like my new look! I got it from House Of 3! {houseof3.com}! They have so many cute things to chose from. And super cheap! $1.50 was all for the background. Still working on the banner, but I will have it figured out soon!

Happy Scrapping Everyone!

Leana

Blog Look

As you can see I am currently under construction. Please don't mind the mess right now. I will hopefully get it cleaned up shortly! It will be cute though when I get it fixed though for sure!

Happy Scrapping!

Leana

Tuesday, March 30, 2010

Kind Thoughts Medallion Card

First of all, for the record, I am a Diet Coke drinker! Woot woot! I hate Diet Pepsi. I bring it up because you can see it in my pic. :D

When I sat down last fall to make this card, I had all intentions to make a Christmas card. I kept seeing beautiful Christmas cards with red and baby blue and a little bit of yellow. But when I had it together {minus the butterfly and "kind thoughts" sentiment}, It was not a Christmas card at all. So I added the butterfly and "kind thoughts" and loved the results.

Most of the supplies are Stampin' Up! Everything but the buttons actually. Those are BasicGrey {I know, big shocker!}. Don't you just love that ribbon! It's so gorgeous! I wish it was still available from Stampin' Up! But alas, it is retired. The shame! And I love the medallion stamp. It was the first thing out of the current catalog that I knew I was buying. And I don't regret it all.

Here's the rundown:

  • Cardstock - textured Real Red, Bashful Blue, Very Vanilla
  • Ink - Chocolate Chip classic
  • Stamp Set's - Medallion background, {uugg! Can't remember the set the butterfly is from}
  • Patterned Paper - Pink Lemonade Designer Series Paper
  • Buttons - BasicGrey

I used pop dots for the butterfly, mini glue dots for the buttons, and ribbon strip to hold the ribbon at the knot.

Happy Scrapping Everyone!!

Leana

So In Love

I know all mom's say it. You hear them gush all the time. I finally get it. I finally understand. It started over 2 years ago. I think it has something to do with an actual physical connection. I think I am just feeling completely sentimental lately too! I love you Peyton. I love you more and more each day. I get so excited to see you grow and accomplish the little things that make you so excited. I get so proud over things like putting your shoes on the right feet, putting your cup in the sink when it is still a foot taller than you. I get excited over your little stories that you tell me every day. You have new words that you say all the time. You pick up on expressions that are way over your head but you seem to use them in the right way. You know when Mama tries to hide things like bubbles from and you don't cry over not getting them {ok, sometimes you do :-)}.

Times like this make me glad I am a scrapper! It's in my blood. Figuring out and executing that next project gets me through my day. And now being a mom just adds to the whole thing even more. I was a crafter before, but now it's like I have my own little muse by my side that is always inspiring me.

Ok, ok. I am done gushing! :D

Happy Scrapping Everyone!!!

Leana

Monday, March 29, 2010

The Results Are In - And They Are Fabulous!

The challenge was a lot of fun! So much so that I think we are going to keep doing it every month! And the cards all turned out super cute!!!


Marci's first. She was so excited to use only Stampin' Up! Products, but one item used wasn't Stampin' Up!


Supplies:

Stampin Up Brand

  • Cardstock - Chocolate Chip, Certainly Celery, Bashful Blue
  • Patterned Paper - {will update with name of paper} retired
  • Stamp Set - Fox And Friends, retired
  • Classic Ink - Chocolate Chip, Bashful Blue
  • Craft Ink - Chocolate Chip
  • Embossing Powder - Clear
  • Brush Tip Markers - Chocolate Chip, Bashful Blue,
  • Brads - Pretty in Pink, Close to Cocoa corduroy
  • Ribbon - Sage Shadow grosgrain, Chocolate Chip taffeta, Pretty in Pink satin
  • Punches - scallop trim border, 3 flower retired

Marvy Uchida

  • Punch - corner rounder

I Love Love Love the Fox and Friends stamp set. The only reason why I haven't got it myself is because I bought another animal set from the big catalog and haven't used it yet. If it makes it past the mini, I may just give in! Love it Marci! And I love the size! Finished size is 3 1/2 square.

Amber's card is next!

Here are her supplies she used:

  • Cardstock - her stash {card base and green stamped flower}
  • Patterned Paper - all patterned paper is BasicGrey Pink Lemonade
  • Stamp Set - Vintage Vogue from Stampin' Up!
  • Classic Ink - Certainly Celery from Stampin' Up!
  • Punches - scallop trim border, extra large two-step bird, lace border. All are Stampin' Up!
  • Brad - Green Rhinestone from the Circle Ice set from Stampin' Up!
  • Cricut - used to cut out the tags behind the birdie and branch

A few things to note about Amber's card. First thing is she doesn't buy pop dots. Instead she saves money by cutting up the rubber from her Stampin' Up! sets {since they are not aassembled} and uses those as her dimensional adhesive. On this card it is behind the scallop trim border strip and behind the green flower. Second thing, the lace trim border was created by making the strip longer than the card and folding it over the top of itself. So cute! Again, don't you just love BasicGrey! I love love love it! Finished card size is 4 1/4"x5 1/2"

And here is mine!


Supplies:

  • Cardstock - Kiwi Kiss retired and Very Vanilla, both from Stampin' Up
  • Patterned Paper - all patterned paper is BasicGrey {including "Best Wishes" sentiment tag}
  • Stamp Sets - Good Neighbors and Vintage Labels, both 2010 Sale-A-Bration from Stampin' Up!
  • Classic Inks - Chocolate Chip, Pretty in Pink, Soft Suede, Old Olive, Kiwi Kiss retired
  • Brad - Pretty in Pink corduroy brad
  • Sizzix Bigshot die - Stampin' Up! edition Originals Blossom party
  • My Stash - Brown and pink grosgrain ribbon

I'm totally in love with the flower die. I had a punch all picked out and then changed my mind. I'm so glad I did. This is such a good die for layering lots of patterned paper. Definitely not sad I got it.

Also, my card idea came from someone else at our club. Thanks Elizabeth! I was so sad I didn't take a picture! She did a way cute envelope and everything to go with hers too!

So did you notice, all three of us used the Scallop Trim border punch. Amber is the only one that got it this time. Two of the three cards used ribbon. 2 of the three cards are smaller than standard 4 1/4"x5 1/2". All three cards use flowers either as stamps, punches, dies or part of the paper design. All three cards use brads. All three cards use patterned paper instead of a stamp background on cardstock.

It was lots of fun doing this so as I mentioned we will try to do it every month! And I will keep posting the items and results here, so make sure to keep watching!

Happy Scrapping Everyone!

Leana

Sunday, March 28, 2010

Dear Friend card


Although I am not completely crazy about this card, I like where it was heading. I am just not crazy about all the colors together. I hand drew and cutout all the petals. Surprisingly it didn't take long. I need a new white gel pen. Even though the ink isn't out, I haven't used it enough to get it to keep flowing. But I tried to trace the petals with white and black pen. Mostly you can just see the black. Then I traced the bird and "dear friend" sentiment.

All supplies are Stampin' Up! brand. It's been a while since I have done anything with only Stampin' Up! supplies. I think I was still a demonstrator the last time I did a project that way. Kinda funny.

Happy Scrapping Everyone!
Leana

Cards Made With Scraps


I made these cards probably about a month or so ago. I made them right after I purchased the Dear Lizzy stuff from Roberts Crafts. I was actually in my craft room cleaning when I came across a bunch of scraps of cardstock and patterned paper. I new I needed to craft right away! The odd size of the cards is because of the size of the cardstock pieces I found. But I thought it turned out perfect for cards.

The card above uses the following supplies:

  • Stampin' Up! - Kraft cardstock, Very Vanilla cardstock, Baja Breeze ink, Close To Cocoa ink, Vintage Labels stamp set, Vintage Vogue stamp set, Sweet Pea felt flower and leaf, bird punch, 3/4" circle punch, scallop circle punch, scallop border punch, bird wing patterned paper
  • American Crafts - brown bird patterned paper
  • Imaginisce - patterned paper for flower
  • Making Memories - blue and white polka dot paper {reverse blue and pink rose}
The above card - Have A Splendid Day - used the following supplies:
  • Stampin' Up - Kraft cardstock, Rose Red cardstock, Very Vanilla brad, Chocolate Chip ink, scallop trim border punch
  • American Crafts - Stamps {Dear Lizzy line}
  • Making Memories - patterned paper
  • Martha Stewart - Butterfly punch
  • Stickles - silver glitter on butterfly
  • my stash - brown polka dot ribbon

The Congratulations card above {I think this one is my favorite out of the 3} used the following:
  • Stampin' Up! - Kraft cardstock, Rose Red cardstock, patterned paper for bird and branch, scallop border punch, Chocolate Chip ink, Well Scripted stamp set, Sweet Pea felt flowers
  • Making Memories - blue polka dot patterned paper
  • My stash - brown and pink grosgrain ribbon, brown ribbon

Happy Scrapping Everyone!

Leana

Christmas Cards In March

I've been trying to go through as much of my paper as I can. So I keep using paper that I have had for a while and never got around to using before now. I got the urge to use some stamps that I got a few months ago and just hadn't gotten around to yet. So then I dug a little further and found the patterned paper. If you can't tell already, this is the BasicGrey Figgy Pudding line. I can't get enough of BasicGrey! I LOVE it!!!
This first card - Joy - uses the following supplies:
  • Stampin' Up! - Soft Suede cardstock, Very Vanilla cardstock, oval Very Vanilla bookplate and brads {2}, Very Vanilla ribbon Slide, Soft Suede polka dot grosgrain ribbon, scallop circle punch, Soft Suede ink, Old Olive ink,
  • BasicGrey - all patterned paper

Here are the supplies for the Holiday Greetings card:

  • Stampin' Up! - Soft Suede cardstock, Very Vanilla cardstock, gun metal brads {3}, Very Vanilla ribbon slide, Soft Suede ink, Real Red ink, Old Olive ink,
  • BasicGrey - all patterned paper
  • Martha Stewart - lace border punch
Happy Scrapping Everyone!
Leana

Best Intentions Don't Always Turn Into Good Results


Ever have an idea in your head of how you want to make the perfect card or other crafty project. And along the way you realize that you just don't like it, sometimes even hate it? And then you keep trying and trying and trying but you just can't make it look at all right? Well that is exactly what happened with this card. I just don't like it. The brown flower looks like giraffe print! I just couldn't get a finished look with it.

No list of supplies for this one. If anyone really does want to know, leave a comment and I will get you the info.

Happy Scrapping Everyone!

Leana

Friday, March 26, 2010

On Your Mark, Get Set, Scrap! - Our Weekend Crafty Challenge

Once a month my friends Marci, Amber and I go to Stampin' Up! Club at Cindy Petersen's house {see her blog link in my list of favorite blogs!}. We got our orders in today with all our fun stuff. Amber proposed a challenge for all three of us and we are rising to the occasion!

Here is the skinny:

  • We each have to use every product that we got today.
  • Each of use will be able to use other products we already have to complete the projects.
  • We have to make 3 each of our chosen project - one for each of us. So this way once we exchange, we will have one of each person's project {this is also how we do our card exchanges}.
  • Results will be revealed Monday at work and displayed here that evening.
  • The winner of the cutest project is crowned Queen of Crafty!!! And the losers have to grovel at the winner's feet!!!
Okay, so all of the above apply except for the groveling. {You can ask both Amber and Marci, I wouldn't grovel, I'm too poor of a loser!} But you get the point! We are challenging ourselves to use what we bought and make it cute! It will be super super super fun! So take a look at the following pictures. They are the products each of us must use! Then make sure to come back to see the results!

Marci's

Amber's

Mine

Happy Scrapping Everyone!

Leana

Wednesday, March 24, 2010

Exciting News!


I am so excited that I just can't wait to tell you all! I am getting a card published on the website magazine Scrapbooking.com! The editor Jami Petersen found my card in my twopeas.com gallery and asked if I would consider having it published. From there, I agreed and she sent it to her decision committee so they could decide if my card got published or not. I got an email from her again a few days later letting me know she was going to publish it! Woot Woot!

I admit, I am not too familiar with the site. So of course I have been checking it out quite a bit since then. Also Jami informed me of the following:

"...Articles that get published stay in our extensive archives and are always accessible (great for design team tryouts, resumes, etc.). Also our magazine is viewed in over 100+ countries and available in several different languages. We get more than a million hits a month.."

Pretty cool! I am super excited. I can't display the card until the issue is released. It will be the May issue. I believe it comes out May 1st. But for sure check out the current issue now and make sure to check out the May issue as soon as it's available!!!

Happy Scrapping Everyone!

Leana

House Shaped Card


This is probably one of my most favorite cards that I have ever made. Sometimes I don't know how things I take on will really turn out, but with this card, I was pleasantly surprised!!! Sorry, guys. I really need to work on not taking blurry pictures. I tried to clear it up a bit but it's still super blurry. Check out the other pictures though down below though to see it better.

Here is a list of supplies:

  • Stampin' Up! - All patterned paper, Close To Cocoa cardstock, Chocolate Chip cardstock, Very Vanilla cardstock, scallop border punch, all stamps, Chocolate Chip and Soft Sky classic ink, Very Vanilla and Old Olive grosgrain ribbon, square hole punch
  • Doodlebug Designs - clear gemstone sticker
  • Cricut - window frame {I don't own one so I had my friend Amber L. cut it out for me}

Here are some things to note:

The card folds at the top. As you can tell the bottom of the card isn't as wide as the top. When I cut the card out, I did it as normal and then cut it again at an angle in towards the bottom on both sides. I purposely didn't cut the sides in the same. I wanted them to be uneven.

To make the roof, I first cut the triangle out {scallop free}out of cardstock. It's going to only be visible from the back, so I used the same color as the card base. Then I took 7 layers of patterned paper - each one slightly smaller than the one below it {make sure the bottom layer is longer than the triangle bottom}. I made sure each layer was the same size as the bottom triangle on the sides. Before adhering them, punch each layer with the scallop border punch. Once all the pieces have the bottom punched, layer each piece on top of each other, smallest on top of course. Fold up the edges to give the look of shingles. Once you have the base of the card decorated how you want it to look and have added the chimney {off to the side attached to the top of the card base}, add the roof to the card.

To make the door, I cut out two door pieces. I thought it made it look like it was framed in - sort of :-). Add the gem sticker or something fun for the door handle. I used Stampin' Up! brand dimensional foam stickers to add the top layer of the door.

There are all kinds of fun things you can try with this layout! I'd love to see any variations!!!! :D

This card is for sale at my Etsy store: craftydork.etsy.com. It's a set of 3 cards for $7.50.

Hope you guys like it!

Happy Scrapping!

Leana

Hi Card - October Afternoon

Don't you just love October Afternoon brand! I saw this paper and new I had to make it mine :-). I actually made this card in September last year and sold it as a set of 3 on my Etsy store - craftydork.etsy.com. I love Etsy! If you haven't had a chance to visit my store, please do and tell me what you think. I do more than just paper crafting, so I have jewelry, paper craft items and a few fabric items as well.
Back to this card. Here is the list of supplies:
  • Stampin' Up! - Pretty In Pink cardstock, chipboard letters, chipboard circle frame, scallop border punch, scallop circle punch, Happy Everything stamp, Basic Black craft ink {used on chipboard letters}, Basic Black classic ink {used on graph patterned paper for Happy Everything sentiment and minimal ink distressing}, black brad {hidden by black button}
  • October Afternoon - all patterned paper
  • Heidi Swapp - Green gem stickers
  • Making Memories - yellow ribbon, black photo turn and brad
  • Autumn Leaves - black button

A few things to note:

To make the flower punch out like 8 or so scallop circles. Crinkle each of them up in your hands. Stack them on top of each other, Either punch a hole with a 1/16th " hole punch or pierce through all of the layers. Add a brad through the middle to hold all the layers together. If you have a brad that you want to be the middle of the flower, definitely use it! But I wanted to use the button, so I didn't mind what brad I used since I new I was covering up. Use a mini glue dot to attach the button on top of the brad. Attach the flower to the card with a pop dot {I think I used 2 to make it stick}. Fold the edges up to get the look that you want. I love using double sided patterned paper for things like this, because you get to see at least parts of the opposite side of whatever side you are displaying.

I messed up and ended up getting black ink underneath the green gems on the bottom left corner. So I took my Basic Black stamp pad and very carefully distressed the card. I say carefully because I had put the whole card together and then noticed the mess in the bottom. I didn't want to get any on the ribbon, and I didn't want the distressing to be as noticeable as I usually make it.

I took the chipboard letters and turned them upside down directly into my Basic Black craft pad to get them colored in ink. I know you can't tell in the picture too well, but I left the sides pretty much the raw color. Also the black on top isn't applied perfectly. I wanted to continue the distressed look and make sure some of the natural chipboard color came through here too.

The last thing is what I did to get the photo turn to stay in place where I wanted. The brad isn't actually going through any paper. I took 2 mini glue dots and put one behind the brad and the other on the tip of the turn to hold the turn to the card. So that I made sure the ends of the brad didn't show, I folded both of them towards the long direction of the turn. This way it stays right where I want it to be and I didn't have to worry about the brad showing on the inside of the card.

Here are a few close up pics to get a better look:


Happy Scrapping Everyone!
Leana

The Beehive Bazaar


I was recently web surfing and happened across something I am not familiar with but got super excited about!! If you haven't noticed, I added the thumbnail to the right side, just below my profile. If you are here in Salt Lake County or Utah County - or anywhere remotely close - I think it's going to be a fun fun fun time!!! I am not sure how long it has been going on, but it's twice a year and from what I can tell usually in Utah County. The next event is May 5, 6, 7, and 8. The only day that has a charge is the first. I guess it is a VIP day. Not sure what it all entails that day. But it's being held at Thanksgiving Point, so I am super excited that it is close to me! The Bazaar is filled with local only vendors of anything and everything homemade. I think it was made for me for sure. I am sure you will all agree!!!

Happy Scrapping Everyone!

Leana

Sunday, March 21, 2010

Fast Trip To Saint George And Already Back

This weekend my husband and I went to St. George for just a day. My mom and dad live down there along with my baby brother. My baby brother had his mission farewell today - so the whole family was down. My hubby and I went down only on Saturday because he plays in a Friday night poker league. So we left yesterday around noon. Today we got home about 10pm. Fast fast trip, but a lot went on in such a short period of time.

We had a get together last night with extended family and friends. Lots of good food and people I hadn't seen in years! It was pretty fun. Plus being down in St. George, the weather was nice and we got to have the festivities outside.

Last night we hung out at my parents house after everything and had a lot of fun! I made my daughter, my niece Malia, and my cousin Kristin's little girl, Abby all flower hair bows so they could wear them to church today. Malia's and Abby's I put them on clippies for the hair, but I put Peyton's on a pin since she has so many already and then I attached it to her shirt. All day today she kept showing it off. It was pretty cute! Here is a pic of the girls together.


Abby is the girl in the green and purple dress. Peyton is in the middle. Then Malia is on the right with the pink dress. I was trying to get a good picture of them together showing off their flowers but it didn't quite work out.

Funny story about the huge plastic lobster Abby is holding. Kristin's sister Shanna went back east along with their mom Peggy. Shanna bought Abby this lobster as a souvenir when they were in Boston. Kristin said Abby takes it everywhere with them! Including to church today! But the best part of the story is that Abby named the poor fellow "Crab"! How cute is that!

I tried to get some cute pictures of Peyton all fancied up for church. I wanted to get some pictures of her hair curled with her sponge curlers {and partially the curling iron} and her cutest skirt that she got for her birthday a few weeks ago along with her bow on her shirt. The pictures didn't turn out as planned, but still turned out super cute! Can't remember why exactly Peyton was crying for the last picture.


The skirt is so cute! As I said, it was a present from her birthday. So when I knew Peyton would be going somewhere where she needed to dress up, I couldn't resist having her wear it to church. My husband and I aren't church goers so we don't usually have anywhere for her to wear her dresses to other than just around the house or to the grocery store and such.

So I took Peyton's white undershirts, layered them and paired them with the skirt, leggings, and sandals. The results were pretty freakin cute! And she loved her flower on her shirt. So much so that I had to put it on her pajama's shirt just to get her to change! So she is in bed at this moment with the pin on her pajama shirt!!! She cracks me up! She may be only 2 but she is already her own person!

As I mentioned Peyton had her hair all curled {I should have taken a picture of her with the sponge curlers because it was also really cute!} and the final touch to everything was that we painted her little piggies for the first time ever. As you can tell from the first picture, I am not an expert toenail painter! I won't show you pictures of my feet painted - but I am sure you get the idea. Still though her toes were really cute and she was more than happy to show them off.


Here is a picture of Daddy and Daughter just as we are heading into church. Aren't they so cute together!


As we were getting ready for church, my mom started going through her hope chest to find the "Quiet Book" 's from when we were kids and from when my mom was a kid. In the search she pulled out two blankets that were hers when she was a kid. The clown blanket was her Kindergarten blanket. She told a funny story of how she hated it because her blanket wouldn't fit in her cubbie and she was always the last out to recess! She said her mom had made it for her and put a lot of time and effort into it. But of course being so little, her concern was elsewhere. She said she made my Grandma let her take another blanket to school that would fit easier!


It's hard to tell but each balloon had different pieces of info on it about my mom. Like one balloon shows that her phone number used to have the first 2 digits of it be letters! OS were the first 2 digits. Then the next five were numbers. Wow phones sure have changed! Also hard to tell from the photo is how cute the red and white polka dot fabric is! The other blanket is my mom's baby blankie {the little boy bum in the pic is my nephew OJ}. I love that so much of what we see today is vintage inspired. Both these blankets prove just that. Look at the elements that are still current today!

Peyton had left on Thursday night along with my dad and niece and 2 nephews. So my husband and I had a brief break from her. I couldn't wait to see her again though yesterday! She was crying so hard on Friday when I talked to her on the phone that she couldn't even talk. It was all she could do just to breath. But she finally calmed down after her homesickness and took a nap. When we got there on Saturday, she came to meet us outside and ran into Thong's arms! Then she proceeded to tell my dad "Bye Poppa!" She was completely ready to go home! It was pretty funny!

When we did actually leave today, she was asleep and was really sad to wake up in the car away from my parents house. But she did recover when I promised her she could get chicken nuggets and french fries! This last picture is of her trying to wake up from her much needed nap!


My baby brother Jordan is going to Montana, Billings for his mission. He leaves to the MTC on Wednesday where he will be for 3 weeks. He's done quite a bit to get to this point in his life and I am an extremely proud big sister! I was sad when I got home tonight only to realize that I didn't take any pictures of him in the last day since I won't see him for so long. But I will make sure to get some before he enters the MTC and will post them at that point.

All in all, it was a great weekend. And as all great things must do, it came to an end way to quickly. So I am off to dreamland now. But I can't wait to get these pictures developed to scrapbook!

Happy Scrapping Everyone!

Leana

P.S. This week I will show better pictures of the flower clippies and give instructions on how to make them!!!

New Favorite Blogs Added To My List

I have been getting lots and lots of inspiration from some of my favorite bloggers. I just added their web addresses to my Favorite Blogs List. Make sure you check them out! Don't forget to check out the older blogs listed too! They are all really awesome and talented!!

Here's the ones I listed:

  • Elizabeth Kartchner - Dear Lizzie
  • Jana Eubank - My Feathered Nest
  • Teresa Collins
  • Stampin With Deanna

I should be adding some other favorites so watch for them. Love you guys! Thanks for the inspiration!

Happy Scrapping!

Leana

P.S. Check out http://www.mylittleshoebox.typepad.com/ This is such cute paper and supplies! I am going to have to go to the store this to see if I can find paper of this brand locally! If not I'll be ordering it off of twopeas.com, another favorite site of mine!

Saturday, March 20, 2010

Queen For A Day layout


My daughter just recently celebrated her 2nd birthday. Her party - the next day after her birthday - was a lot of fun. We had kids and adults, good food and birthday cake and ice cream. Of course, what birthday party would have been complete without balloons. Certainly not Peyton's! Pey loves loves loves balloons. She has pretty much for the last 2 years. What kid doesn't! But with Peyton being an only child right now and her birthday being a whole day just about her {she so new it was her birthday party and that everyone was there for her since I had been telling her for about 2 weeks that it was coming up} she just didn't want to share those balloons! Not even a little bit. Not even if she got 11 and another kid got 1! She wanted every single one of them and was not taking no for an answer! That is why Pey is so my little Queeny! She was in charge of her party and there was no questioning it! I admit, I got frustrated with her, but as my mom reminded me - oh so patiently as most mothers do - that she was only 2 and she still doesn't quite have the grasping down of what exactly sharing is. So since it was her birthday, I pretty much let her have rule over the balloons {not completely since balloons were being snuck out as kids were leaving}. She didn't notice that they slowly kept making it out the door! Wonder if I will be so lucky next year!!!! :D

These pictures capture Peyton in all her 2 year old glory. I am awestruck at how fast time goes by. I spend so much time wishing for time to pass so the weekend can come sooner or so I can go on that well deserved vacation that I forget sometimes to stop and smell the roses. But these 2 pictures... these 2 pictures help me do just that.

It is so much fun being your mom Pey! I love love love you. I get a little choked up in the fact that I love you more and more everyday. It may be a cliche, but in your case little girl it is 100% accurate and to the point!

Here are the supplies that I used:

  • BasicGrey - brown card stock and patterned paper {large flower background}, purple chipboard "q", green letter stickers, floral pattern brad
  • My Minds Eye - flocked brown and green patterned paper
  • Sassafrass - brown and pink patterned paper strips
  • Heidi Swapp - large pink silk flowers, white damask sticker
  • American Crafts - glitter buttons {Dear Lizzy line}, brown Thickers, "love" button flair
  • Martha Stewart - Lace Trim border punch
  • 7 Gypsies - metal key
  • Stampin' Up! - Chocolate Chip ink, rubon flowers and word
  • Stickles - pink and white liquid glitter
  • Imaginisce - Castle clear stamp
  • All My Memories - copper word charm
  • Stash - yellow ribbon, clear gemstone stickers
  • Daisy D - flourish stamp on the letter "q"
As you can see I have quite a stash of pattern paper that has been building up over the years {embellishments too}. So even though I just made this page, I have been trying to use a lot of my old paper on all of my layouts and projects. This BasicGrey background floral print is probably one of my all time favorites. I bought it years ago and bought like 10 pages of it! This is the first time I have actually used it! I struggled with it because the flower is so big and I never wanted to cover it up. I obviously covered it up really well in this page, but I think I left as much of it showing as I could. Can't wait to see what I can do with the 9 pages of it!

The flocked green polka dot and brown print paper is new from My Minds Eye! I wish I had more of it than just a few pieces! It's so pretty! I think I will have to use the brown on a card!

Well I am off for today. Happy Scrapping Everyone!

Leana

P.S. Here are some up close pictures of all the pretty little details


Friday, March 19, 2010

Check Out My Friend Deanna's Blog

I have a friend who is a Stampin' Up! Demonstrator. At one point she used to be my downline. We met through a mutual friend, who at one time was alos a Stampin' Up! Demonstrator as well :-).

Deanna and I are the same age and have our birthdays just a day a part. And we have found that we have really similar senses of humor and tend to think alike too. Funny how that works!

She has a blog through Stampin' Up! where she posts her classes and projects and such. I will just say, you must must must check it out!

stampinwithdeanna.com

She has done some really cool things with fabric and her Bigshot that you all must see!! I also added her blog address to my list of favorites!

Happy Scrapping Everyone!

Leana

Thursday, March 18, 2010

New Blog Look

So part of me getting back into blogging was for me to get my blog into the year 2010! I am still in the process of finding the look that I want, so please pardon the changes you may see over the next week or so until I find that just oh so perfect layout!

Happy Scrapping Everyone!

Wednesday, March 17, 2010

Two Lasting Bequests Layout


I made this layout about a year ago. As you can tell, this layout screams BasicGrey. Even though I seem to be drawn to other brands right now, BasicGrey continues to be one of my most favorites. They have a way of designing products that are shabby and a little classy at the same time. And they have such a huge line of products that it is hard not to turn to them over and over again.

Even though this page doesn't have a lot of supplies, the paper really adds to the pages so I didn't think there were empty holes. As you can see from my previous posts, I have a hard time with empty holes. I am working on trying to get a better eye and see balance on my layouts better, but it's a struggle for me because my style is just usually stuff, stuff, stuff! :D

Here are the supplies used:
  • BasicGrey - Pattern papers, die cut flower, brown ribbon
  • Offray - Thin brown ribbon
  • Can't remember for the life of me - Chipboard flocked letter P, white lace trim {Making Memories maybe?} Does anyone know??? If you do, so please remind me :D
  • QuicKutz - self adhesive card stock {diecut letter saying}, die cut alphabet {even though I used my Sizzix Bigshot to cut out the letters. It's a lot bigger so I could cut more letters out at a time}
  • Maya Road - Chipboard flourish
  • Stampin' Up! - Vanilla brads and book plate, book plate punch

Here are a few things to note:

I used a pen knife to cut the bird partially out of the patterned paper so that I could slit the photo behind it on the bottom right hand corner.

Also this was such a long saying that cutting all the letters out was such a pain! I am a little upset with the QuicKutz self adhesive card stock. Although I love the concept, the paper doesn't stick to well and just a year later the letters are starting to come up. I will have to go back and glue them down with liquid glue eventually. So if I ever were to diecut such a long saying again, I would ask my friends Amber or Marci if I could have them cut them out for me on their Cricuts. I am totally jealous of them for having one :D! I love my Big Shot though, especially the Stampin' Up! line. They have so many fun dies and products for it. With letters on this scale though, electricity is completely the way to go!!!

I can say this layout has become my favorite for 2 reasons. I love the picture of Peyton. With her being 2 now, I love being reminded of how little she was and so innocent and fragile. The other is for the saying. I don't remember what magazine I saw it in, but when I read it, I knew it was something that I not only wanted to remember, but also something I wanted to be able to teach my daughter. I think it totally captures what being a mother is all about. I want to be able to protect her from everything, but I am still teaching her to take care of herself! Makes me a little teary just thinking about it :D! Ha ha! Mushy mushy...

Here are a few more pictures of the project


Happy Scrapping Everyone!

Leana

P.S. I so hate the formatting on blogger!! Argh!!!