Share |
Showing posts with label Dear Lizzy. Show all posts

Sunday, August 28, 2011

A Shadowbox For Peyton

Sorry, I know it's been a few weeks. My post from last week got delayed because I was getting ready for a garage sale. This week has been a lot of purging, pricing and Pride & Prejudice! Alright and a lot of Twilight and, New Moon, and Eclipse. What can I say, I watched the movies a lot this week!

And as I am typing, I am watching Breakfast At Tiffany's - one of my all time favorites. I love everything of Audry Hepburn's that I have seen. Some day when I grow up, I want to be just like her :).

My garage sale went great! I sold a few hundred dollars and then the rest went to the thrift store. Not too bad. I want to buy a sewing machine, so we shall see what will come of that.

A few months back I went to crafty night with my friend Trudie, who I also work with, and I made something for Peyton's room. It's a shadow box. You know the darling little tiny shadow boxes from Maya Road? That's what I used. I love how it has the square chipboard pieces to fit in the back of each section, so you can decorate those and then stick them right in the spot. That also allowed me to move the pieces around until I got each of them just where I wanted them.

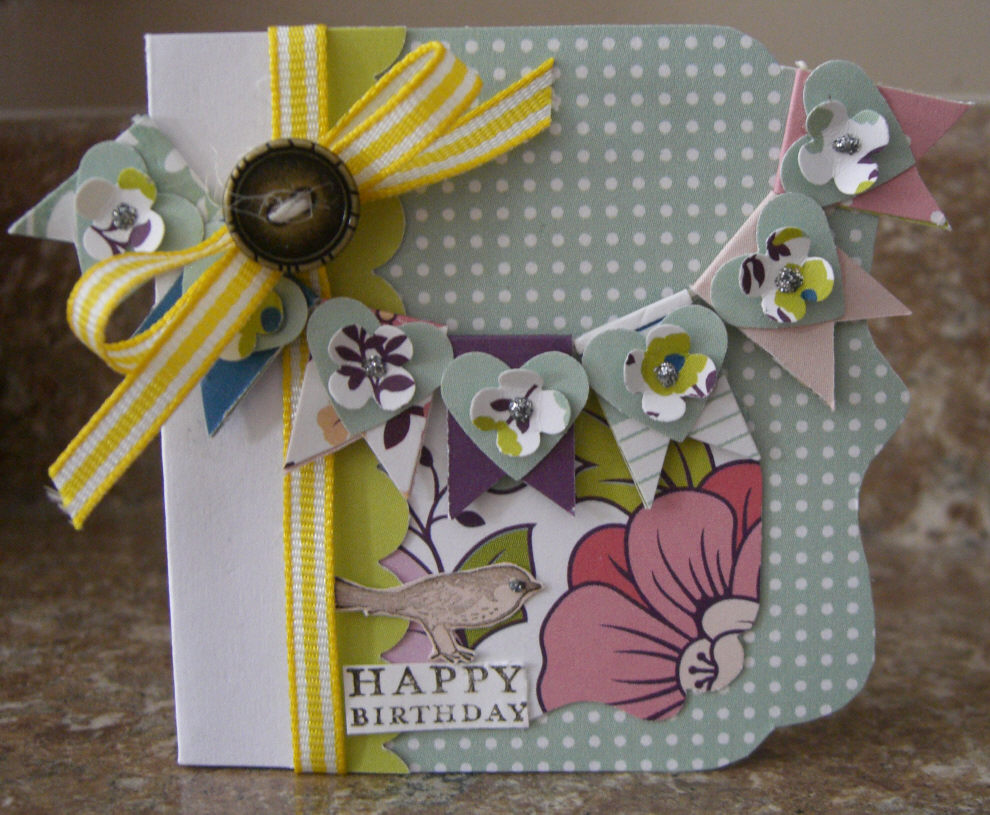
I painted the shadowbox a light turquoise/blue color. Peyton is obssessed with blue, so it had to be blue! And it matches her room. Turns out the paint was a few years old so it was pretty thick and didn't go on so smooth. It actually added to it and made the whoel thing look like I painted it a few years ago. Not intentional at all, but it worked out into my favor. The scallop trim at the top is the endge of Sassafrass paper. I love their paper, don't you! The top banner is American Crafts and Sassafrass paper. I made it by cutting strips of paper, folding them in half, cutting the ribbon edge into them and then glueing heart and flower punches onto each section. The whole thing is strung on twine. It's currently my favorite thing to make right now! I can't get enough of these banners!!! {If you remember, I did one on the picture frame I showed on the last post}.

Here are the supplies and photos - Square by Square:


Square 1 - Old Olive cardstock Stampin' Up!; Sassafrass, American Crafts patterned paper; Pink and White bakers Twine My Mind's Eye; White and Yellow headpins Joanne's Crafts; EK Success border punch, Bird punch Stamin' Up!; Polka-dot embossing folder; pearlies Stampin' Up!


Square 2 - patterned paper Sassafrass, American Crafts; Ribbon Stampin' Up!; thimbal; Scallop border punch Stampin' Up!.


Square 3 - patterned paper American Crafts; ribbon Stampin' Up!; dress stamp Dear Lizzy for American Crafts; heart button Stampin' Up; pearlies Stampin' Up! Scallop border punch Stampin' Up!


Square 4 - patterned paper Sassafrass, American Crafts; punches Designer Label Stampin' Up, Scallop Trim border Stampin' Up! Heart and flower punches Stampin' Up!; Butterfly stamp American Crafts; Pearlies Stampin' Up!; Baker's Twine Martha Stewart.


Square 5 - patterned paper American Crafts, Sassafrass; Martha Stewart glitter glue, Stampin' Up! polka dot brown ribbon, yellow lace my stash, Martha Stewart baker's twine; Stampin' Up! Itty Bitty Flower punch.


Square 6 - patterned paper American Crafts, Sassafrass; baker's twine American Crafts; Stamps American Crafts; Inks Stampin' Up!; Flower Prima Marketing; Scallop circle punch Stampin' Up!; border punch EK Success.


Square 7 - patterned paper American Crafts; Ribbon my stash. Scallop border and scallop circle punch Stampin' Up!; blue flower Prima Marketing.


Square 8 - patterned paper American Crafts, Stampin' Up, Sassafrass; Ribbon Stampin' Up!; Baker's twine American Crafts; Stamps Dear Lizzy for American crafts; Scallop border and designer lable punch Stampin' Up!; Button American Crafts; flower dies Sizzix Bigshot for Stampin' Up!.


Square 9 - patterned paper Sassafrass; scallop circle punch Stampin' Up!; polka-dot ribbon American Crafts; Scallop circle Stampin' Up!; Itty Bitty Flower punch Stampin' Up!; tea cup stamp Stampin Up!; Martha Stewart glitter glue; pearlies Stampin' Up!; clear button Basic Grey.

Sweet Lable - stamps Stampin' Up! {lable} Dear Lizzy for American Crafts; Inks Stampin' Up!; flowers Itty Bitty Stampin' Up!; blue jewels Doodlebug Designs.

Top - {See above for scallop border and banner details}. Ribbon May Arts and Stampin' Up!, my stash {yellow ribbon}; flower Prima Marketing; bird and birdcage charm Prima Marketing.

So when we went to Costco the other day, they had out princess Halloween costumes. Peyton has been saying that she wanted to be a butterfly. Well once she saw the princess costumes that all went away!! There was Cinderella, Tiana, Sleeping Beauty, Ariel, Barbie Princess and Snow White. Of course Peyton wanted Cinderella, but that would be #4!!!! So she decided upon Snow White. And she looks so cute in it, if I do say so myself! What do you all think?


One last thing before I head out. Peyton told me the other day that she wishes the workers on our house would come back and paint her room blue! Blue is her absolute favorite color! And Cinderella is her most favorite princess. So now she wants her room blue. I told her sorry, but repainting her room was not an option right now. My mom found the blue paper lantern in the photo below and got it for her bedroom. It's super cute and would be fun to add a light to. But I think it's cute as is too. I want to make some smaller balls to hang next to them. But it adds a fun splash of turquoise blue to her room in the mean time. And she loved it too!


I am off! Hope you are all enjoying this busy time of year!

Happy Crafting!

Sunday, March 20, 2011

Card Patterns Sketch Challenge 107

Hi Everyone! Thought I would show you my very first attempt at a sketch challenge. The card didn't quite turn out how I wanted. Oh well :). Card Patterns Blog always has cute sketches. But I have never made a card from any of them. Or any sketch for that matter. So I thought I would give it a try.

First, here is my card:


Bliss Card - Card Patterns Sketch Challenge 107:
Cardstock - Pink Pirouette, Whisper White Stampin' Up!
Patterned Paper - Dear Lizzy for American Crafts
Stamp - Stampin' Up!
Ink - Early Espresso Stampin' Up!
Punches - Flower Petal border EK Success; Bird, Itty Bitty Flower Stampin' Up!
Ribbon - Brown Grosgrain May Arts
Paper Doilies - Darice
Bling - Half Pearlie Stampin' Up!
For the doily, because it was a lot bigger than the paper rosette, I folded it in 1/8th's, cut the center out and then gathered it so it fit snugly behind the rosette. I know it's pretty subtle, but there is an embossed hydrangea blossom on the top right hand side of the patterned paper. I didn't want to cover the whole thing up because I love it, so I did the borders, ribbon, rosette and bird on the bottom 1/3rd of the card. That way the hydrangea blossom wasn't lost.

And now here is the sketch:


As you can tell, I also rotated the the card on it's side and then, like I mentioned above, moved the scallops, ribbon and rosette down to the bottom 3rd.

I linked up my blog to the sketch challenge. I hope I win because the prize is Unity Stamps! Love them! I haven't ever purchased any of their stamps but the images are so cute! And now they have teamed up with Webster's Pages, another brand I love. So cross your fingers for me :).

Before I head off, here is one last card I made:

Happy Birthday Banner Card:
Card - Studio G
Cardstock - Whisper White Stampin' Up!
Patterned Paper - Dear Lizzy for American Crafts
Stamps - Stampin' Up!
Ink - Early Espresso Stampin' Up!
Ribbon - May Arts
Punches - Scallop border, Itty Bitty Heart and Flower, Designer Label Stampin' Up!
Button - Stella and Rose for My Mind's Eye
Glitter - Martha Stewart

The card is from Studio G. They have a few packages of cards where you get small cards - my favorite!!! - and coordinating envelopes. There are two of each style, and three designs. And of course, they are only $1. You can't pass that up! And because I love small cards, I definitely couldn't pass them up.

I made the banner by cutting the different papers into half in strips and then just cutting the flag end into each piece. Super easy! Oh, and before I cut the end, I scored them at 3/4" so that way each one would be a rectangle and not square. But since the card is so small, I didn't want the flags to be too big.

I am linking my post up to

and

If you haven't checked out either blog, I highly recommend to do so! They are both great!

Off to craft a little more before the weekend is over. Hope you have a great rest of yours!

Saturday, January 29, 2011

I'm Back! And I've Been Busy!

Hello. My name is Leana and I am a crafting supply hoarder. {admitting feels good! :-)}

There, I said it! Well, not only do I hoard crafting supplies, but I am just a cluttery person in general. Sigh.... Well, my husband has been really wonderful and is helping me get out of my rut! It started with turning the weekend of Martin Luther King Day into a three day holiday of cleaning my craft room - I started the weekend before really, but kept it going. Now I am loving my room all over again! I still have a lot of work to do on it, but it is at least getting manageable.

But wait, there's more....

I also cleaned out my bedroom closet this week! I had about 6 bags of clothes that went to the D.I. - for those that don't know what that is, think Good Will - and found a bunch of clothes that fit me again :-)! I was able to put some pants and other clothes that are too big away, and get out clothes that I haven't been able to wear in like 5 years! I haven't actually typed it down here on my blog, but I can tell you all that I have lost 30 pounds :). I am starting to feel like my old self again. I still have a lot of work to do and I am not down to my goal. But I actually feel like it's achievable now. I have been basically working with the old Weight Watchers point program, but didn't follow it strictly. I have worked hard though with portion control and trying to eat healthy - though it doesn't always work.

Because of all the cleaning that I mentioned before, I was able to go through my stamps and get rid of a lot that I don't use anymore. I have them listed on Etsy for purchase. I have them listed pretty cheap, if you all want to hop on over and check them out. :-)

Aside from all this other news though, I have been trying to craft when I could sneak in some time. This evening I finally finished two things to list on Etsy. They are both card kits. One comes completely assembled with the cutest little envelopes to fit the cards. The other comes with 1 finished card and then everything needed to make 5 more cards to match.

I'll show the assembled kit first...


Don't you love that chair! It's one of my favorite stamps from the current Stampin' Up set. And it's one of my most recent purchases.


This little envelope is a Big Shot die from Stampin' Up! Isn't it so cute!
 As you all know, I love to make smaller cards. It's just my thing lately! I am doing a swap with some friends, and I was specifically told that I had to make my cards 4x5! Ha! Funny hu! Oh, well.

Anyway, I have had this envelope die since I got my Big Shot and never used it. I have used my upline, Cindy's, at her house for our monthly club projects, but I have never done anything with mine on my own. I knew though that I wanted to make a small set of cards that had envelopes to go with them. And then it hit me - du! I have envelopes that I can make and then make the cards to fit them! Gotta love the light bulb moments! So I took my favorite chair stamp and some My Mind's Eye patterned cardstock and this cute little set was born. I made 6 cards and 6 envelopes to sell at my Etsy store craftydork.

 Here is the kit all packaged up and ready for Etsy :-) ....


This is what I used to make them:

Cardstock - Pretty In Pink, Bashful Blue, Old Olive, Very Vanilla and Naturals Ivory Stampin' Up!
Patterned Paper - My Mind's Eye
Die - Scallop Envelope Big Shot for Stampin' Up!
Punches - Itty Bitty 4 petal flower, Designer Label, Scallop Trim border, Dotted Scallop Ribbon border, Large Scallop Circle, 1/16" hole Stampin' Up!
Stamps - Stampin' Up!
Ink - Chocolate Chip, Soft Suede, Pretty In Pink Stampin' Up!
Ribbon - Old Olive grosgrain Stampin' Up!
Pearls - Stampin' Up!
Adhesive - glue stick 3 M; liquid glue Crystal Effects from Stampin' Up!

A few things to note: I stamped the envelope flowers in Soft Suede on 3 envelopes, and then Chocolate Chip on the other 3. Also, for some reason, even though all the chairs are in Soft Suede, a few of them came out darker than the others. Not really sure why, or how I did that! And the last thing is, the envelopes don't seal. I think they would be cute with a bit of ribbon tied around them, or just a tiny dab of Crystal Effects to hold it closed would work too.

And there you have it folks. I think these would be adorable on a present! What do you all think?

So my next kit features one of my most favorite paper brands, American Crafts! But more specifically, their Dear Lizzy line! I've said it before, but Elizabeth Kartchner is such a cutie! And her stuff is to die for! And her Enchanted papers are so cute! I love the big florals and bright colors.

This card just makes me happy....

Isn't the paper so pretty! :)

Stampin' Up!'s spring mini catalog is full of gorgeous stamps, paper and accessories. The dress form stamp is from the Oh Sew Suite line and it is one of my favorites! The button is also from Stampin' Up! but it is in the main catalog.

Here is a breakdown of the supplies:

Cardstock - Daffodil Delight, Whisper White Stampin' Up!
Patterned Paper - Enchanted Dear Lizzy for American Crafts {the solid paper, besides the white, is the reverse side of the patterned paper}
Stamps - Sew Suite {dress form} Stampin' Up!; frame and "my favorite" sentiment Dear Lizzy from American Crafts
Inks - Perfect Plum, Baja Blue, Early Espresso Stampin' Up!
Punches - Small Scallop Circle, 1/16" hole, Scallop border, 1 3/8" Circle Stampin' Up!
Bling - half pearls Stampin' Up!; orange jewels Doodle Bug; pink metal flowers with rhinestones Making Memories {aren't these so cute!!!!!!}
Ribbon - blue and brown scallop American Crafts; baker's twine my stash
Button - Rich Razzleberry Stampin' Up!
Adhesive - glue stick 3M; ribbon line Pop Dots;

Here is the kit all packaged up...


The only things you need to assemble the kit together is a glue stick and a little bit of liquid glue! The liquid glue was used to adhere the orange jewels and then just a dab behind the bottom of the stand on the dress form. Everything that needs to be inked, cut, punched, tied or scored is already done for you.

As I mentioned, this card just makes me happy. :-) The colors and patterns are all about spring. And I am so anxious for it to just be here already! How about you all?

And lastly, I have some fun Valentine cards I made. Originally I had made these to go on Etsy too. I am working on a set of 10. But I had the owner of the company I work for, purchase them already :).

Here are the 3 I have finished so far...


The patterned paper is absolutely adorable, don't you think! It's all Fancy Pants brand, except the red glitter paper. The cards - in Sahara Sand - are from Stampin' Up! about 4 years ago.  They have envelopes that fit them. The patterned paper is actually to make little Valentines. They have a label on the other side so you can put to and from. But I decided I would just convert them into cards - at least for the set of 10. I bought another sheet of the paper though, so I may make some to go along with some candy as just regular Valentines.

Here are all the supplies used:

Patterned Paper - Fancy Pants
Cardstock - Whisper White, Early Espresso Stampin' Up!
Glitter Cardstock - American Crafts
Stamp - Love American Crafts
Ink - Early Espresso, Ridinghood Red markers Stampin' Up!
Punches - Scallop border, Itty Bitty 4 petal flower, Itty Bitty flower, Scallop Trim border, Dotted Scallop Ribbon border Stampin' Up!; Lace border Martha Stewart
Button - BasicGrey
Bling - pearls, rhinestones Stampin' Up!
Glitter Glue - red Studio G {used on the Happy Valentine's Day card. I used it on the heart shaped balloon}
Ribbon - Brown and white polka-dot grosgrain May Arts; Red grosgrain Making Memories; Baker's Twine my stash
Adhesive - glue stick 3m; foam adhesive Dimensionals from Stampin' Up!; Glue Line Pop Dots; liquid glue Crystal Effects from Stampin' Up!

So for the Everything Grows Better With Love card, the hearts are cut out from one of the patterned papers. On the From My Heart to Yours With Love card, those pink hearts were just  hand cut out. Stampin' Up! has a heart punch that I so want, but I just haven't bought it yet.

And there you have it. As soon as I get more of the Valentines cards finished, I'll post those. And check out my Etsy store if you are interested in the card kits. Oh and as soon as my room is finished, I will post updated pics of it here too.

Last thing before I am off... I decided to try out for the Stampin' Up! Artisian Award this year. I don't know what my chances are, but here's hoping! I have a few things completed already. But I will share them at a later date :)

Hope you are all good and staying crafty!

Friday, November 19, 2010

A Few More Numbers Down...

Hi crafty friends! Hope you are all doing good! I am excited to show the next few numbers that I have completed. I have decided that I am being super slow because I watch TV while I craft and pay more attention to the shows sometimes than to my projects!!!! :) Like last night, I was watching Glee - the episode with Gwyneth Paltrow - and crafted maybe 5 minutes out of that time! Oh, well. Such is life. But I did get 2 numbers done last night, plus I started on some of the ornaments to decorate the tree too.

 I have said it before, and I will say it again! I LOVE Dear Lizzy's lines! She is the cutest and makes the cutest supplies. Her current Christmas selection - a throw back to the 1930's - 1950's - is so fun to work with. I wasn't crazy about the colors at first, I admit. But the more I use the papers, the more I love them!!

Here is how #6 turned out:


As you all know, I have a hard time leaving things well enough alone when it comes to being crafty. I love other's simple styles, but I always have urges to just keep adding! So I was proud of myself that I stopped where I was here. Sometimes, I admit, I get a little crazy - too crazy! I wanted to add more though to the picture of the sleigh and kids, but I left it alone with the exception of adding the glitter to the horse.


Here are the supplies used:

Patterned Paper - American Crafts Dear Lizzy line, My Mind's Eye {the polka dot scallop oval tag}
Cardstock - Stampin' Up! {only the #6. All other solid colors are the Dear Lizzy papers}
Punches - Scallop Ribbon border, Scallop Oval, Small Oval, Itty Bitty Flower Stampin' Up!
Ink - Soft Suede Stampin' Up!
Bling - Rhinestone Jewel Stampin' Up!, Red liquid glitter Studio G
Die - QuicKutz
Magnet Sheet - QuicKutz
Brad - 7 Gypsy's
Ribbon - All My Memories {you can tell I have really been digging into my stash with using old brands!}

This next number I made with the oh so adorable Margie Romney-Aslett Twig and Tinsel line. OK, could you just die! Could you! I so am in love with her style and papers and everything. Her materials have been hard to come by here in the good old Beehive State! I tried to get the Toil and Trouble line but it ran out so fast everywhere, I couldn't get my hands on any of it :(. So as soon as I saw her Christmas papers, I knew they needed to be mine :). I didn't even get all of them, but I got one of each the store had!!!!! I love the shabby chic/vintage look of all of her things!

Here is what I came up with for #8:


Here are the supplies used:

Patterned Paper - Twig and Tinsel The Girl's Paperie
Cardstock - Very Vanilla Stampin' Up!
Inks - Soft Suede Stampin' Up!
Punches - Scallop Ribbon border, Small Star, 3/4 Circle Stampin' Up!, Large Corner Rounder EK Success
Die - QuicKutz
Magnet Sheet QuicKutz
Ribbon - Brown Gathered Satin Maya Road, Green Seam Binding May Arts, Baker's Twine My Stash
Button - Brown bling Bazzill Basics
Half Pearls - Stampin' Up!
Fabric - Stampin' Up!
Adhesive - my glue gone to hold the fabric flower together, Crystal Effects {used to make the epoxy circle on #8 and to attache the half pearls}, Pop Dots and Continuous Line Glue Dots

Here is the first ornament I made for the tree. I borrowed Amber's ornament punch and stamp set from Stampin' Up! so I could make these cute ornaments with patterned paper and cardstock stamped with the cute stamp set. Don't you love this ornament punch! I know I do!!!! The stamps are just as awesome too!

Here is the front:


Side 2:

Side 3:


So, as you can tell from this picture, I shoved the ribbon down into the 3 layers of the ornament to have a little hanger. Then I am going to clippy the ornaments on the tree. I think I need about 10 of them!!!


I have my tree sitting on top of my kitchen counter until I get it hung up. My dogs are so the dogs that would "eat homework" if given a chance!!!! So there is no way I can have the tree sitting against the wall until I hang it up. As  you can see, I still need to make 3, 4 and 5 but then the bottom is finished. I was really hoping that I could get this done before Thanksgiving since I plan to get my Christmas stuff out right after then. But since I am going slow, doesn't look like that is going to happen. I guess it depends on how much I get done this weekend for sure.

Well, I am off! I hope you are all well and being crafty!

Oh, and I will list the supplies for the ornaments on my next post.

Tuesday, November 16, 2010

More Christmas Tags for Etsy

Hello Everyone!!! Hope you are all having a good week so far. Here is the next set of tags that I mad to sell on Etsy. I want to do a set of 4 different tags, 4 of each of those. And then like I mentioned before, package them up all cute together and sell them together. So I have 2 down and 2 to go.

Here are the pic's of tag #2 in the mean time:


Supplies:

Patterned  Paper - Dear Lizzy for American Crafts {this is the Christmas line she came out with. Don't you just love it! It reminds me of Christmas in the '50's!!!} - the solid green, blue {the be merry tag}, silver{under the button} and brown are the reverse of the patterned papers.
Cardstock - Whisper White - Stampin' Up!
Stamps - Bird is from the Dear Lizzy line that came out in spring; the "be merry" sentiment is Stampin' Up!
Punches - Large Scallop Circle, Designer Label, 1 3/8" Circle, Word Window, Itty Bitty Flower, 1/16" hole Stampin' Up!
Buttons - Itty Bitty pack Stampin' Up!
Bling - Jewel Rhinestone stickers Stampin' Up!

The bird that I used is from Dear Lizzy's spring collection, like I mentioned above, but I thought it was still perfect for Christmas. I am a total fan of Elizabeth Kartchner. She is extremely talented and she also has a great sense of style. She is the cutest pregnant person ever!!! :) I can't wait to see what she comes out with next!

This next tag isn't for my Christmas set to sell on Etsy, but I liked it so much I may make a set of them to sell on there as well. What do you guys think?


I was sad that you lose so much of the cool patterned paper behind the stamped tag image, but I thought what you could see was still perfect for the scale of the tag. Looking at the banner in the pic, I can see that it's a little crooked. Going to have to fix that :). But I absolutely love this set from Stampin' Up! And I thought paring it together with this Basic Grey patterned paper was the perfect combination.

Here are the supplies:

Cardstock - Chocolate Chip and Very Vanilla Stampin' Up!
Patterned Paper - Basic Grey
Punches - Small Oval, Scallop Oval, 1/16" hole, Itty Bitty Flower, Scallop Dotted Ribbon border Boho Blossoms Stampin' Up!
Stamps - Stampin' Up!
Inks - Ridinghood Red, Not Quite Navy, Crumb Cake Stampin' Up!
Bling - yellow jeweled brad and rhinestone sticker Stampin' Up!
Ribbon - Blue Seam Binding May Arts, Baker's Twine My Stash

And there you have it. I would change some of the placement around a bit for the jewels and the banner before making them to sell, but I love the colors combined with the stamped images for sure!!

Alrighty, I am off to bed. Hope you are all well and see you next time :).

Sunday, November 14, 2010

Woot! Another Day Down...

Yep, I went out of order. That's right! I made 1, then 2 and now 7. :) I can't help it sometimes. I just have to craft whatever I am feeling in the moment. Cindy, my Stampin' Up! upline would laugh and tell me it's because I am right brained!!!! It's true, I am. I found this test online to take that tells you what is your dominate side. It's not very scientific but it's fun. Click here if you want to take the test. It's only 20 questions.

Back to crafting....

Here is the latest number that I made:


Isn't the pink frame adorable! Another Making Memories one from Amber. It is actually supposed to be a baby's first Christmas ornament. But I cut off that wording - it was attached to the snowman, and then decided I didn't want a photo.

Here are the supplies used:

Cardstock - Very Vanilla Stampin' Up!
Patterned Paper - Dear Lizzie for American Crafts {I love her Christmas line!! It reminds me of a '50's style Christmas and that reminds me of my grandma :)}, My Minds Eye
Stamp - I Believe from My Minds Eye
Ink - Early Espresso & Ridinghood Red Stampin' Up!
Buttons - Naturals & clear Itty Bitties
Punches - 3/4" Circle, Itty Bitty flower, Designer Label, Large Scallop Circle Stampin' Up!
Die - QuicKutz
Ribbon - Pink Polka-Dot & Baker's Twine my stash, Soft Sky Double Stitched grosgrain Stampin' Up!
Magnet Sheeting - QuicKutz
Chipboard Frame - Making Memories {the snowman was originally attached to the frame

So until Amber gave me all the fun Christmas stuff, I wasn't going to do pink in my calendar, but as soon as I took one look at it all, I knew that I changed my mind! I love traditional colors, prints and patterns when it comes to Christmas. And I love the more traditional looks than cutesy usually. But I love this Making Memories stuff! And I love mixing all the brands together! So now I have pink and turquoise and different colors of reds and greens in the calendar, and I love it!!!!

Well ladies,  it's late and I am tired! So it's off to bed I go! Hope you all have a great rest of your crafty weekend!

Sunday, November 7, 2010

1 Day Down, 24 To Go

Wow, look at all these posts in a few days! :) I love when I have this much to blog!

The weather here in Utah is still super nice. I am just waiting for the cold to come. I am so not a winter person, but I do love the fall! So hopefully the crisp temperatures will last a little while before the bitter cold comes. Doesn't usually work that way here though. So we'll see.

I did day number 1 for my countdown calendar last night. It took me a while to figure out exactly how I wanted to do it. I did know that I wanted to add something on for each day instead of take something off, that way the tree gets fuller as Christmas gets closer. Then I figured that I could add the numbers each day - and that Peyton could definitely help with this part. The tricky part was figuring out how to make it work.

This is what I came up with:


This first day happens to be 4" x 4", but I think I am going to have each day vary in sizes. I love the blingage for sure! :)


 Here is day 1 without the number. Behind the plaid tag is a strip of magnet. The magnet isn't strong enough between 2 pages of cardstock, so make sure you only do it behind one piece of paper or it won't work.


Here is the front of the number.


And here is the back. I die cut the number backwards with the magnet sheet. It's self adhesive so it's so nice to be able to stick it right to the paper without any extra work!!

I figured I can keep the numbers in a binder page sectioned for small things, to keep the numbers from getting all mixed up. And then we can pull the current day out each day to add it on. I am so excited to get this finished!!! The end product for attaching the item for each day wasn't exactly what I had in mind, but I think it will still turn out super cute.

I can't wait to keep showing you guys each day as I get them finished.

Oh, really fast, here are the supplies before I forget:

Cardstock - Early Espresso and Very Vanilla Stampin' Up!
Patterned Paper - {blue and white background} Dear Lizzy for American Crafts, {Red and Cream/Green Polka dot} The Girls Paperie, {red punched flower on 1} Stampin' Up!, {Plaid tag and blue under clear button}  My Minds Eye, {flower lollie} book page
Punches - Scallop Trim border, Scallop border, Bird, Itty Bitty flower Stampin' Up!, Large Corner Rounder EK Success
Blingage - Jewel stickers Stampin' Up, Red Glitter Studio G
Ribbon - Brown Satin Stampin' Up!, Bakers Twine from my stash
Buttons - Brown Bazzill Basics, Green Stampin' Up!, Clear Itty Bitty Stampin' Up!
Ink - Early Espresso Stampin' Up!
Magnet Sheets - QuicKutz
Die - QuicKutz

Before I had my Big Shot, I had the QuicKutz manual die cut machine. I am glad I upgraded for sure. But I am still able to use all my old dies, because they are compatible. So I don't feel like what I invested into my QuicKutz was a waist for sure. I got the magnet sheets at a convention a few years back and have only used it a few times, so I have plenty to complete my project! And the sheets are super thin so they are very easy to die cut. It makes it super nice to work with. Plus as I mentioned above, it's adhesive backed, which makes it all the better!!

I love that Day Light Savings is over! It was nice to have the extra hour today! Hope you all enjoy the rest of your Sunday. I will certainly do my best to do the same!

Sunday, August 29, 2010

What's The Title Of That Layout?

Hey everyone! Hope you are having just as good of a lazy Sunday afternoon as I am. I am loving this slightly cooler weather and looking forward to fall! It's my favorite time of year - even though I really hate winter :-). As I stated before, I have been making lots and lots of tags! Plus I have also done a few scrapbook pages. Love getting back into the crafty swing of things for sure.

On my previous post I posted a picture of the pin cushion I made for my crafty twin, Amber Lafata. I posted it super late at night and failed to mention that I stole :-) the picture from her blog! The shame! He he he ! Love ya Amber. If you haven't checked out her blog, do so as soon as you finish reading my post! She has more pin cushion jars and they are super super cute!

As I mentioned, I have mad a few new scrapbook pages, so I figured I would show them. As my title suggests, something crazy is up with one of the titles to my scrapbook pages. I use a lot of Thickers from American Crafts - which I have mentioned several times how much I love them! But when I was making my page  yesterday, I didn't have enough of the one alphabet to finish my title. So for now I have it with the letters missing :-(. I will have to buy more letters to get the title finished. Thank goodness for Robert's 40% coupons!!!!!

So here is the layout that I did yesterday:


There is glare on the picture, but the background is leaves from trees. We were on the Train at Hogle Zoo. I love this picture. Peyton has such a huge love for life! Hence the title name, but as you can see I need some more letters to complete the title to actually say that. We had a lot of fun at the zoo that day but this is probably my favorite picture from the whole outing. I just can't get enough of how much she loves to learn about everything and anything. She gets so excited to learn and find out as much as she can.

Here are some more detailed pictures of the layout:


I was inspired by a favorite blogger of mine, Maggie Holmes. She has such an awesome style. About a week ago she made a post showing her kitchen table covered in layouts. She admitted once she makes her layouts she has a hard time actually putting them in albums. So she has stacks and stacks of them in her house! I decided then and there, that I was going to CASE each layout on the table that was visible! I couldn't help it! I love all of the pages! So this is my second one that I did off of her table. Here is the link to the post that I am referring to. Check it out! It's an awesome post! If you go to it, on the table, I started on the top right hand corner of the photo. This layout is the second one in on the top row. It looks quite different than mine does. But I did use some of the same elements. I broke out my acrylic paints and pained on the cardstock - a technique that I have loved and admired for quite some time but never tried. Also, I used a combination of dies and punches to create the border on the right side. They have 2 things in common. They are all Stampin' Up! brand and they are all labels. I can't get enough of labels right now! Label punches, dies, chipboard! Love them!

Here are the details:

Cardstock: Wild Wassabi, Daffodil Delight {love this new color!}, Kiwi Kiss {retired color}, Close To Cocoa {retired}, Whisper White and Very Vanilla from Stampin' Up!

Patterned Paper: Letterbox line from American Crafts {green and white polka dot fabric paper is Dear Lizzy from American Crafts}

Stamps: Medallion background and tags Stampin' Up!; Journal spot Autumn Leaves

Thickers: American Crafts

Chipboard: flowers, circles label, bird Letterbox line from American Crafts; flourish Maya Road

Punches and Dies: scallop and pinking hearts borders Stampin' Up!; lace border punch Martha Stewart; label dies all from Stampin' Up!, Butterfly embosslet Stampin' Up!

Flower: Prima

Ink: Chocolate Chip, Pretty In Pink Stampin' Up!

Acrylic Pain: Vanilla and Pink Making Memories

Ribbon: blue polka dot grosgrain American Crafts; skinny pink grosgrain {my stash}


On to the next layout....


I have been trying to get inspiration for titles from my daughters favorite Nick Jr shows. There is so much my little toddler loves from that channel, so where better to turn to than her favorite channel. I got this title from the show "Little Bill". There is an episode where Bill has to perform in the school play and his little class sings this cute little song called Spring Is Here. I couldn't resist the urge to use it for the title of these pictures from an afternoon spent at Thanksgiving Point's Tulip Festival.

Here are some more pictures:


I love the mini acrylic albums from Maya Road! I couldn't help but use one of the butterflies from it here on this page!!!


As I mentioned before, I got inspiration for this layout from Maggie Holmes. This layout is on the top right corner of her photo of her table covered with layouts. It's on the top row.

Here are the details:

Cardstock: Melon Mambo, Chocolate Chip, Daffodil Delight Stampin' Up!
Patterned Cardstock: Letterbox from American Crafts
Thickers, Stickers and Flair: American Crafts
Stamps: Letterbox American Crafts
Circles, label, photo corner and Border Strip stickers: Stampin' Up!

And there you have it! One complete page and one just about completed. Hopefully it will be sooner than later.

Hope you are having a great lazy summer just like I am!