Share |
Showing posts with label Echo Park. Show all posts

Saturday, January 28, 2012

Valentine's Cards


Hi Everyone! Hope your new year is going great. I have been playing some more with my Cricut and have been making some Valentine's cards. Once I get these Valentine's projects out of the way, my next project is Peyton's birthday. She is turning 4! And she wants a princess birthday party. No surprise there, right!

Here are the pics of what I have been working on:

I have been having a lot of fun using non-traditional Valentine's paper to make these Valentine's cards.
Happy Valentine's Day card
Cardstock - Kraft Archiver's
Patterned Paper - Happily Lost Lily BeeStamps - heart American Crafts; sentiment Studio GInks - pigment ink American Crafts; Chocolate Chip Stampin' Up!Embossing Powder - clear Stampin' Up!
Ribbon - Stampin' Up!
Border Punch 
- Scallop Border
Pearlie 
- Stampin' Up!
Pins 
- Joann's Crafts
Cricut 
cartridges - scallop squares Accent Essentials

Yep, I broke out my paper crimper to use on the heart for this card!
XOXO card
Cardstock - Kraft Archivers; Very Vanilla Stampin' Up!
Patterned Paper - Happily Lost Lily BeeStamp - Studio GInk - American CraftsEmbossing Powder - clear Stampin' Up!
Twine - my stash
Jewel - Stampin' Up!
Cricut 
cartridges - Heart and Circle George and Basic Shapes; xoxo Opposites Attract

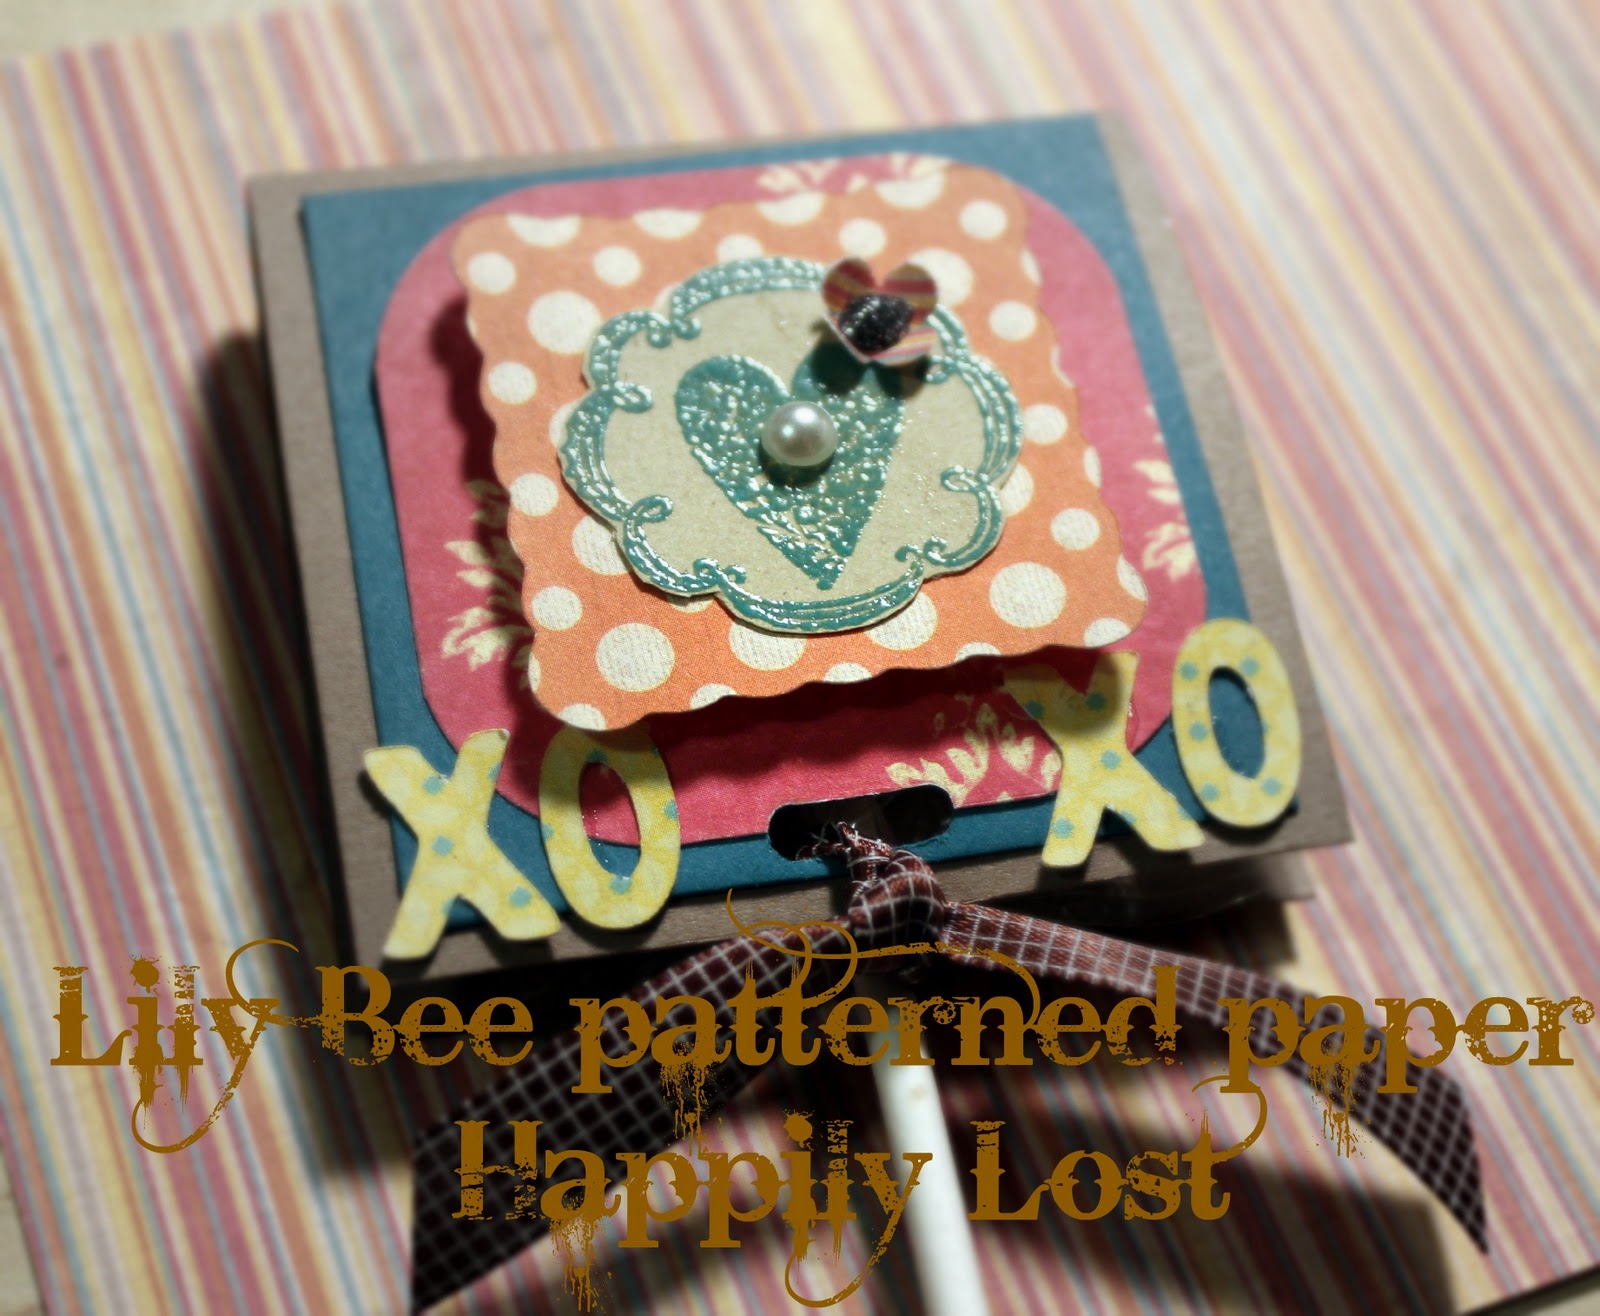
This year's Valentine's sucker cover. I love making these every year!
XOXO sucker cover
Cardstock - Close to Cocoa Stampin' Up!; Kraft ArchiversPatterned Paper - Happily Lost Lily BeeStamp - Studio G Ink - American Crafts 
Embossing Powder - Stampin' Up!
Punches - itty bitty flower and slit Stampin' Up!
Cricut 
cartridges - scallop square Accent Essentials; xoxo Opposites Attract Glitter glue - Martha Stewart Pearlie - Stampin' Up! Ribbon - Stampin' Up!


Yep, it's true. I really do love my Cricut. It's been so much fun and now I can't seem to craft without it. Even for making these tiny cards! And guess what! They actually fit inside envelopes cut from one of my Cricut cartridges. It's hard to tell from the picture, but the cards shimmer from using the Valentine's special edition ink spray from Tattered Angels. It's pink, but when I sprayed it on this black cardstock it just made it shimmery and pretty.
Be Mine cards
Cardstock - textured black and Kraft Archiver's; Very Vanilla Stampin' Up! 
Patterned Paper - type print Stampin' Up!; Yours Truly Echo Park
Punches - itty bitty flower and heart Stampin' Up!Jewels - Stampin' Up!Glitter Glue - red Martha StewartTwine - my stash
Stamp - Studio G
Ink - Basic Gray Stampin' Up!Ink spray - Studio Calico {on Be Mine sentiment}
Cricut cartridges - medium size and large hearts and background shapes Accent Essentials
 

I love the Echo Park Valentine's paper this year! What caught my eye was the more traditional colors used. Although I have been using the Lily Bee paper too to make Valentine's, I knew I also wanted to make some using more traditional Valentine's colors as well. 

Well, I am off. I hope you are all good! 

P.S. I went and saw One for the Money yesterday with friends. I was pleasantly surprised that I liked it as much as I did. The book is awesome, but the movie ended up being pretty good too!

Tuesday, January 10, 2012

Just A Few Cards

Hi Everyone! I just wanted to take a minute to show you the cards I have made lately. I haven't had a lot of time for crafting in the last few weeks. But I managed to do a few cards. Plus I also made my dad's birthday present. It was pretty cute. I neglected to take any pictures though :(. So I will have to post it another time.

Here are the cards:


hello Card
Supplies:
Cardstock - Stampin' Up! Very Vanilla, Basic Gray {textured}, Going Gray
Patterned Paper - Authentique Blissful line
Ink - Stampin' Up! Basic Gray; Stazon Black
Stamps - Stampin' Up! 
Punches - Stampin' Up! Scallop border, Large Scallop Circle, Itty Bitty Flower 
Cricut Cartridges - Once Upon A Princess {hello tag, tea pot}
Ink Spray - Tattered Angels 
Crochet Flower - Imaginisce
Brad and Jewel - Stampin' Up!
Ribbon - American Crafts
Foam Adhesive - my stash

I just love this paper from Authentique. All of the paper that they have come out with is gorgeous! But for some reason, this one seems to be my favorite. I don't usually gravitate to these colors, but I totally love the color combinations. 


Be Mine mini Card
Cardstock - Very Vanilla, Real Red Stampin' Up!; Kraft Archiver's
Patterned Paper - Echo Park Yours Truly
Cricut Dies - Accent Essentials {scallop circle, large heart}; 
Forever Young {red and kraft tag}
Stamps - Studio G {Be Mine sentiment}; Stampin' Up! Established Elegance {established 1873 sentiment}
Inks - Real Red, Crumb Cake Stampin' Up! 
Ink Spray - Tattered Angels Be Mine
Punches - Scallop Border, Small Heart, Itty Bitty flower Stampin' Up!
Glitter Glue - Martha Stewart
Jewels - Stampin' Up!
Button - Basic Grey
Ribbon - American Crafts; Stampin' Up!
Liquid Glue - Crystal Effects Stampin' Up!

This year I had a hard time choosing the Valentine's paper that I wanted. That is until I saw the line from Echo Park. I loved the other brands I saw, but I LOVE this Echo Park line. It's just fun and I love the traditional color scheme. I am sure this is not the only project I will be using the products for. 


Thanks So Much Card
Cardstock - Very Vanilla Stampin' Up!
Stamps - Established Elegance, {Thanks So Much sentiment} Stampin' Up! 
Inks - Island Indigo, Crumb Cake Stampin' Up!
Spray Ink - Studio Calico Mister Huey's Clay
Jewels - Reflections

This is a very simple card for me, if you all don't know already. It takes a lot for me to not piece a card together. When I got my new Island Indigo stamp pad, and my new Established Elegance stamp pad from Stampin' Up! however, I got inspired to simplify just a bit.


Happy Valentine's Day Tag
Cardstock - Kraft, Jet Black textured Archiver's; Very Vanilla Stampin' Up!
Patterned Paper - Echo Park Yours Truly
Cricut Cartridges - Once Upon A Princess {Envelope and Tags}, Accent Essentials {Large Heart, scallop circles}
Punches - Itty Bitty flower, Small Heart Stampin' Up!
Stamps - Happy Valentine's Day sentiment Studio G; flourish Stampin' Up! Embellished Elegence
Inks - Real Red, Basic Gray Stampin' Up!
Jewels - Reflections
Glitter Glue - Martha Stewart
Ribbon and Twine - Basic Gray satin Stampin' Up!; twine is my stash

When I saw the cute envelope and tag on the Once Upon A Princess cartridge from Cricut, I knew it was only a matter of time before I attempted to do something with it! And it didn't take too long after all! I love this darling envelope and tag. I will get plenty of use out of it for sure!!! And, yep. Used more of the Echo Park paper for this one too. I really just absolutely LOVE it! 


I know I keep mentioning the Cricut cartridges I have been using on all my projects lately. But I haven't mentioned the fact that I got a Cricut! :). I borrowed my friend Marci's Cricut to work on my sisters shower decorations. I fell in LOVE with it, told my mom and then she got me my very own! I was debating whether to upgrade to the Cricut Mini but I like the fact that I don't have to plug this one into the computer. I want to eventually get a Cricut Expression. A girl can dream :). 

I am lucky to be able to borrow cartridges from Marci and also from Thong's cousins, Thia and Bea. I have purchased a few on my own, and also got clobbered on Black Friday at a local store who was selling them for $10!!!! I got three that morning {after waiting in the freezing cold for 4 hours}, one of which wasn't really one I wanted, or one that I have yet to use. Since then, I have purchased two more since then - Once Upon A Princess {MY FAVORITE} and Cindy Loo {Love the font on this cartridge!}

I got it early and was supposed to wrap it and put it under my tree. Somehow though it ended up straight up in my craft room instead, open and turned on with a cartridge just waiting to be used! What can I say, I used it right away :). It was practically begging me to anyway, right!


I have got to show you all this adorable pin cushion {you can see the ones that Amber made me, and one that I made right behind it}. I didn't make this most adorable pin cushion ever! No, that was made by Thia, my husbands cousin. I fell in love with it right away! Could you just die! :)

Hope this year is coming along great for everyone. I admit, it hasn't all been roses, but it has been good! I have a new addition to my family. His name is Jack and he is such a cute little happy guy! He belongs to my sister and her husband. He is just a few days old, but is loved immensely already!


Peyton couldn't wait to meet her new baby cousin and hold him for the very first time. She is already planning games for them to play when he gets a little older. I told her it may be a while, and she said she will wait! :) 

Talk to you all soon!

Sunday, January 1, 2012

Once Upon A Princess

Once upon a time...

There was a little girl who said when she grew up that she wanted to be professional soccer player, tooth fairy, dentist, doctor, and of course a princess. When her family would drive by the large professional soccer stadium she would tell them how much she longed to play there someday. She was a happy girl who loved to dance, sing, dress up, watch movies about fairies and longed for adventures. Cinderella was her favorite princess in the entire world and her favorite color was blue. She loved blue so much she would make her mom go to the blue doors at Super Target any time they went there! She was all ready to be a "big girl" and told her mom she was no longer 3 but 33 years old. She dreamed of big celebrations to spend with her family and friends. She spent lots of time making decorations and invitations for her events. She played hard and loved everyone around her.

The End

I know all mothers think their kid is the best kid in the world. I am by no means the exception. I love how much Peyton loves life and loves her friends and family. She is such a happy girl and she makes me happy that I am her mom.

My Cricut has been a lot of fun already in the short time since I have had it. Although I have mostly done Christmas stuff at this point, I have made a scrapbook page, some cards, and am also currently working on a project for my dad's birthday next week. Peyton's birthday is coming up in February, so I am going to start working on party decorations as well. She wants a princess party, no surprise there :). Right after I got my Cricut, since I only had the cartridge it came with, I ended up purchasing 2 more {not counting the 3 I got trampled for on Black Friday}. One is Cindy Loo. That cartridge has such a fun font!!! I've now used it on a few projects already. The other is Once Upon A Princess. This is such a fun cartridge for all things Peyton! I instantly knew that it would inspire projects for Peyton's birthday party to her bed room, and even some paper dolls for her to play with. I had been working some sort of wall hanging out in my head for the last few weeks since I had got the cartridge, but it took seeing the special issue of Cricut Magazine Home Decor, to get the gears really moving.

Here is what I came up with:


Yep, still addicted to these junk bows. Thanks Amber! :)


A few years ago, I had to ground myself from a little local store called The Wood Connection. I LOVE it! It's full of unfinished wood projects and such. I got the frame from there. It's been sitting in my craft room closet just waiting for me to use it. Hence, the grounding due to excess products purchased there that I have yet to use all of. But I am glad I finally had the perfect use for it. A few years ago - actually 2007 - I posted some small magnet boards. Those were actually purchased from The Wood Connection.

Anyway, here are the supplies used for the frame:

Paint - Acrylic cream
Stamps - Pebbles, Inc.; Stampin' Up!
Ink - Stampin' Up! Chocolate Chip, Baja Breeze, Soft Suede, Old Olive
Ribbon - American Crafts; Stampin Up!; tulle is my stash; Close to My Heart
Cardstock - Stampin' Up!
Patterned Paper - Echo Park; Stampin' Up! {only on junk bow}
Cricut Cartridges - Once Upon A Princess {Princess, butterflies, large scallop border, rose}; Cindy Loo {flourishes, Font}
Punches - Itty Bitty Flower, Tiny Heart Stampin' Up!
Glitter Glue - Stickles
Flair - American Crafts
Jewels and Pearlies - Stampin' Up!
Paper Doily - Wilton


To make the frame "dirty" I take a sponge and cover it in ink - same as when I distress a piece of paper - and then I rub it all over the wood. This is of course once it is painted and the paint is dry. I love the effect. It makes an instant impact.

For the month of December, local paper craft company, American Crafts, had a warehouse sale. I guess they do the same thing every year. I have mentioned many times how much I love their stuff. So I knew I would have to make the trip at least once. I was pleasantly surprised at how much great stuff I found and at such great deals. It's actually where I got all the Crate Paper patterned Christmas paper from. I also got some cheap clear stamps, {we are talking $2 for sets normally $6} including the princess phrases I used in this frame. I also got tons of ribbon. They were ridiculously low {40 spools for $5!}. I even got a large 12x12 paper trimmer there for $8. They had great deals on scrapbooks, inks, Thickers and all kinds of things. Can't wait to check it out next year for sure!


Hope you are all enjoying your holiday week! Happy New Year!

Linking to Paper Issues

Sunday, October 9, 2011

Boil Boil Toil and Peyton - Oh, I mean Trouble!

Hi Everyone! Ever have those days when you think your kid is the best kid in the whole entire world and that they can do no wrong! And that you couldn't ever be prouder! Then ever have those days where your kid cries about EVERYTHING non stop all day long and you want to pull your own hair out and ground yourself to your room so you can have a break! Oh, today is so one of those days where the crying just doesn't stop. Today is one of those days where I did almost ground myself to my room just to have a moment of piece and quiet. Ahhh! I feel better now. Thanks for listening! :).

Now on to all that is crafty! So I have been working on a banner for Halloween for a few weeks. I got the pennants all cut out and my black cardstock scored to make lollies. And then I had my friend Amber cut out the letters for me, along with the scallop circles. I am so happy with the way it turned out!!!! I am sure those of you that have been visiting for a while know that I have a hard time just leaving things be. I always have to clutter things up. It's my style. It's what I do :). But I got the lollies, scallop circles and letters on, and then strung the whole thing with ribbon and tulle, and I loved it just as it was! I know, something is seriously wrong with me! I got my Halloween decorations up a week before Halloween and I didn't keep adding more stuff to my banner! Ha! What can I say, I loved it just the way it was.

So here are the pic's:


I love all the fun papers!


This spider was on my high counter, but when I put up the spider-web, I knew it would have to be moved over. Peyton and I decided that it is Aragog and the other small spiders are it's kids!


The spider-web was such a pain to hang up! I have tape all over my pretty banister :(. It didn't want to stay. But finally I got it all up. It's literally all hanging on by a thread.

Here are the banner supplies:

Cardstock - Bazzill Basics
Patterned Paper - Fancy Pants, Authentique, Echo Park
Ribbon - May Arts, my stash, Stampin' Up!
Die Cut Letters - Cricut {Thanks Amber!}

Smallest supply list ever!

After I finished my banner, I was going to start working on my paper mache skull that I got the other day, but I guess I am out of mod podge :(, so I made a little circle garland for my little black Halloween tree. I have been wanting to make one of these for the longest time, and so finally, I just did it!!!

Here are the pic's:


After I added on the garland, I added on a small amount of spider-web and then Peyton and I put on a few spiders! I have been trying to figure out for the longest time what to add to this tree, and I am so glad that the garland worked out so well!!!
Here are the supplies for the garland:

Paper - Fancy Pants, Echo Park, Authentique
Twine - my stash
Glue - Crystal Effects from Stampin' Up!
Punches - 3/4" cirlce, 1" circle from Stampin' Up!

Hope you all are enjoying this Halloween Season!

Linking up to:

Sunday, October 2, 2011

Halloween Time!

I truly love fall! I love the cooler temperatures. I love the changing leaves. I love the warm colors of fall and Halloween decorations. I love pulling my sweaters out of storage. The only thing I don't love about fall is the shorter days. I am a lot better than I used to be, but I used to have a really hard time with the days getting shorter. Not so much anymore.

I got my Halloween decorations out last weekend! That has to be a record for me, right! Two things prompted me to get them out this early though: My cute new Halloween advent calendar, and my fun jars that I made, well I added to them.

First, here is the advent calender:


I found this super cute advent calendar up at Swiss Days. It's a local celebration that takes place up in a city called Midway, about 20 minutes south of Park City. It happens every year during Labor Day weekend. It is filled with hundreds of local craft booths, wrapping paper booths, bakery items, Navajo tacos {lovingly referred to as Swiss tacos} children's clothing, Halloween costumes. This is just the tip of the iceberg. There is so much fun stuff there! And it's 2 days of shopping fun! It's so big that it has busted out of the original square from where it takes place and has booths across the street on the north and south side of the square, as well as down the street!

This year, a camera crew from HGTV was there even to film some of the fun and more original stuff. So so so fun!

The advent calender is all handmade! Hand cut and hand sewed. How cute is it! They had plush nativity scenes, church books, finger puppets and all sorts of fun things. They had Christmas advent calendars too.

So as I mentioned there were 2 things that prompted me getting my Halloween decorations out already. The other was some super cute jars - also purchased at Swiss Days!

Here are the jars:


The jars came with the candlestick bases and lids. What I wanted to do was make sure I could use them all year long. So everything comes off very easily. The other thing I wanted to do, was make them decorated from both sides. From this view the jars spell BOO.


Sorry, this pic turned out blurry. It's the only one that I have. The little saying says "Things that go bump in the night"

Here is the B.


And then this is the back side of the B. The image is a witch that says "broom rides 25 cents" and then there is a pic of a witch. I thought it was pretty cute!


First O Jar. In order to get the letters to stand up inside the jars, and in the middle, I attached each one to transparency sheets. I stamped spiders on them in black Stazon Ink, as well. Then the candy corn works to hold up the transparencies. Hard to tell from the pic though.


Here is the backside of the first O.

And then the last O.


Sorry, again with the blurry pictures. I thought I was done with that :). This is the backside of the last O.

Here are the supplies:

Patterned Paper: Echo Park, Authentique, Fancy Pants
Cardstock: Stampin' Up!
Punches: Stampin' Up!
Score Board: Martha Stewart {to make the banner}
Ribbon: Stampin' Up! My Mind's Eye. {the white lace ribbon and wine came on the jar :)}
Stamps: Stampin' Up!
Inks: Stampin' Up!
Dies: QuicKutz, Spellbinders


The Hello Kitty basket is what I pass out Halloween candy in. I haven't been home for the last few years though so we haven't passed out candy. The ceramic pumpkin was made by my grandma :). I know you can't tell on from the pic, but the tree has flashing lights on it that are candy corns! I love them. I got the cute little pumpkin at Tai Pan Trading this year. The little dish is filled with a candy that I didn't love, in fact despised, until this year! Candy Corn!!! The runner was made by my mommy, and is Hello Kitty Halloween :).


The spider is also from Tai Pan. I LOVE that store!


These BOO letters were made about 4 or 5 years ago for a class that I taught. The style is sort of outdated already. But I still love them. All supplies are Stampin' Up! {do you like my rice cooker in the background :).}

And here is the other side of my living room:


I made the banner that says "SPOOKY" last year. A few things here stay up all year long - the drawers, glass jar on top of them, and usually the stripped vase.

The little scary guy was from my dad, to Peyton! You press his belly and his eyes turn red and he makes a screechy noise. It's pretty funny and Peyton is terrified of it! The skull garland, small black glitter Boo, and spider on the far right side is from Tail Pan. the white jack-o-lantern and big metal pumpkin are from Rod Works. The glass pumpkins are from Walmart. The banner from last year, is partially also from Tai Pan.

Here are some closeups:


Hope you all had a great weekend and have a great fall season as well!

Monday, March 28, 2011

Next Card Kit

Hi everyone! Hope you all had a great weekend. I had a busy one but still it was good.

On my last post, I showed you all the next card kit I am listing on Etsy. But I decided to try something a little different out of my normal kit process this time around. I always get idea overload and come up with several concepts that I want to attempt. But because of time, most of them get pushed back. So what I decided to do this time was to create a few cards at a time, and then make the kits for each card at once. That way I can still use my creative energy to make the cards that I want to in this moment, get them out of my system, and finally move onto creating the kits. I am hoping I can then start the cycle over again. So I plan to make 5 cards in this particular series - so far that is how many I have planned out in my head; we'll see how that goes though - before I start making the kits. Designing is always my favorite part anyway. And seems to take up most of my time. So cross your fingers for me and here's hoping! :)

So I continued with the same sketch to come up with this next card. I do have to say though that I made the dimensions 4 1/4x3 this time, just to try to get more use out of one sheet of cardstock. I am still LOVING this Echo Park paper line - and as I mentioned above I am trying for a series here - so I stuck with that patterned paper. For the stamp image, I went with Stampin' Up! of course, as well as for the embellishments, punches and cardstock.

And here is the card:


Amour Eiffel Tower card:
Cardstock - Chocolate Chip, Very Vanilla Stampin' Up!
Patterned Paper - For the Record Echo Park
Stamps - Stampin' Up!
Ink - Early Espresso, Crumb Cake Stampin' Up!
Button and Bling - brown button and half pearlie Stampin' Up!
Ribbon - 1/8" Old Olive Stampin' Up!
Punches and Die - Small Heart, Scallop border, Designer Label, butterfly {embosslit die} Stampin' Up!
Adhesive - glue stick 3M; Continuous Line Glue Dots; liquid adhesive Crystal Effects Stampin' Up!

I thought it would be fun to make the focus of the card not fit on it entirely. So that is why I kept with the smaller card and made the main section taller than the card itself. And I do have to say, I like the results. It was fun to experiment with going outside of what I normally do. Another thing I don't usually do is mat the main stamped image, but again, I wanted to try to get out of my comfort zone a bit. Although I don't love that part of it, I like the color the mat provides, as well as helping with the overall flow of the card. So my gut told me to leave it. :)

Hope you all are good and staying crafty! I am off!

Wednesday, March 23, 2011

Best Wishes Echo Park Mini Card Kit

Hi Everyone! Thought I would show you my next card kit to go on Etsy. Is it just me or is there not enough time in the day! I wish that I could get more kits made. Oh, well :).

So I am still liking to make small cards for my kits. But I thought I would try a different size besides my standard 4" square card. So, okay, it's still 4". But I did 4"x3". Ha! Talk about a variation! :). But I do have to say, I was pleasantly surprised.

Here is the card:


Best Wishes Card Kit W/Echo Park paper:
Cardstock - Very Vanilla, Soft Suede Stampin' Up!
Patterned Paper - For the Record Echo Park
Stamps - Stampin' Up!
Ink - Soft Suede, Early Espresso, Marina Mist Stampin' Up!
Punches - Scallop border, Designer Label, Itty Bitty Flower Stampin' Up!
Mini Clippie - Stampin'  Up!
Twine - My Stash
Ribbon - cream grosgrain My Stash
I think it is safe to say, I have finally joined the Echo Park band wagon. As much as I have loved all the lines that I have seen, I am already a huge American Crafts fan, and I feel like a lot of their lines look like American Crafts - even though they are super super super cute! But I found a line of theirs today called For the Record. It has my name written all over it! It's so shabby and pretty and reminds me of my grandma :). I can't wait to see everything I can come up with now!

As for the shabby stamp set above - it's actually a combination of 3 - the pretty birdhouse and "no. 147" is a Stampin' Up! set that I have been debating for quite some time of whether I should get it or not. Well I finally bit the bullet, and I love it!!! I admit, I don't love all of the stamps in the set, but I have a few like that anyway. The set is called Nature Walk and it is in the current mini catalog. The bird is from the Sale-a-Bration set, Bliss. And the Best Wishes stamp is from the Vintage Labels set that is now retired. As you all know, I am a Stampin' Up! girl, through and through! The images of their stamps are consistantly top notch. And the quality of their stamps is amazing. In my opinion - :) - there are only a few other brands that I think are as good of quality. Okay, there is my 2 cents! I promise that is all for the night!

Hope you all like it. When I get the kit put together, I will post it on here. And of course on Etsy to sell.

Linking up to:


Have a great night everyone!

P.S. While I am thinking about it, have you all been watching American Idol! How do you choose a winner?? They are all so good! Paul is probably my favorite. And then Lauren Alaina. But I love almost everyone!

And last thing, have you been watching Outragous Kid Parties on TLC? $30k for bday parties. Who does that kind of thing? Well apparently 2 families here in Salt Lake, plus other families across the country. I don't get it!

Alright, off for the night, I promise :). Have a great one!