Share |

Tuesday, August 31, 2010

Finally, The Tags I Made For Amber's Party

As I have been promising, I am finally showing the tags I made for Amber's party she hosted for me. Here is the skinny. I made one of the projects way too complicated and poor Amber and the rest of the participants spent a lot of time doing just one of the 5 tags! Agghhhh! Every person's nightmare who does any kind of demonstrations or home party, right! Thank goodness all of the fabulous ladies stayed fabulous and are still friends with me after the ordeal!!! :-) Love all of you!

So lets start with the easiest of the 5, which also happens to be the last one - as well as my least favorite. :-P.


Can you see all the lines on the label that says You Take The Cake! That is from the Big Shot plates. We used it so many times, even though my plates were brand new, the lines showed up from the previous dies that were cut out. I actually didn't mind it, thought it gave it kind of a fun texture.

Here are the details: {All Supplies are from Stampin' Up!

Cardstock - Chocolate Chip, Whisper White, Daffodil Delight

Stamps - Party Hearty

Inks - Chocolate Chip, Melon Mambo, Daffodil Delight

Dies - Lots Of Tags Sizzlets 4 pack

Onto Tag Number Two....


Looks like the little half pearl that was on the flower on the bird cage fell off before I took the picture. This was my second favorite tag that we made. One thing about this stamp set. The pole for the cages is pretty long. It actually takes up most of the height of the white block. What I did so I didn't have to change how I stamped it was stamp the post directly on to the block and then stamp the cage on a separate piece of white paper. Then I cut out the bird cage and glued it on top of the post covering up a lot of it. This also lets me overlap onto the patterned paper just a bit. The cage isn't hard to cut out except for the little swirls close to the top on both sides. So I didn't cut that part out! But because I am putting white paper on top of white paper, you really don't notice. At least not enough where it bothered me. I hate when things are noticeable when they don't need to be, so I was excited when I came up with solution instead.

Here are the details of the tag: {all supplies are Stampin' Up!}

Cardstock - Daffodil Delight, Pumpkin Pie, Whisper White

Patterned Paper - Greenhouse Gala

Stamps - Aviary {clear mount}, Birthday Bliss

Inks - Chocolate Chip, Daffodil Delight, Pumpkin Pie, Pear Pizazz

Punches and Dies - Scallop Square bigz die, Backgrounds 1 Texturz Plates {not a fan of the plates for embossing! The folders and embosslets are awesome though!}, Scallop border

Half Pearl - {not shown since fell off} from the retired Pretties Kit but are now sold all by themselves and are adhesive backed!!!!

Tag Number Three...


I liked the way this tag turned out. I knew when I was planning the class that I was going to want a big flower one at least one of the tags! As you can always tell, I am obsessed with flowers :-). And I hadn't had the die too long, so I figured I would use this one for sure. I liked that it had the center large enough to put a large circle in the middle too. The patterned paper is the paper that comes completely white with embossed images over the various sheets. Then you take a dauber, roller or some kind of tool to transfer color onto the paper, and the embossed images stay white! It is so cool! I love it!!!!

Here are all the details: {all supplies are Stampin' Up!}

Cardstock - Old Olive, Rich Razzleberry, Very Vanilla

Patterned Paper - Presto Patterns Specialty

Stamps - Circle Circus, Sincere Salutations

Inks - Rich Razzleberry, Chocolate Chip

Dies and Punches: Corner Rounder, Fancy Label, 1 3/8" Large Circle, Beautiful Wings embosslits, Island Floral Bigz, Itty Bitty Shapes

Half Pearl - See above tag about pearl!

Onto Tag Number Four.....


This is my second least favorite one. Here is why. I actually think it turned out quite nice, but it really isn't my style. Although I like it just fine, it was a stretch for me only because of the plainness of it! I know, lame! But it is the way I am! :-)

Here are this tags details: {all Supplies are Stampin' Up!}

Cardstock - Ridinghood Red, Old Olive, Whisper White, Chocolate Chip

Stamps - Punched Posies, Pocket Silhouettes

Inks - Ridinghood Red, Old Olive, Chocolate Chip

Punches - Large Oval, Scallop Oval, Pinking Hearts, Extra Large 5 Petal Flower, Ticket Corner, Itty Bitty Punch Pack

And finally!!! Tag Number Five.....

I have saved this last one for a few reasons, one it was my favorite, and two, as I mentioned above, this is the one that was the biggest pain of all of them! Almost all tags, I used the big shot on and this had a lot of pieces that needed to be die cut! Again, ladies I am so sorry :-). Hopefully you will forgive me for sure!


As you can see, lots and lots of pieces. The blue flowers and then the tag that is the tag the chair is on, is 2 of the same die. The flower, I staggered. The tag behind the chair, I cut the middle out of a diff patterned paper and layered it over the other pattern of the same tag. If you look on the chair, it shows specks over it. I watched YouTube and learned how to make my own glimmer mists!!!! So easy and so much cheaper than buying them! I will post the link if I find it!

Here are the details of the tag: {all supplies again are Stampin' Up!}

Cardstock - Real Red textured, Daffodil Delight, Marina Mist, Very Vanilla

Patterned Paper - Greenhouse Gala {I am in love with this paper!}

Stamps - Happy Birthday sentiment is from a retired Sale-A-Bration set from this year, Have A Seat

Brads and Pearls - See above note about Pearls, clear gem brad

Inks - Chocolate Chip, Real Red

Glimmer Mist - my own creation

Dies and Punches - Top Note, Itty Bitty Punches, 3/4" Circle, Lots Of Tags dies, Blossom Party {love this die! This is the one I use to make the paper roses that i have been showing!}, Scallop Trim border

Ribbon: White grosgrain


And there you have them all! Crazy night of tag making. I learned my lesson, I promise!!! Hope everyone is good! Till text post!

Sunday, August 29, 2010

Lots and Lots and Lots of Tags

Hi Everyone! A few posts ago I mentioned that I had a tag party at my crafty twin, Amber Lafata's house. Here are the tags that I promised I would post. As I have mentioned before my crafty twin got me on a tag kick! I love to make them! They look so cute on a pretty package all wrapped up. No envelope required but they are just as effective as a great card!

I am starting out with some tags I made earlier this summer. Here is the first:


These tags were my first that I made once I got the impulse/obsession to make them. I didn't quite know what I was making. But I like they way they turned out. Do you ever do that? Make something that you have the impulse to make but not really sure what it looks like until it is made? Sometimes those are my favorite projects! The ones I do strictly on impulse and I don't  plan out at all, in my head or on paper before hand.

Here are the details:

Cardstock: Barely Banana {retired}, Whisper White Stampin' Up!
Patterned Paper: My Minds Eye
Stamps: Stampin' Up!
Inks: Chocolate Chip, Old Olive Stampin' Up!
Brad: Stampin' Up!
Distress Tool: Close To My Heart

Tag Number Two....


This card was super fun to make. And super easy. I love making these paper twirly wirlies {I watch too much kids T.V.} All of the paper is from Stampin' Up! They came out with this paper pack in their spring mini catalog this year that I absolutely loved! I was sad to see it go!!! I have lots left though to still use and use and use :-).

Here are the details:

Cardstock: Whisper White textured and smooth, and Melon Mambo from Stampin' Up!

Patterned Paper: Stampin' Up!

Stamps: Stampin' Up!

Ink: Chocolate Chip, Tempting Turquoise, Pretty In Pink, More Mustard Stampin' Up!

Ribbon: Pink Gingham Making Memories


Tag Number Three....


I got this layout for this card from the current Stampin' Up! catalog. I love this flower stamp! It's part of one of my favorite sets and the card I CASEd it from is on the same page as the set.

Here are the details:

Cardstock: Rich Razzleberry, Whisper White Cardstock Stampin' Up!

Patterned Paper: Razzleberry Lemonade Stampin' Up!

Brads: Old Olive Stampin' Up!

Stamps: For All You Do and Tiny Tags from Stampin' Up!

Other: bakers twine

Tag Number Four....


This is one of 2 tags made that look the same. The other I put on a present for my crafty twin! She had her 5 year anniversary at our work, so I added it to the present from our work!

Here are the details:

Cardstock: Certainly Celery and Whisper White Stampin' Up!

Patterned Paper: Making Memories

Stamps: Forest Friends and Tiny Tags from Stampin' Up!

Markers: Chocolate Chip and Old Olive from Stampin' Up!

Ribbon: my stash

Punch: Stampin' Up!


Tag Number Five....


I love this darling patterned paper from Imaginisce! When I purchased the Forest Friends stamp set, I knew I wanted to pare them together. It took a while before I did, but I was excited with the results.

Here are the details:

Cardstock: Real Red textured, Bashful Blue and Whisper White Stampin' Up!

Patterned Paper: Imaginisce and Stampin' Up!

Punches and Die: Word Window and Scallop Trim border, pretty label Stampin' Up!

Ribbon: American Crafts

Markers: Old Olive and Chocolate Chip Stampin' Up!

Tag Number Six....


These tags were a lot of fun to make. And not too complicated. I use a lot of patterned paper - as you guys know - but I like using stamps to make cardstock look like patterned paper. These colors are also a lot of fun! This patterned paper continues in the current catalog in a new color scheme.

Here are the details:

Cardstock: Rich Razzleberry, Whisper White Stampin' Up!

Patterned Paper: Razzleberry Lemonade Stampin' Up!

Inks: Melon Mambo, Rich Razzleberry, Crushed Curry Stampin' Up!

Ribbon: My stash

Punches: Scallop border and Word Window Stampin' Up!

Stamps: For All You Do, Baroque Motifs, Pocket Silhouettes


Tag Number Seven....


Sorry, I realize the top is cut off of the photo. But I made this tag for my Stampin' Up! meeting from this last week. Part of getting together as demonstrators, we do an exchange. I did tags this time. These are simpler than what I normally do for projects, as you can tell, but I figure they are a good base to build off of. It isn't my favorite, but I know I could use it as a template to make one that I do like.

Here are the details:

Cardstock: Real Red textured, Whisper White, Baja Breeze, Daffodil Delight, Chocolate Chip Stampin' Up!

Stamps: Pocket Silhouettes, Have A Seat, Sincere Salutations

Inks: Soft Suede, Baja Breeze

Punches and Dies: Scallop Oval, Large Oval, Butterflies Stampin' Up!

And there you have almost all of them! I have four more to show, but I will make them another post. There were quite a bit here, so I will save them for another time!

I have been watching them Emmy's while posting, and they have been really good this year! I love Jimmy Fallon and NBC has been great at the show.

Hope you all have a great night!

What's The Title Of That Layout?

Hey everyone! Hope you are having just as good of a lazy Sunday afternoon as I am. I am loving this slightly cooler weather and looking forward to fall! It's my favorite time of year - even though I really hate winter :-). As I stated before, I have been making lots and lots of tags! Plus I have also done a few scrapbook pages. Love getting back into the crafty swing of things for sure.

On my previous post I posted a picture of the pin cushion I made for my crafty twin, Amber Lafata. I posted it super late at night and failed to mention that I stole :-) the picture from her blog! The shame! He he he ! Love ya Amber. If you haven't checked out her blog, do so as soon as you finish reading my post! She has more pin cushion jars and they are super super cute!

As I mentioned, I have mad a few new scrapbook pages, so I figured I would show them. As my title suggests, something crazy is up with one of the titles to my scrapbook pages. I use a lot of Thickers from American Crafts - which I have mentioned several times how much I love them! But when I was making my page  yesterday, I didn't have enough of the one alphabet to finish my title. So for now I have it with the letters missing :-(. I will have to buy more letters to get the title finished. Thank goodness for Robert's 40% coupons!!!!!

So here is the layout that I did yesterday:


There is glare on the picture, but the background is leaves from trees. We were on the Train at Hogle Zoo. I love this picture. Peyton has such a huge love for life! Hence the title name, but as you can see I need some more letters to complete the title to actually say that. We had a lot of fun at the zoo that day but this is probably my favorite picture from the whole outing. I just can't get enough of how much she loves to learn about everything and anything. She gets so excited to learn and find out as much as she can.

Here are some more detailed pictures of the layout:


I was inspired by a favorite blogger of mine, Maggie Holmes. She has such an awesome style. About a week ago she made a post showing her kitchen table covered in layouts. She admitted once she makes her layouts she has a hard time actually putting them in albums. So she has stacks and stacks of them in her house! I decided then and there, that I was going to CASE each layout on the table that was visible! I couldn't help it! I love all of the pages! So this is my second one that I did off of her table. Here is the link to the post that I am referring to. Check it out! It's an awesome post! If you go to it, on the table, I started on the top right hand corner of the photo. This layout is the second one in on the top row. It looks quite different than mine does. But I did use some of the same elements. I broke out my acrylic paints and pained on the cardstock - a technique that I have loved and admired for quite some time but never tried. Also, I used a combination of dies and punches to create the border on the right side. They have 2 things in common. They are all Stampin' Up! brand and they are all labels. I can't get enough of labels right now! Label punches, dies, chipboard! Love them!

Here are the details:

Cardstock: Wild Wassabi, Daffodil Delight {love this new color!}, Kiwi Kiss {retired color}, Close To Cocoa {retired}, Whisper White and Very Vanilla from Stampin' Up!

Patterned Paper: Letterbox line from American Crafts {green and white polka dot fabric paper is Dear Lizzy from American Crafts}

Stamps: Medallion background and tags Stampin' Up!; Journal spot Autumn Leaves

Thickers: American Crafts

Chipboard: flowers, circles label, bird Letterbox line from American Crafts; flourish Maya Road

Punches and Dies: scallop and pinking hearts borders Stampin' Up!; lace border punch Martha Stewart; label dies all from Stampin' Up!, Butterfly embosslet Stampin' Up!

Flower: Prima

Ink: Chocolate Chip, Pretty In Pink Stampin' Up!

Acrylic Pain: Vanilla and Pink Making Memories

Ribbon: blue polka dot grosgrain American Crafts; skinny pink grosgrain {my stash}


On to the next layout....


I have been trying to get inspiration for titles from my daughters favorite Nick Jr shows. There is so much my little toddler loves from that channel, so where better to turn to than her favorite channel. I got this title from the show "Little Bill". There is an episode where Bill has to perform in the school play and his little class sings this cute little song called Spring Is Here. I couldn't resist the urge to use it for the title of these pictures from an afternoon spent at Thanksgiving Point's Tulip Festival.

Here are some more pictures:


I love the mini acrylic albums from Maya Road! I couldn't help but use one of the butterflies from it here on this page!!!


As I mentioned before, I got inspiration for this layout from Maggie Holmes. This layout is on the top right corner of her photo of her table covered with layouts. It's on the top row.

Here are the details:

Cardstock: Melon Mambo, Chocolate Chip, Daffodil Delight Stampin' Up!
Patterned Cardstock: Letterbox from American Crafts
Thickers, Stickers and Flair: American Crafts
Stamps: Letterbox American Crafts
Circles, label, photo corner and Border Strip stickers: Stampin' Up!

And there you have it! One complete page and one just about completed. Hopefully it will be sooner than later.

Hope you are having a great lazy summer just like I am!

Friday, August 27, 2010

Pin Cushion Jar


Hi Everyone! Look 2 whole posts in one week! Told you I was back.

Thought I would share something I made for my crafty twin, Amber Lafata. We seem to be drawn to most of the same products, brands, patterns, projects....... It's like we are one crafty soul in two different bodies sometimes! It's very rare we like something the other one doesn't when it comes to crafting! She is my crafty soul mate! Ha! Love ya Amber!

Back to my post..

The above jar was made for her for hosting a Stampin' Up! party for me. We made tags {which I will post at a later date} and this was her prize for having the party at her house. We have been seeing these fun pin cushions all over and figured we would make some ourselves. The jars are super inexpensive. I got a pack of 4 at walmart for less than $4! And they come in all kinds of sizes.

Here are the rest of the details:

Fabric - Joann's Crafts {love this fabric! It's their own brand and it has matching turquoise and red polka dots too}
Ribbon, Cardstock, Inks, Stamps, Punches, Pins {with pearls and beads} - Stampin' Up!
Green Leaf Pins - Maya Road
Other - Red organza ribbon, bakers Twine, batting

I filled the inside with lemon drops and I think it turned out pretty cute! Amber ended up making some too, so make sure to check out her blog from the link above to see what she came up with! They turned out really, really cute! You will love her blog, so also make sure you sign up to follow her! She is worth it, I promise!

Hope everyone is good!

Saturday, August 21, 2010

My Latest Obsession

Hey everyone! Sorry it's been so long since my last post. It's been a busy and fun fun summer! I am sure I am not the only that has felt that way for the last few months :-). We've done baseball games and Hogle Zoo and shopping in Park City, hanging with family..... and of course crafting!

Here are a few pics from this summer:


The new splash park at Alta Canyon Pool


Daddy and Pey at the 4th of July Bees Game


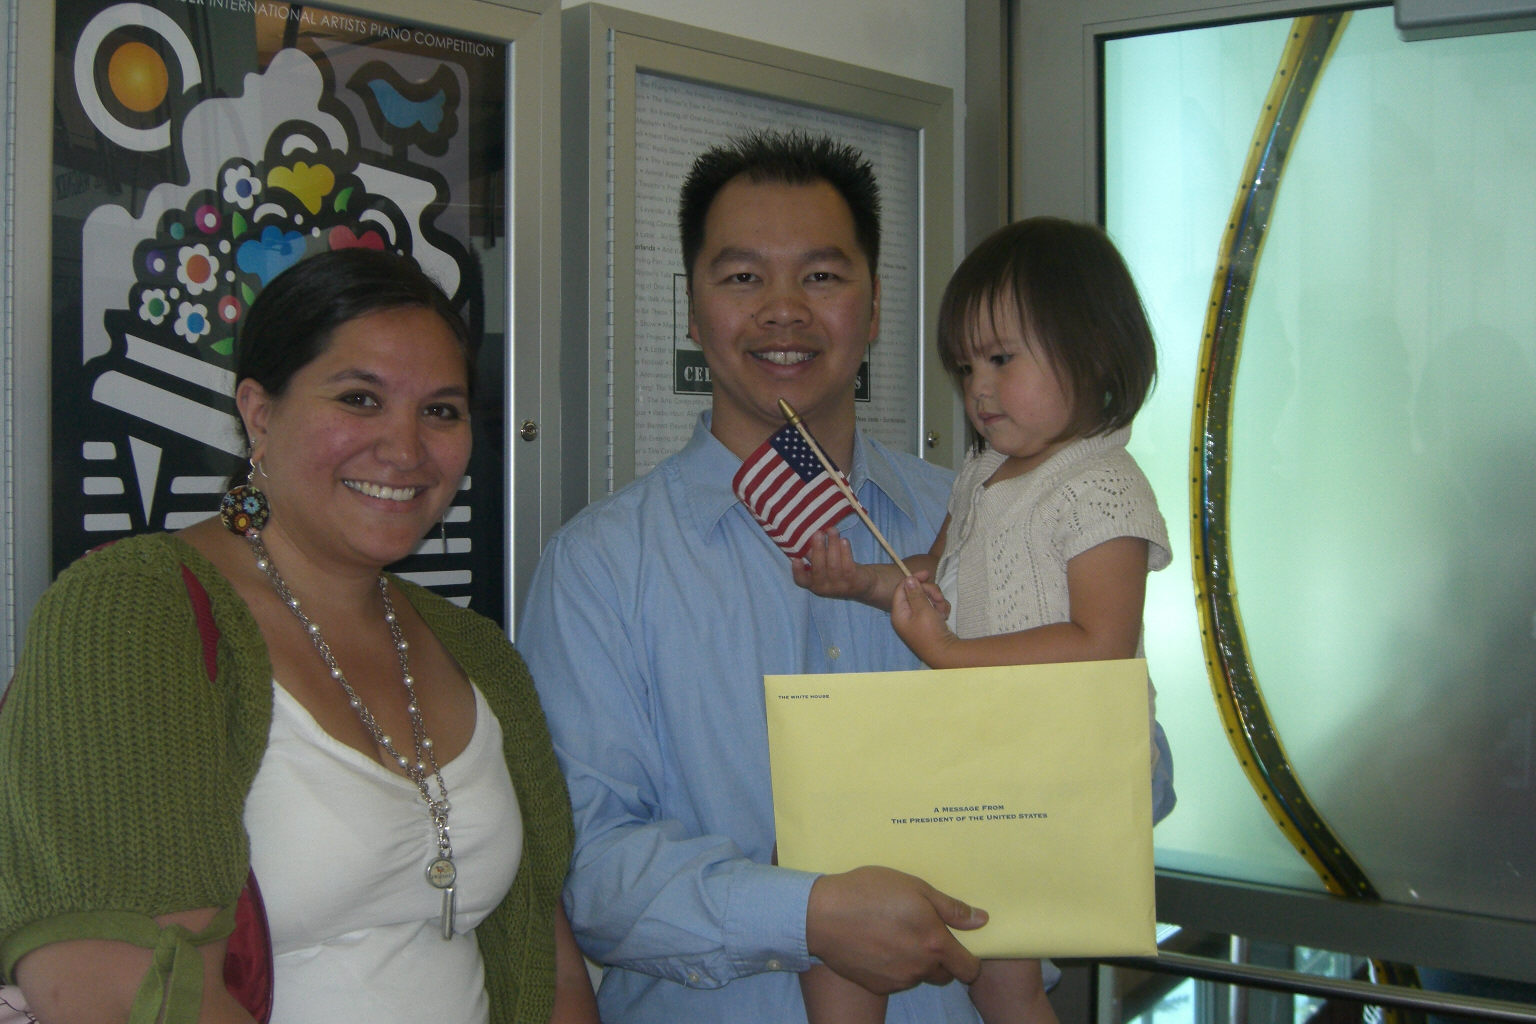
In the beginning of July Thong was granted citizenship. We were pretty excited! And so
proud of course! The picture above was taken by Oren Hatch's sister. She spoke at the
ceremony and it was an incredible speech. The judge that oversaw the ceremony also happened
to be the same judge that did my dad's ceremony. I was in 6th grade when my dad got his,
so it was quite some time ago :-) - I mean only like 10 years ago!!


I love being Peyton's mom! She is such a fun little girl! She looked so pretty for Thong's ceremony too. I can't believe she is 2 1/2 the end of this month!


We also went to the Bee's game for the weekend of Pioneer Day. This time we had seats instead of grass. Check out my sweet shades!!!!


Last weekend we went to Park City to check out the outlets. We only ended up with 3 shirts for Peyton, but we had a lot of fun nonetheless.

As my title speculates for this post, I do have a latest obsession! It's shadow boxes! From Stampin' Up! to 7 Gypsy's and all over the crafting world, I keep seeing the most darling shadow boxes! So I have been searching far and wide to try to find one. I want to get one of the 7 Gypsy's ones, but I will probably have to wait a bit. In the mean time I found a frame shadow box from Hobby Lobby. It was only $8.99 for a 5x7 frame. And then of course I used a 40% off coupon for it! And I continue with my story... Yesterday I went to Roberts Crafts and found out all the American Crafts stuff was 40% off. I chose to take advantage and purchased the Letterpress paper, matching Thickers, clear stamp set and some matching stickers! I knew I wanted to use it for the shadow box!!!

And here is what I came up with:


Here are the supplies I used:

Frame: Hobby Lobby
Patterned Paper, Cardstock, Thickers, Fabric Paper, Remarks stickers, and  clear stamps: American Crafts
Ribbon: Making Memories
Twine, Inks, border punches: Stampin' Up!
Green gems: Heidi Swapp

So it wasn't exactly what I wanted, but it turned out, I love it :). This picture is of Peyton from her 2nd birthday party. The other person in the picture is my mom. They have a special relationship. Even though she lives in St. George, Peyton goes crazy over my mom and dad! So I thought she would love to have this in her bedroom. The best part is that it matches Peyton's room perfectly!

Hope  you all like it and hope you are having a great summer! I have much more to post soon!

Off to movie night with my family! Bedtime Story is such a great movie! Bugsy is my favorite.

Wednesday, July 21, 2010

An Assortment Of Tags!

Hi everyone! I am sorry I have been so MIA lately! It has been a very busy month! I was recently promoted at work and moved to a different department. It's been a great change and an exciting challenge so far. Also, when we aren't at work, my  husband and I have been enjoying the warmer weather with our daughter spending a ton of time outside!!! I so love summer! We have been to a minor league baseball game for the local team - The Bee's {we did this for the Fourth Of July and saw fireworks there!}, up to the Hogle Zoo {Peyton loves the animals!!!}, We went to St. George for the weekend a few weeks ago to visit my parents, Thursday night is softball night for Thong, Of course I saw Eclipse and LOVED it!.... But this has left little time for crafting for sure!!!! And I have been working on this post now for 2 weeks! Busy, Busy, Busy! Summer is great though for that very reason!

My girlfriends and I try to do a card exchange every few months or so. This time we did a tag exchange. It was the first time we have done just tags. It's been an option before, but we still could make cards instead if we wanted. So this time around we each had to make 3 different tags: a boy birthday, girl birthday and then one of our choice. There were 8 of us, so by the time it was said and done, we had to make 3 sets of 8 - 24 tags! So as you all know, I have a really hard time keeping things simple, and tags are no exception for me! So when I did have a moment to craft, it was just working on my tags. I had some late nights for sure. Plus I ended up making another 3 sets for someone who ended up not being able to make hers! I was okay with it because now I have twice the amount back : D. I will probably give the extra set to my mom.

Speaking of my mom, today is her birthday. Happy Birthday Mom!! Love you forever! Thank you for being so great at being a mom and grandma. And thank you for being such a great friend! {This was again typed up 2 weeks ago when it was closer to my mom's birthday!}

I have 6 different tags to show you!

For the first tag, I put my prize from Scrapbook Trends Magazine to good use! I am sad that it took so much of my paper I have been trying to use for my mini albums, but love the results even more!

Here are the pics:


I tried to get a good picture to show off the sparkle and to show the tag says For You. But I couldn't get them to show too well.

I used the following supplies:
  • Cardstock - Stampin' Up! Chocolate Chip
  • Patterned Paper - My Minds Eye Lush line {all patterned paper}
  • Die - Stampin' Up! Tropical Flower
  • Punches - EK Success Real Estate Sign, Stampin' Up! Scallop Trim border
  • Ribbon - Stampin' Up!
  • Buttons - My Minds Eye
  • Twine - Baker's twine - purchased from Etsy
  • Stamps and Ink - Stampin Up! Chocolate Chip and
  • Smooch Spritz Spray Ink - Stampin' Up! Vanilla Shimmer
  • Faux Pearl - Stampin' Up! Cream flat half back - from the Pretties collection {they are now sold in the most recent catalog as adhesive backed and are available for purchase all by themselves. The Pretties kit is no longer available.}
So what I did for the flower was layer 4 die cuts and roll the petals up towards the center. Then I staggered the petals. Then once the card was completely assembled, I sprayed the whole thing with Smooch Spritz. It's my new favorite thing right now!

This next tag was actually the first one I came up with out of all of them. I can't get enough of this bicycle set from Stampin! Up! I thought it would work really well for the boy tags. But I think it could really go for a boy or girl present. It really just has a vintage feel to it. The set is fun because it has this bike, a two-seater bike a tricycle and a saying of Enjoy the Journey, as well as a cool border stamp. It's my favorite from the current summer mini catalog.

Here are some pics:


Here are the supplies used:
  • Cardstock - Stampin' Up! Kraft, Chocolate Chip, Sage Shadow, Very Vanilla
  • Patterned Paper - My Minds Eye, Stampin' Up!
  • Stamps - Stampin' Up! Pedaling Past, Vintage Label
  • Ink - Stampin' Up Soft Suede, Chocolate Chip, Baja Breeze {used on the background paper behind the bicycle. I applied it with a makeup sponge.}
  • Ribbon - Making Memories
  • Brads - My stash {All My Memories and KI Memories, I believe, but not sure}
  • Punches - Stampin' Up! Scallop Border punch, Crop-A-Dial, 1/16" hole punch
The patterned paper matted behind the bicycle cutout is a white cardstock that is glossy on some parts so when you go over it with a brayer or a makeup sponge, you can make the paper any color of ink you  have!!! I love it! I used it too on my Edward Sparkle card on a section. It's a cool way to get the color you want and it works really well with vintage looking projects. There are a bunch of patterns in the pack!

Tag number three used some of the same supplies as the bicycle tag. I made into an actual tag shape.
Of the six different tags I made, this was my least favorite, but it was still fun to make.

Here are some pictures:


Here are the supplies used:
  • Cardstock - Stampin' Up! Confetti
  • Patterned Paper - My Minds Eye {the reverse of the patterned paper was the solid red}
  • Inks - Stampin' Up! - Close To Cocoa craft {mine is all dried out. I was going to emboss the swirl on the background of the tag, but it was too dry, so I just left it and ended up liking it anyway}
  • Stamps - Stampin' Up! {the For You sentiment is from a retired set, but I love the set, so of course I have kept it and use it a lot.} Baroque Motif
  • Ribbon - Stampin' Up! Very Vanilla Taffeta
  • Punches - Stampin' Up! Slot Punch, Designer Label, Crop-A-Dile
  • Die - Stampin' Up! Beautiful Wings
The Beautiful Wings die is really cool because it embosses and die cuts at the same time! It's one of my favorite dies right now!

Halfway through!!! On to tag number four!

This was the first of the 3 tags made to replace the ones my sister-in-law couldn't make. I made them the night before {and day of :D} we got together so I knew I would keep them pretty simple, but I still didn't keep everything extremely simple. It's not me! :D There was still stuff cut out and layers and such. But I really like how the next three turned out! What do you guys think?

Here are pics:


Here are the supplies:
  • Cardstock - Making Memories white
  • Stamps - Stampin' Up! For All You Do, Tiny Tags
  • Ink - Regal Rose, Baja Blue, Crushed Curry, Soft Suede, River Rock
  • Ribbon - Stampin' Up! Whisper White grosgrain, white satin ribbon {my stash}
Onto tag number five! This was the smallest tag I have ever made!!! But I like the results still a lot! I thought it would be perfect for a small little gift bag!

Here are the pics:


The supplies:
  • Cardstock - Making Memories white
  • Patterned Paper - My Minds Eye {Solid red. It's patterned on the side not shown}
  • Stamps - Stampin' Up! For All You Do, expired set that I use all the time, but can't remember the name! {friend sentiment}
  • Die - Beautiful Wings
  • Inks - Baja Breeze, River Rock, Soft Suede
  • Ribbon - brown satin {my stash}
And the last one! I have never made anything so simple before!!!! And I really like it! I go over the top with everything, but I knew I had to keep it as simple as I could.

Here are the pics:


Here are the supplies:
  • Cardstock - Making Memories white
  • Ribbon - white and brown satin {my stash}
  • Stamp set - retired birthday set {argh! Can't remember the name right now
  • Ink - Stampin' Up! Riding Hood Red stamp pad, Close to Cocoa marker
And there you have it!!! Sorry it has taken me so long to post! I am here and not dead, I promise!!! Hope you all like the projects!!!

Here are some more pics!