Share |

Monday, March 26, 2012

Celebrate Birthday Banner

Hi Everyone! Here's a little something I made for Peyton's birthday! Who says a Cricut and Big Shot can't work hand in hand :).


Celebrate!


Once Upon A Princess cartridge made the cute little princesses, cupcakes and presents


The font for Celebrate is from the Cindy Loo cartridge


The penants are from Maya Road


The hearts are from Stampin' Up and are the Hearts Collection Framelits Dies set for the Big Shot.

Here are the rest of the supplies:

Patterned Paper - My Mind's Eye
Cardstock - Stampin' Up!, Archivers
Paint - Plaid
Ribbon - Tulle, May Arts, American Crafts, Offray
Stamps - Tripple Treat flower Stampin' Up
Pearlies - Stampin' Up!
Embossing Folder - Textured Impressions Perfect Polka Dots for Big Shot by Stampin' Up!


Next post I will show you all the cute treat boxes! I loved how they turned out!

Hope you all are great!

Stay Crafty!

Sunday, March 18, 2012

Peyton's Birthday Party

Hi Everyone! Hope you are all good! It's been a busy busy month. I signed back up as a Stampin' Up demonstrator :), had Peyton's 4th birthday, turned 28 {for the 4th year in a row!!} and have been busy with work and play!

So I am finally getting around to posting pictures now from Peyton's birthday. My baby girl turned 4! Where does the time go!

All dressed up and ready to party!

Princess for a day and everyday!

A few of the party guests, just waiting to get their nails painted. Aren't these girls so cute!

It's Peyton's turn! She was last and so patient! Since she was the birthday girl, she even got an extra color on her flowers. 

Back at our house and ready to party!

Birthday girl and her Daddy!

Birthday morning cupcake


We had Peyton's birthday party the day before her birthday, so the next day, she was still able to do a little more celebrating. She got a birthday morning cupcake, had a few more presents to open, and then we went shopping! Malia, my niece, even came with us! It made for a great weekend!

On the next blog post, I'll show you all her fun birthday decorations and party favors! 

Stay crafty everyone!

Saturday, January 28, 2012

Valentine's Cards


Hi Everyone! Hope your new year is going great. I have been playing some more with my Cricut and have been making some Valentine's cards. Once I get these Valentine's projects out of the way, my next project is Peyton's birthday. She is turning 4! And she wants a princess birthday party. No surprise there, right!

Here are the pics of what I have been working on:

I have been having a lot of fun using non-traditional Valentine's paper to make these Valentine's cards.
Happy Valentine's Day card
Cardstock - Kraft Archiver's
Patterned Paper - Happily Lost Lily BeeStamps - heart American Crafts; sentiment Studio GInks - pigment ink American Crafts; Chocolate Chip Stampin' Up!Embossing Powder - clear Stampin' Up!
Ribbon - Stampin' Up!
Border Punch 
- Scallop Border
Pearlie 
- Stampin' Up!
Pins 
- Joann's Crafts
Cricut 
cartridges - scallop squares Accent Essentials

Yep, I broke out my paper crimper to use on the heart for this card!
XOXO card
Cardstock - Kraft Archivers; Very Vanilla Stampin' Up!
Patterned Paper - Happily Lost Lily BeeStamp - Studio GInk - American CraftsEmbossing Powder - clear Stampin' Up!
Twine - my stash
Jewel - Stampin' Up!
Cricut 
cartridges - Heart and Circle George and Basic Shapes; xoxo Opposites Attract

This year's Valentine's sucker cover. I love making these every year!
XOXO sucker cover
Cardstock - Close to Cocoa Stampin' Up!; Kraft ArchiversPatterned Paper - Happily Lost Lily BeeStamp - Studio G Ink - American Crafts 
Embossing Powder - Stampin' Up!
Punches - itty bitty flower and slit Stampin' Up!
Cricut 
cartridges - scallop square Accent Essentials; xoxo Opposites Attract Glitter glue - Martha Stewart Pearlie - Stampin' Up! Ribbon - Stampin' Up!


Yep, it's true. I really do love my Cricut. It's been so much fun and now I can't seem to craft without it. Even for making these tiny cards! And guess what! They actually fit inside envelopes cut from one of my Cricut cartridges. It's hard to tell from the picture, but the cards shimmer from using the Valentine's special edition ink spray from Tattered Angels. It's pink, but when I sprayed it on this black cardstock it just made it shimmery and pretty.
Be Mine cards
Cardstock - textured black and Kraft Archiver's; Very Vanilla Stampin' Up! 
Patterned Paper - type print Stampin' Up!; Yours Truly Echo Park
Punches - itty bitty flower and heart Stampin' Up!Jewels - Stampin' Up!Glitter Glue - red Martha StewartTwine - my stash
Stamp - Studio G
Ink - Basic Gray Stampin' Up!Ink spray - Studio Calico {on Be Mine sentiment}
Cricut cartridges - medium size and large hearts and background shapes Accent Essentials
 

I love the Echo Park Valentine's paper this year! What caught my eye was the more traditional colors used. Although I have been using the Lily Bee paper too to make Valentine's, I knew I also wanted to make some using more traditional Valentine's colors as well. 

Well, I am off. I hope you are all good! 

P.S. I went and saw One for the Money yesterday with friends. I was pleasantly surprised that I liked it as much as I did. The book is awesome, but the movie ended up being pretty good too!

Tuesday, January 10, 2012

Just A Few Cards

Hi Everyone! I just wanted to take a minute to show you the cards I have made lately. I haven't had a lot of time for crafting in the last few weeks. But I managed to do a few cards. Plus I also made my dad's birthday present. It was pretty cute. I neglected to take any pictures though :(. So I will have to post it another time.

Here are the cards:


hello Card
Supplies:
Cardstock - Stampin' Up! Very Vanilla, Basic Gray {textured}, Going Gray
Patterned Paper - Authentique Blissful line
Ink - Stampin' Up! Basic Gray; Stazon Black
Stamps - Stampin' Up! 
Punches - Stampin' Up! Scallop border, Large Scallop Circle, Itty Bitty Flower 
Cricut Cartridges - Once Upon A Princess {hello tag, tea pot}
Ink Spray - Tattered Angels 
Crochet Flower - Imaginisce
Brad and Jewel - Stampin' Up!
Ribbon - American Crafts
Foam Adhesive - my stash

I just love this paper from Authentique. All of the paper that they have come out with is gorgeous! But for some reason, this one seems to be my favorite. I don't usually gravitate to these colors, but I totally love the color combinations. 
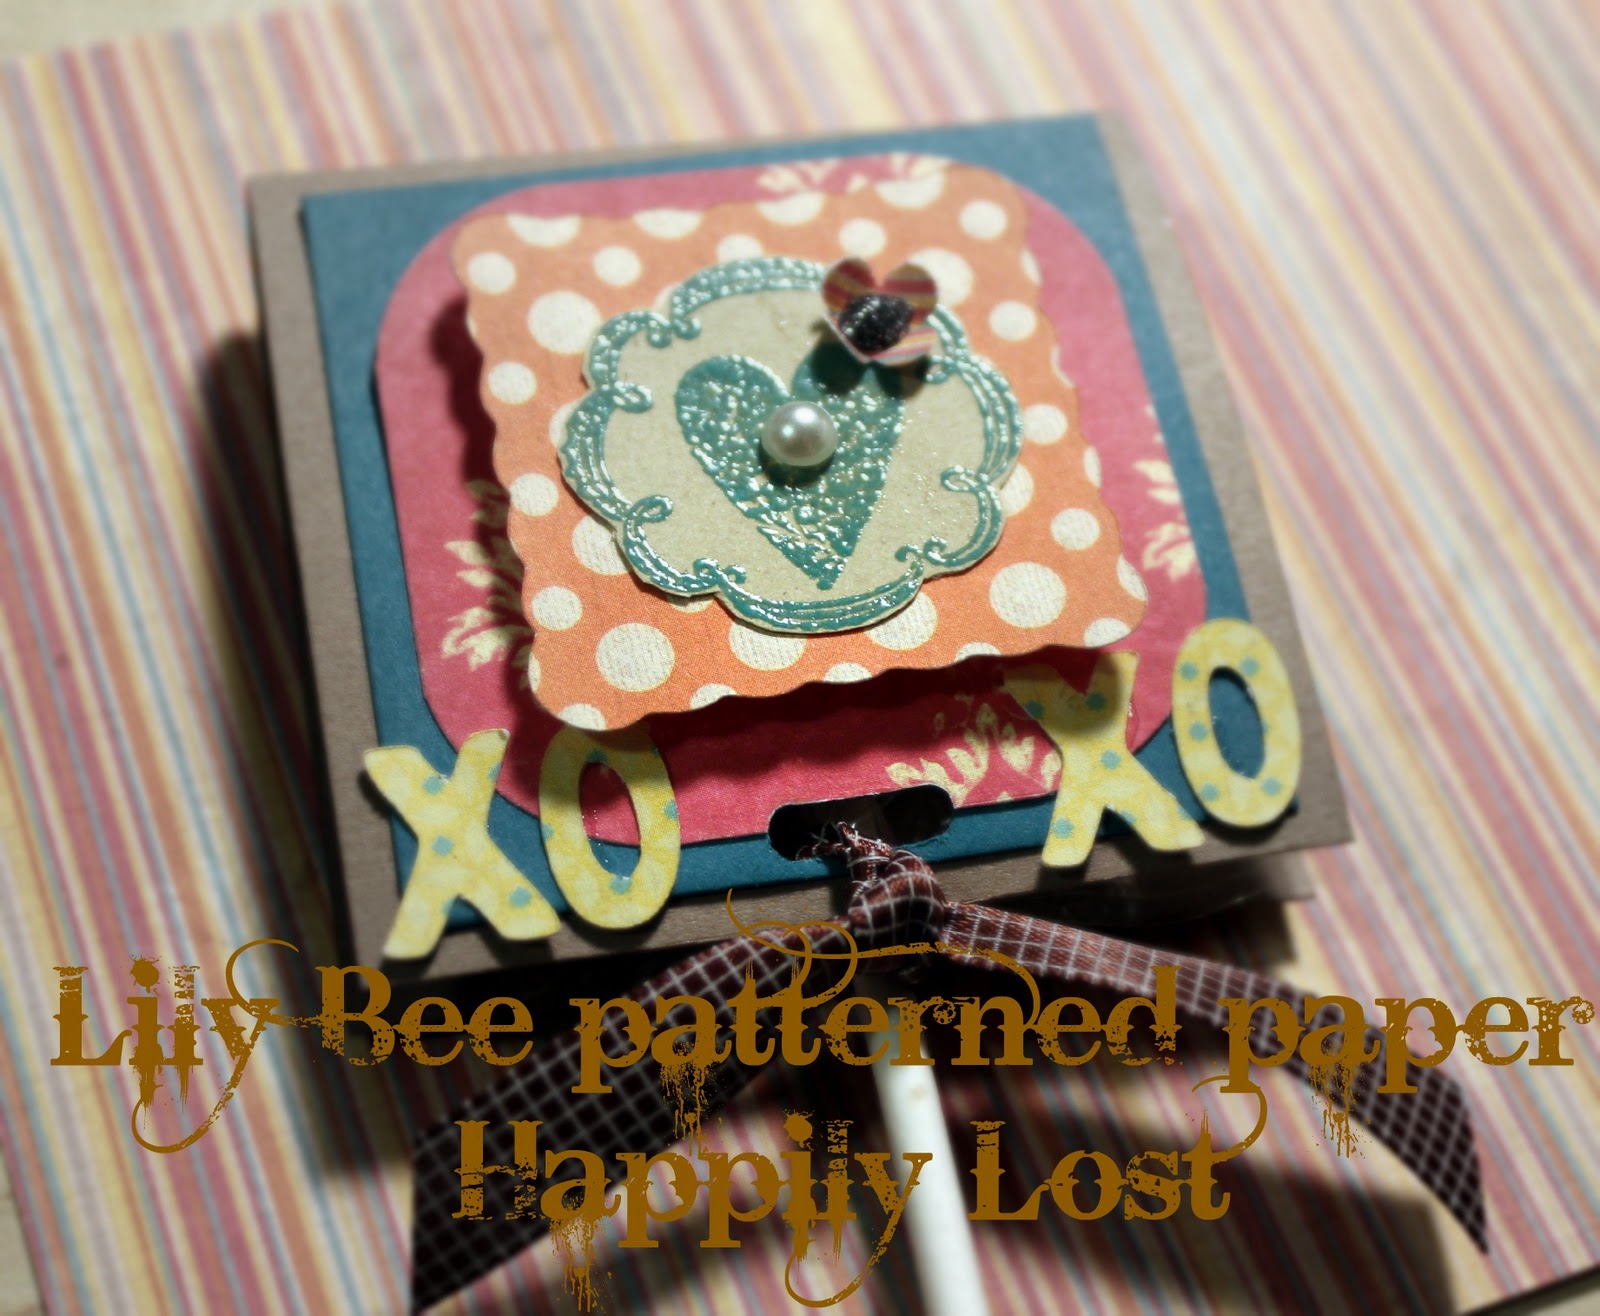

Be Mine mini Card
Cardstock - Very Vanilla, Real Red Stampin' Up!; Kraft Archiver's
Patterned Paper - Echo Park Yours Truly
Cricut Dies - Accent Essentials {scallop circle, large heart}; 
Forever Young {red and kraft tag}
Stamps - Studio G {Be Mine sentiment}; Stampin' Up! Established Elegance {established 1873 sentiment}
Inks - Real Red, Crumb Cake Stampin' Up! 
Ink Spray - Tattered Angels Be Mine
Punches - Scallop Border, Small Heart, Itty Bitty flower Stampin' Up!
Glitter Glue - Martha Stewart
Jewels - Stampin' Up!
Button - Basic Grey
Ribbon - American Crafts; Stampin' Up!
Liquid Glue - Crystal Effects Stampin' Up!

This year I had a hard time choosing the Valentine's paper that I wanted. That is until I saw the line from Echo Park. I loved the other brands I saw, but I LOVE this Echo Park line. It's just fun and I love the traditional color scheme. I am sure this is not the only project I will be using the products for. 


Thanks So Much Card
Cardstock - Very Vanilla Stampin' Up!
Stamps - Established Elegance, {Thanks So Much sentiment} Stampin' Up! 
Inks - Island Indigo, Crumb Cake Stampin' Up!
Spray Ink - Studio Calico Mister Huey's Clay
Jewels - Reflections

This is a very simple card for me, if you all don't know already. It takes a lot for me to not piece a card together. When I got my new Island Indigo stamp pad, and my new Established Elegance stamp pad from Stampin' Up! however, I got inspired to simplify just a bit.


Happy Valentine's Day Tag
Cardstock - Kraft, Jet Black textured Archiver's; Very Vanilla Stampin' Up!
Patterned Paper - Echo Park Yours Truly
Cricut Cartridges - Once Upon A Princess {Envelope and Tags}, Accent Essentials {Large Heart, scallop circles}
Punches - Itty Bitty flower, Small Heart Stampin' Up!
Stamps - Happy Valentine's Day sentiment Studio G; flourish Stampin' Up! Embellished Elegence
Inks - Real Red, Basic Gray Stampin' Up!
Jewels - Reflections
Glitter Glue - Martha Stewart
Ribbon and Twine - Basic Gray satin Stampin' Up!; twine is my stash

When I saw the cute envelope and tag on the Once Upon A Princess cartridge from Cricut, I knew it was only a matter of time before I attempted to do something with it! And it didn't take too long after all! I love this darling envelope and tag. I will get plenty of use out of it for sure!!! And, yep. Used more of the Echo Park paper for this one too. I really just absolutely LOVE it! 


I know I keep mentioning the Cricut cartridges I have been using on all my projects lately. But I haven't mentioned the fact that I got a Cricut! :). I borrowed my friend Marci's Cricut to work on my sisters shower decorations. I fell in LOVE with it, told my mom and then she got me my very own! I was debating whether to upgrade to the Cricut Mini but I like the fact that I don't have to plug this one into the computer. I want to eventually get a Cricut Expression. A girl can dream :). 

I am lucky to be able to borrow cartridges from Marci and also from Thong's cousins, Thia and Bea. I have purchased a few on my own, and also got clobbered on Black Friday at a local store who was selling them for $10!!!! I got three that morning {after waiting in the freezing cold for 4 hours}, one of which wasn't really one I wanted, or one that I have yet to use. Since then, I have purchased two more since then - Once Upon A Princess {MY FAVORITE} and Cindy Loo {Love the font on this cartridge!}

I got it early and was supposed to wrap it and put it under my tree. Somehow though it ended up straight up in my craft room instead, open and turned on with a cartridge just waiting to be used! What can I say, I used it right away :). It was practically begging me to anyway, right!


I have got to show you all this adorable pin cushion {you can see the ones that Amber made me, and one that I made right behind it}. I didn't make this most adorable pin cushion ever! No, that was made by Thia, my husbands cousin. I fell in love with it right away! Could you just die! :)

Hope this year is coming along great for everyone. I admit, it hasn't all been roses, but it has been good! I have a new addition to my family. His name is Jack and he is such a cute little happy guy! He belongs to my sister and her husband. He is just a few days old, but is loved immensely already!


Peyton couldn't wait to meet her new baby cousin and hold him for the very first time. She is already planning games for them to play when he gets a little older. I told her it may be a while, and she said she will wait! :) 

Talk to you all soon!

Sunday, January 1, 2012

Once Upon A Princess

Once upon a time...

There was a little girl who said when she grew up that she wanted to be professional soccer player, tooth fairy, dentist, doctor, and of course a princess. When her family would drive by the large professional soccer stadium she would tell them how much she longed to play there someday. She was a happy girl who loved to dance, sing, dress up, watch movies about fairies and longed for adventures. Cinderella was her favorite princess in the entire world and her favorite color was blue. She loved blue so much she would make her mom go to the blue doors at Super Target any time they went there! She was all ready to be a "big girl" and told her mom she was no longer 3 but 33 years old. She dreamed of big celebrations to spend with her family and friends. She spent lots of time making decorations and invitations for her events. She played hard and loved everyone around her.

The End

I know all mothers think their kid is the best kid in the world. I am by no means the exception. I love how much Peyton loves life and loves her friends and family. She is such a happy girl and she makes me happy that I am her mom.

My Cricut has been a lot of fun already in the short time since I have had it. Although I have mostly done Christmas stuff at this point, I have made a scrapbook page, some cards, and am also currently working on a project for my dad's birthday next week. Peyton's birthday is coming up in February, so I am going to start working on party decorations as well. She wants a princess party, no surprise there :). Right after I got my Cricut, since I only had the cartridge it came with, I ended up purchasing 2 more {not counting the 3 I got trampled for on Black Friday}. One is Cindy Loo. That cartridge has such a fun font!!! I've now used it on a few projects already. The other is Once Upon A Princess. This is such a fun cartridge for all things Peyton! I instantly knew that it would inspire projects for Peyton's birthday party to her bed room, and even some paper dolls for her to play with. I had been working some sort of wall hanging out in my head for the last few weeks since I had got the cartridge, but it took seeing the special issue of Cricut Magazine Home Decor, to get the gears really moving.

Here is what I came up with:


Yep, still addicted to these junk bows. Thanks Amber! :)


A few years ago, I had to ground myself from a little local store called The Wood Connection. I LOVE it! It's full of unfinished wood projects and such. I got the frame from there. It's been sitting in my craft room closet just waiting for me to use it. Hence, the grounding due to excess products purchased there that I have yet to use all of. But I am glad I finally had the perfect use for it. A few years ago - actually 2007 - I posted some small magnet boards. Those were actually purchased from The Wood Connection.

Anyway, here are the supplies used for the frame:

Paint - Acrylic cream
Stamps - Pebbles, Inc.; Stampin' Up!
Ink - Stampin' Up! Chocolate Chip, Baja Breeze, Soft Suede, Old Olive
Ribbon - American Crafts; Stampin Up!; tulle is my stash; Close to My Heart
Cardstock - Stampin' Up!
Patterned Paper - Echo Park; Stampin' Up! {only on junk bow}
Cricut Cartridges - Once Upon A Princess {Princess, butterflies, large scallop border, rose}; Cindy Loo {flourishes, Font}
Punches - Itty Bitty Flower, Tiny Heart Stampin' Up!
Glitter Glue - Stickles
Flair - American Crafts
Jewels and Pearlies - Stampin' Up!
Paper Doily - Wilton


To make the frame "dirty" I take a sponge and cover it in ink - same as when I distress a piece of paper - and then I rub it all over the wood. This is of course once it is painted and the paint is dry. I love the effect. It makes an instant impact.

For the month of December, local paper craft company, American Crafts, had a warehouse sale. I guess they do the same thing every year. I have mentioned many times how much I love their stuff. So I knew I would have to make the trip at least once. I was pleasantly surprised at how much great stuff I found and at such great deals. It's actually where I got all the Crate Paper patterned Christmas paper from. I also got some cheap clear stamps, {we are talking $2 for sets normally $6} including the princess phrases I used in this frame. I also got tons of ribbon. They were ridiculously low {40 spools for $5!}. I even got a large 12x12 paper trimmer there for $8. They had great deals on scrapbooks, inks, Thickers and all kinds of things. Can't wait to check it out next year for sure!


Hope you are all enjoying your holiday week! Happy New Year!

Linking to Paper Issues

Saturday, December 31, 2011

A Little Christmas Cheer to End the Year

Hi Everyone! Yes, yes, I know Christmas is over. Thing is, I have had these pics on my camera for a few weeks and haven't had time to post. So here it all is!

As I have been saying and saying, I want to make a Christmas village. So I made another house to go into it. It doesn't fit the same theme of papers as my house from last year, but I figured it was how all the houses will end up being anyway. As much as I love the one I made the one I made last year, I LOVE this one even more!

Here are the pics:


I am totally in love with picnik. It's so easy to use, it's free and it's tons of fun. As you can tell from the pictures, I was playing around with adding the words to my photos. Not to mention this paper from Crate Paper makes me want to use the 1960s photo edit to every picture of projects made with it! 

Here are all the supplies used to make the house:

Deco Podge House - Hobby Lobby {mid size}
Patterned Paper - Crate Paper
Cardstock - Stampin' Up! Chocolate Chip {used for reindeer}
Mini Ornaments, Bells and Lights - Michael's Crafts
Mini Jingle Bells - Stampin' Up!
Baker's Twine - my stash
Ribbon - Stampin' Up, Michael's
Cricut Cartridges - Cindy Loo {reindeer reins, flourish below roof}, Christmas Cheer {sleigh, reindeer, wreath}, Forever Young {flower on Santa's sleigh}
Pre-made Cutouts - Crate Paper {Santa and Tree}
Jewels and Half Pearls - Stampin' Up!, Reflections; Doodlebug Designs
Border Punches - Stampin' Up!, Martha Stewart
Punch - EK Success {corner rounder to make large scallop trim below roof}
Glues - Mod Podge, Crystal Effects, glue gun


Well, I hope everyone had a great Christmas! We sure did. I asked Peyton what her favorite present was and she said, "Everything Mom. I love everything!" It made my Christmas for sure.

Happy New Year!

Linking to Paper Issues

Monday, December 19, 2011

Thank You Cards Bundle

Hi Everyone! I made these thank you cards a while back. They were a requested order. I think they turned out pretty cute. I love small cards, as I have said many times before. These cards are all made by Stampin' Up! And they have coordinating envelopes for each that fit perfectly. They are all retired cards, so you can't order these particular ones anymore. But they still do have some currently in their catalog.

Here are the ones I made:

Stampin' Up!; Cricut, Baker's Twine, October Afternoon

Stampin' Up!

Stampin' Up, Cricut, May Arts, Target $1 Spot

Stampin' Up!; October Afternoon; My Mind's Eye; Cricut


These cards were all really simple and fun to make. My favorite turned out to be the button one. But I actually loved all of them.

I have Friday off this week, so 4 more working days, then 4 days off!!!

Sunday, December 18, 2011

Packaging and Sugar Cookies - What Could Be Better

Hi Everyone! Are you all ready for Christmas? I'm getting close. A few loose ends to tie up. But lots and lots of presents to wrap.

Last night, my mom had me wrap a present for her work Christmas party. What's inside is pretty cute, but I think the packaging turned out pretty cute too!!!!


Thanks to Amber, I am obsessed with making these bows on anything I can. And then I have been having more fun adding mini ornaments or regular size ornaments to them! I like to add some of the tinsel ribbon and silver elastic cord too. Or even baker's twine. I add as much ribbon and tulle as I want and always a little bit of type style paper, or a book page. Sometimes I will distress the paper with ink. A lot of times, I have just left it plain. The last touch is usually a little tag of some kind. And walah! There you have it! A fun and festive package just ready to be given away!

So this week, Peyton and I made sugar cookies. It was a lot of fun and very messy!! She wasn't crazy about frosting the cookies, but she loved the cookie cutter part, playing in the flour and topping the cookies with sprinkles! Okay, love is an understatement! She went crazy and went through a whole bottle of sprinkles. It was pretty funny.

It started off calm. Peyton didn't like the sour cream frosting, so I frosted some with chocolate frosting just for her. 

She decided on the pink and purple Barbie sprinkles that we still had. And then she wanted to mix it up with the Christmas sprinkles too :).

It is so hard to get a picture of Peyton looking at the camera. She just doesn't do it usually. All of our tricks to get her to, usually fail. So she sort of has scary eyes in this picture, but she is actually looking at the camera!

There ended up being more sprinkles on the plate than there were on the cookies!!!! It was pretty funny. And really pretty cute.
We are making cookies this week for the neighbors, so wish me luck that I don't run completely out of sprinkles before we get them all done! This time around I am making gingerbread cookies! Yum, yum!

Hope you all have a great last week before Christmas! 


Sunday, December 11, 2011

Christmas Banner

Hi Everyone!

Hope you are all having a crafty and wonderful holiday season. Last night we took Peyton to see Christmas lights at Temple Square. It was cold, but we bundled up warmly and had a lot of fun. It has been a while since we had ventured downtown Salt Lake so it was great to see all the changes that have been going on there. It's going to be really nice when it's all finished. Hopefully it will help bring back small businesses when it's all finished too. All the construction didn't stop there from being Christmas decorations everywhere!!!

So for my sister's baby shower, I borrowed my friend, Marci's standard Cricut. She also let me use some of her lettering cartridges. They came in super handy. And I admit, I totally fell in love with it! So I started talking to my mom about it, and sure enough, that's the very thing she got me for Christmas! I got the standard Cricut too, thinking of price and portability as the key factors. After I had it, I started looking more and more into the Cricut, and found a brand new one they came out with recently called the Cricut Mini. So I have decided to list mine for sale - along with a few other things - on the local classified listing site, ksl.com. And then I am going to get the Mini. I am pretty excited either way though.

But enough about that...

I have been a busy little beaver making all sorts of fun things with my Cricut. Thanks to being trampled on Black Friday, for $10 cartridges, borrower some from Marci, and my hubby's cousin's Bea and Thia, I have been able to do quite a lot. I went down to the American Crafts Warehouse Sale that is going on this entire month and picked up really cute paper by Crate Paper super cheap. I brought it home, and made a darling banner with it!!!


What I love most about the Cricut is how much you can do with just one cartridge.

Supplies Used:

Cardstock - Bazzill Basics Textured, Stampin' Up!
Patterned Paper - Crate Paper
Die Cut Machine - Cricut
Cartridges - Christmas Cheer,
Ribbon - Mostly my stash, May Arts, Stampin' Up!, Offray, tulle, American Crafts, baker's twine, stretchy silver elastic cord is from Stampin' Up!
Little Somethings - bells Stampin' Up!; Red Jewels Reflections; button Autumn Leaves
Adhesives - 3M glue stick, glue gun, foam adhesive, Crystal Effects from Stampin' Up!

Cutest Tree Hugger Ever!
Peyton loved all the lights, but she was slightly disappointed by the lack of blue lights! I know, she is pretty silly. So when we found some blue trees though, she was pretty excited. She ran right up to one so we could take her picture in it.

The Reason for the Season
Part of the road was converted into this garden at the side of Temple Square. It was sort of a big controversy here when it all happened. Literally, the road was torn out and a garden was put in, so traffic has to go around now to get down the road, instead of being able to go through like they used to. I have to admit, it is rather beautiful though. And right now, with it being Christmas and all, they have the big tree, you can see in the distance, plus animals, shepherds, Mary, Joseph, baby Jesus and lights everywhere. I love the little bubble lights on top of the water. Those were my favorite. I was really happy, that despite all the people around, I was able to actually get this photo. It's so peaceful and it's such a great reminder what all the fuss around this time of year is actually all about.

Hope you are all enjoying your holidays this year!! Merry Christmas!

P.S. All the photo editing was done using picnik.com. Check it out! It's a great site and it's free!