Share |

Sunday, October 2, 2011

Halloween Time!

I truly love fall! I love the cooler temperatures. I love the changing leaves. I love the warm colors of fall and Halloween decorations. I love pulling my sweaters out of storage. The only thing I don't love about fall is the shorter days. I am a lot better than I used to be, but I used to have a really hard time with the days getting shorter. Not so much anymore.

I got my Halloween decorations out last weekend! That has to be a record for me, right! Two things prompted me to get them out this early though: My cute new Halloween advent calendar, and my fun jars that I made, well I added to them.

First, here is the advent calender:


I found this super cute advent calendar up at Swiss Days. It's a local celebration that takes place up in a city called Midway, about 20 minutes south of Park City. It happens every year during Labor Day weekend. It is filled with hundreds of local craft booths, wrapping paper booths, bakery items, Navajo tacos {lovingly referred to as Swiss tacos} children's clothing, Halloween costumes. This is just the tip of the iceberg. There is so much fun stuff there! And it's 2 days of shopping fun! It's so big that it has busted out of the original square from where it takes place and has booths across the street on the north and south side of the square, as well as down the street!

This year, a camera crew from HGTV was there even to film some of the fun and more original stuff. So so so fun!

The advent calender is all handmade! Hand cut and hand sewed. How cute is it! They had plush nativity scenes, church books, finger puppets and all sorts of fun things. They had Christmas advent calendars too.

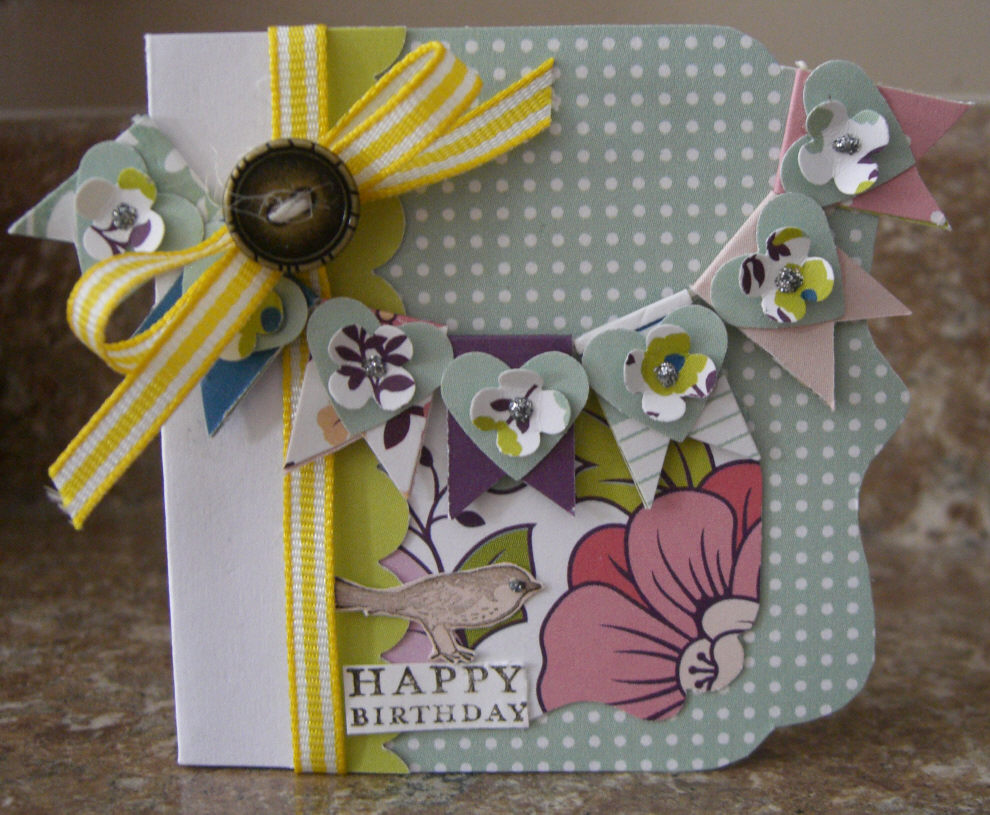
So as I mentioned there were 2 things that prompted me getting my Halloween decorations out already. The other was some super cute jars - also purchased at Swiss Days!

Here are the jars:


The jars came with the candlestick bases and lids. What I wanted to do was make sure I could use them all year long. So everything comes off very easily. The other thing I wanted to do, was make them decorated from both sides. From this view the jars spell BOO.


Sorry, this pic turned out blurry. It's the only one that I have. The little saying says "Things that go bump in the night"

Here is the B.


And then this is the back side of the B. The image is a witch that says "broom rides 25 cents" and then there is a pic of a witch. I thought it was pretty cute!


First O Jar. In order to get the letters to stand up inside the jars, and in the middle, I attached each one to transparency sheets. I stamped spiders on them in black Stazon Ink, as well. Then the candy corn works to hold up the transparencies. Hard to tell from the pic though.


Here is the backside of the first O.

And then the last O.


Sorry, again with the blurry pictures. I thought I was done with that :). This is the backside of the last O.

Here are the supplies:

Patterned Paper: Echo Park, Authentique, Fancy Pants
Cardstock: Stampin' Up!
Punches: Stampin' Up!
Score Board: Martha Stewart {to make the banner}
Ribbon: Stampin' Up! My Mind's Eye. {the white lace ribbon and wine came on the jar :)}
Stamps: Stampin' Up!
Inks: Stampin' Up!
Dies: QuicKutz, Spellbinders


The Hello Kitty basket is what I pass out Halloween candy in. I haven't been home for the last few years though so we haven't passed out candy. The ceramic pumpkin was made by my grandma :). I know you can't tell on from the pic, but the tree has flashing lights on it that are candy corns! I love them. I got the cute little pumpkin at Tai Pan Trading this year. The little dish is filled with a candy that I didn't love, in fact despised, until this year! Candy Corn!!! The runner was made by my mommy, and is Hello Kitty Halloween :).


The spider is also from Tai Pan. I LOVE that store!


These BOO letters were made about 4 or 5 years ago for a class that I taught. The style is sort of outdated already. But I still love them. All supplies are Stampin' Up! {do you like my rice cooker in the background :).}

And here is the other side of my living room:


I made the banner that says "SPOOKY" last year. A few things here stay up all year long - the drawers, glass jar on top of them, and usually the stripped vase.

The little scary guy was from my dad, to Peyton! You press his belly and his eyes turn red and he makes a screechy noise. It's pretty funny and Peyton is terrified of it! The skull garland, small black glitter Boo, and spider on the far right side is from Tail Pan. the white jack-o-lantern and big metal pumpkin are from Rod Works. The glass pumpkins are from Walmart. The banner from last year, is partially also from Tai Pan.

Here are some closeups:


Hope you all had a great weekend and have a great fall season as well!

Sunday, August 28, 2011

A Shadowbox For Peyton

Sorry, I know it's been a few weeks. My post from last week got delayed because I was getting ready for a garage sale. This week has been a lot of purging, pricing and Pride & Prejudice! Alright and a lot of Twilight and, New Moon, and Eclipse. What can I say, I watched the movies a lot this week!

And as I am typing, I am watching Breakfast At Tiffany's - one of my all time favorites. I love everything of Audry Hepburn's that I have seen. Some day when I grow up, I want to be just like her :).

My garage sale went great! I sold a few hundred dollars and then the rest went to the thrift store. Not too bad. I want to buy a sewing machine, so we shall see what will come of that.

A few months back I went to crafty night with my friend Trudie, who I also work with, and I made something for Peyton's room. It's a shadow box. You know the darling little tiny shadow boxes from Maya Road? That's what I used. I love how it has the square chipboard pieces to fit in the back of each section, so you can decorate those and then stick them right in the spot. That also allowed me to move the pieces around until I got each of them just where I wanted them.

I painted the shadowbox a light turquoise/blue color. Peyton is obssessed with blue, so it had to be blue! And it matches her room. Turns out the paint was a few years old so it was pretty thick and didn't go on so smooth. It actually added to it and made the whoel thing look like I painted it a few years ago. Not intentional at all, but it worked out into my favor. The scallop trim at the top is the endge of Sassafrass paper. I love their paper, don't you! The top banner is American Crafts and Sassafrass paper. I made it by cutting strips of paper, folding them in half, cutting the ribbon edge into them and then glueing heart and flower punches onto each section. The whole thing is strung on twine. It's currently my favorite thing to make right now! I can't get enough of these banners!!! {If you remember, I did one on the picture frame I showed on the last post}.

Here are the supplies and photos - Square by Square:


Square 1 - Old Olive cardstock Stampin' Up!; Sassafrass, American Crafts patterned paper; Pink and White bakers Twine My Mind's Eye; White and Yellow headpins Joanne's Crafts; EK Success border punch, Bird punch Stamin' Up!; Polka-dot embossing folder; pearlies Stampin' Up!


Square 2 - patterned paper Sassafrass, American Crafts; Ribbon Stampin' Up!; thimbal; Scallop border punch Stampin' Up!.


Square 3 - patterned paper American Crafts; ribbon Stampin' Up!; dress stamp Dear Lizzy for American Crafts; heart button Stampin' Up; pearlies Stampin' Up! Scallop border punch Stampin' Up!


Square 4 - patterned paper Sassafrass, American Crafts; punches Designer Label Stampin' Up, Scallop Trim border Stampin' Up! Heart and flower punches Stampin' Up!; Butterfly stamp American Crafts; Pearlies Stampin' Up!; Baker's Twine Martha Stewart.


Square 5 - patterned paper American Crafts, Sassafrass; Martha Stewart glitter glue, Stampin' Up! polka dot brown ribbon, yellow lace my stash, Martha Stewart baker's twine; Stampin' Up! Itty Bitty Flower punch.


Square 6 - patterned paper American Crafts, Sassafrass; baker's twine American Crafts; Stamps American Crafts; Inks Stampin' Up!; Flower Prima Marketing; Scallop circle punch Stampin' Up!; border punch EK Success.


Square 7 - patterned paper American Crafts; Ribbon my stash. Scallop border and scallop circle punch Stampin' Up!; blue flower Prima Marketing.


Square 8 - patterned paper American Crafts, Stampin' Up, Sassafrass; Ribbon Stampin' Up!; Baker's twine American Crafts; Stamps Dear Lizzy for American crafts; Scallop border and designer lable punch Stampin' Up!; Button American Crafts; flower dies Sizzix Bigshot for Stampin' Up!.


Square 9 - patterned paper Sassafrass; scallop circle punch Stampin' Up!; polka-dot ribbon American Crafts; Scallop circle Stampin' Up!; Itty Bitty Flower punch Stampin' Up!; tea cup stamp Stampin Up!; Martha Stewart glitter glue; pearlies Stampin' Up!; clear button Basic Grey.

Sweet Lable - stamps Stampin' Up! {lable} Dear Lizzy for American Crafts; Inks Stampin' Up!; flowers Itty Bitty Stampin' Up!; blue jewels Doodlebug Designs.

Top - {See above for scallop border and banner details}. Ribbon May Arts and Stampin' Up!, my stash {yellow ribbon}; flower Prima Marketing; bird and birdcage charm Prima Marketing.

So when we went to Costco the other day, they had out princess Halloween costumes. Peyton has been saying that she wanted to be a butterfly. Well once she saw the princess costumes that all went away!! There was Cinderella, Tiana, Sleeping Beauty, Ariel, Barbie Princess and Snow White. Of course Peyton wanted Cinderella, but that would be #4!!!! So she decided upon Snow White. And she looks so cute in it, if I do say so myself! What do you all think?


One last thing before I head out. Peyton told me the other day that she wishes the workers on our house would come back and paint her room blue! Blue is her absolute favorite color! And Cinderella is her most favorite princess. So now she wants her room blue. I told her sorry, but repainting her room was not an option right now. My mom found the blue paper lantern in the photo below and got it for her bedroom. It's super cute and would be fun to add a light to. But I think it's cute as is too. I want to make some smaller balls to hang next to them. But it adds a fun splash of turquoise blue to her room in the mean time. And she loved it too!


I am off! Hope you are all enjoying this busy time of year!

Happy Crafting!

Monday, August 8, 2011

Receipt Holder and Picture Frame

Hi all! Hope you have all had a great first half of 2011! Sorry I have been in cyber oblivion. Thanks to Amber, I am getting my butt in gear and posting again!!! I have not crafted a lot. But I did make some fun stuff for my bed room and thought I would show you all.

Let's start with the receipt holder:


Are you all just as in love - and obsessed - with 7 Gypsies as I am! When I saw the vintage receipt holder, I knew I had to have one! Notice something different about mine though???? It comes black! I spray painted it this cream color. When I have it all finished I will show you what the back still looks like. I have 4 more spaces to go though, so I can't wait to get it finished!

Here is a rundown of supplies though in the mean time:

Paper - My Mind's Eye, Fancy Pants, Stampin' Up! {cardstock}
Stamps - Stampin' Up!, My Mind's Eye
Inks - Stanpin' Up!
Dies - Sizzix for Stampin' Up!
Punches - Stampin' Up!, EK Success
Buttons - Stampin' Up!, Bazzill Basics, My Mind's Eye
Glitter - Stickles
Brads - My Mind's Eye
Paper Doilies - Darice
Ribbon and Twine - Stampin' Up!, Martha Stewart, my stash
Pearlies - Stampin' Up!

As you can tell, I still have some work to do on it. But it will be so pretty when it's all finished :). I have my bed room as the last room in my house to decorate. So I figure it's about time. I have been wanting to do black, cream and blue for the colors. I wanted a black and cream damask for the bedding. But I haven't been able to find scrapbook paper to match my color scheme. So I have decided to go for brown instead of black. I think it will transition better with some of the furniture pieces that I already have anyway. And I love brown. I also don't want just a straight plain old blue. I have been trying to find a good balance between turquoise and country blue. I want that pretty bright blue that looks great on furniture and so many other things. So I have a few things down and am on search now for fabric for bedding. Can't wait to get it all together!

Before I go, here is one last thing:


This frame was super easy and inexpensive to make. I bought it thinking I was going to paint and distress it. But when I changed my mind on the color scheme for my room I realized it was perfect the way it was. It cost me $6 at a local home decor store here called Rod Works. They have great furniture and decorating pieces. A lot of my house is decorated in their products :).

Here are the supplies:

Paper - My Mind's Eye, Fancy Pants, Stampin' Up! {cardstock}
Punches - Stampin' Up!, EK Success
Ribbon and Twine - American Crafts, Martha Stewart
Stamps - Stampin' Up!, My Mind's Eye
Inks - Stampin' Up!
Glitter - Stickles
Charms - Prima Marketing

The whole thing took me about an hour to put together. It probably would have taken me less time, but I was totally engrossed in Keeping Up With the Kardashians at the time :).

An interesting side note - Peyton, my 3 year old - took the picture of my DH and I! Not too shabby of a job, if I do say so! We have a lot of fun in the summer. We go from city carnival to city carnival. Hit up some sporting events and love to watch as many fireworks shows as we can. This picture was taken at a Bee's Baseball Game - the local minor league team. Baseball games are one of our favorite things to do in the summer! This time we even got tickets right behind home plate! I have to say, it was my favorite spot that we have ever sat at. Peyton even made friends with the cute boy in front of us, whose name happened to be Easton. She was so excited that it was the same name as Amber's cute little girl!

Alright crafty chicks! I am signing off for the night. Hopefully I will be back soon. I am working on posting once a week, so I will be back shortly for sure!

Happy Crafting and Happy Summer!

Monday, March 28, 2011

Next Card Kit

Hi everyone! Hope you all had a great weekend. I had a busy one but still it was good.

On my last post, I showed you all the next card kit I am listing on Etsy. But I decided to try something a little different out of my normal kit process this time around. I always get idea overload and come up with several concepts that I want to attempt. But because of time, most of them get pushed back. So what I decided to do this time was to create a few cards at a time, and then make the kits for each card at once. That way I can still use my creative energy to make the cards that I want to in this moment, get them out of my system, and finally move onto creating the kits. I am hoping I can then start the cycle over again. So I plan to make 5 cards in this particular series - so far that is how many I have planned out in my head; we'll see how that goes though - before I start making the kits. Designing is always my favorite part anyway. And seems to take up most of my time. So cross your fingers for me and here's hoping! :)

So I continued with the same sketch to come up with this next card. I do have to say though that I made the dimensions 4 1/4x3 this time, just to try to get more use out of one sheet of cardstock. I am still LOVING this Echo Park paper line - and as I mentioned above I am trying for a series here - so I stuck with that patterned paper. For the stamp image, I went with Stampin' Up! of course, as well as for the embellishments, punches and cardstock.

And here is the card:


Amour Eiffel Tower card:
Cardstock - Chocolate Chip, Very Vanilla Stampin' Up!
Patterned Paper - For the Record Echo Park
Stamps - Stampin' Up!
Ink - Early Espresso, Crumb Cake Stampin' Up!
Button and Bling - brown button and half pearlie Stampin' Up!
Ribbon - 1/8" Old Olive Stampin' Up!
Punches and Die - Small Heart, Scallop border, Designer Label, butterfly {embosslit die} Stampin' Up!
Adhesive - glue stick 3M; Continuous Line Glue Dots; liquid adhesive Crystal Effects Stampin' Up!

I thought it would be fun to make the focus of the card not fit on it entirely. So that is why I kept with the smaller card and made the main section taller than the card itself. And I do have to say, I like the results. It was fun to experiment with going outside of what I normally do. Another thing I don't usually do is mat the main stamped image, but again, I wanted to try to get out of my comfort zone a bit. Although I don't love that part of it, I like the color the mat provides, as well as helping with the overall flow of the card. So my gut told me to leave it. :)

Hope you all are good and staying crafty! I am off!

Wednesday, March 23, 2011

Best Wishes Echo Park Mini Card Kit

Hi Everyone! Thought I would show you my next card kit to go on Etsy. Is it just me or is there not enough time in the day! I wish that I could get more kits made. Oh, well :).

So I am still liking to make small cards for my kits. But I thought I would try a different size besides my standard 4" square card. So, okay, it's still 4". But I did 4"x3". Ha! Talk about a variation! :). But I do have to say, I was pleasantly surprised.

Here is the card:


Best Wishes Card Kit W/Echo Park paper:
Cardstock - Very Vanilla, Soft Suede Stampin' Up!
Patterned Paper - For the Record Echo Park
Stamps - Stampin' Up!
Ink - Soft Suede, Early Espresso, Marina Mist Stampin' Up!
Punches - Scallop border, Designer Label, Itty Bitty Flower Stampin' Up!
Mini Clippie - Stampin'  Up!
Twine - My Stash
Ribbon - cream grosgrain My Stash
I think it is safe to say, I have finally joined the Echo Park band wagon. As much as I have loved all the lines that I have seen, I am already a huge American Crafts fan, and I feel like a lot of their lines look like American Crafts - even though they are super super super cute! But I found a line of theirs today called For the Record. It has my name written all over it! It's so shabby and pretty and reminds me of my grandma :). I can't wait to see everything I can come up with now!

As for the shabby stamp set above - it's actually a combination of 3 - the pretty birdhouse and "no. 147" is a Stampin' Up! set that I have been debating for quite some time of whether I should get it or not. Well I finally bit the bullet, and I love it!!! I admit, I don't love all of the stamps in the set, but I have a few like that anyway. The set is called Nature Walk and it is in the current mini catalog. The bird is from the Sale-a-Bration set, Bliss. And the Best Wishes stamp is from the Vintage Labels set that is now retired. As you all know, I am a Stampin' Up! girl, through and through! The images of their stamps are consistantly top notch. And the quality of their stamps is amazing. In my opinion - :) - there are only a few other brands that I think are as good of quality. Okay, there is my 2 cents! I promise that is all for the night!

Hope you all like it. When I get the kit put together, I will post it on here. And of course on Etsy to sell.

Linking up to:


Have a great night everyone!

P.S. While I am thinking about it, have you all been watching American Idol! How do you choose a winner?? They are all so good! Paul is probably my favorite. And then Lauren Alaina. But I love almost everyone!

And last thing, have you been watching Outragous Kid Parties on TLC? $30k for bday parties. Who does that kind of thing? Well apparently 2 families here in Salt Lake, plus other families across the country. I don't get it!

Alright, off for the night, I promise :). Have a great one!

Monday, March 21, 2011

Stampin' Up! Club Swaps - Owl Boxes

Hey Everyone! So Amber, Marci and I go to club once a month at my Stampin' Up! Upline's house. Cindy has a great blog. Check it out if you get a chance. A few months back Cindy started a swap with her club members. As you all know, I love to make mini cards. When Cindy sent out the first email to give the details, she specifically said to make FULL SIZE cards. He he he! So I did, just like a good girl. But this time around, I decided to not make a card at all! I got a petal box die last month, so I decided to make boxes for everyone.

Here they are:

Counter curtosy of Amber Lafata! :)

Owl For You Petal Box:
Cardstock - Real Red, Kiwi Kiss, Very Vanilla, Chocolate Chip Stampin' Up!
Patterned Paper - My Mind's Eye
Stamps - Stampin' Up!
Ink - Old Olive, Chocolate Chip Stampin' Up!
Punches - Owl and Itty Bitty flower Stampin' Up!
Die - Petal Box Sizzix for Stampin' Up!
Liquid Glitter - Martha Stewart
Baker's Twine - My Stash
Jelly Beans - Life Saver and Starburst :)

These are so simple to make. You cut out 2 petals. Then you glue the flaps on each side to just inside each piece. I glued the flaps down on top, but you don't have to. You can leave them loose or fold them on top. I planned on having them open though to have the candy sticking out of the top. Otherwise I would have closed them. And because I was being cheap and didn't want to buy Sticky Strip to hold it all together, I used my glue gun. It wasn't perfect. But they held together just fine.

Two non-crafting items to mention:

The first thing, has anyone read Water for Elephants? I just started it today finally. And I am really loving it so far. I am hoping the movie will be good! The movie coming out is the reason why I finally decided to read it, although I have been wanting to read it for quite a while. I admit, I am worried Robert Pattinson won't be a strong enough actor to play the part. Hopefully, I am wrong though! We shall see.

And the second thing is, I am watching Les Miserables 25th Anniversary Concert The O2 tonight. It's been forever since I have seen the movie and listened to the music. I forget how good it is. So many good songs and characters! Wow, it's such an amazing experience. Even on the small screen and just the music. It's on PBS, so if you get a chance, watch it!! So so so good!

Linking up to:


Alright, I am off. Hope you are all good!

Sunday, March 20, 2011

Card Patterns Sketch Challenge 107

Hi Everyone! Thought I would show you my very first attempt at a sketch challenge. The card didn't quite turn out how I wanted. Oh well :). Card Patterns Blog always has cute sketches. But I have never made a card from any of them. Or any sketch for that matter. So I thought I would give it a try.

First, here is my card:


Bliss Card - Card Patterns Sketch Challenge 107:
Cardstock - Pink Pirouette, Whisper White Stampin' Up!
Patterned Paper - Dear Lizzy for American Crafts
Stamp - Stampin' Up!
Ink - Early Espresso Stampin' Up!
Punches - Flower Petal border EK Success; Bird, Itty Bitty Flower Stampin' Up!
Ribbon - Brown Grosgrain May Arts
Paper Doilies - Darice
Bling - Half Pearlie Stampin' Up!
For the doily, because it was a lot bigger than the paper rosette, I folded it in 1/8th's, cut the center out and then gathered it so it fit snugly behind the rosette. I know it's pretty subtle, but there is an embossed hydrangea blossom on the top right hand side of the patterned paper. I didn't want to cover the whole thing up because I love it, so I did the borders, ribbon, rosette and bird on the bottom 1/3rd of the card. That way the hydrangea blossom wasn't lost.

And now here is the sketch:


As you can tell, I also rotated the the card on it's side and then, like I mentioned above, moved the scallops, ribbon and rosette down to the bottom 3rd.

I linked up my blog to the sketch challenge. I hope I win because the prize is Unity Stamps! Love them! I haven't ever purchased any of their stamps but the images are so cute! And now they have teamed up with Webster's Pages, another brand I love. So cross your fingers for me :).

Before I head off, here is one last card I made:

Happy Birthday Banner Card:
Card - Studio G
Cardstock - Whisper White Stampin' Up!
Patterned Paper - Dear Lizzy for American Crafts
Stamps - Stampin' Up!
Ink - Early Espresso Stampin' Up!
Ribbon - May Arts
Punches - Scallop border, Itty Bitty Heart and Flower, Designer Label Stampin' Up!
Button - Stella and Rose for My Mind's Eye
Glitter - Martha Stewart

The card is from Studio G. They have a few packages of cards where you get small cards - my favorite!!! - and coordinating envelopes. There are two of each style, and three designs. And of course, they are only $1. You can't pass that up! And because I love small cards, I definitely couldn't pass them up.

I made the banner by cutting the different papers into half in strips and then just cutting the flag end into each piece. Super easy! Oh, and before I cut the end, I scored them at 3/4" so that way each one would be a rectangle and not square. But since the card is so small, I didn't want the flags to be too big.

I am linking my post up to

and

If you haven't checked out either blog, I highly recommend to do so! They are both great!

Off to craft a little more before the weekend is over. Hope you have a great rest of yours!

Saturday, March 19, 2011

Listography: If I Could I Would...

I'm in a mood for lists today! So bare with me for one more :-)

1. Eat dessert everyday.

2. Always wake up on the right side of the bed and be happy.

3. Make a living out if being crafty. I have lots of ideas but haven't gotten anything going yet.

4. Dance to my own theme music all the time! He he he. I always wanted to be in a musical :-) "I feel pretty..."

5. Sleep in everyday and stay up until 3 am. I'm a bit of a night owl.

6. Buy a sweet NIKON SLR camera. And take classes on how to use it too.

7. Figure out how to make the days longer and need less sleep. That way I could get everything I want done in a day! I know, I'm crazy :-)

8. Go to Disneyland at least 4 times a year! Hehehe.

9. Visit Wine Country. I've always wanted to go.

10. Not be so afraid of trying to be crafty for a living :-)

11. Get my motorcycle licence so I can drive an Easter Egg blue moped.

12. Get my weight down 40 more lbs. I can do it!!

13. Go on a Mediterranean cruise. I want to see Europe so bad!!!

14. Blog and craft every day.


I am off for the day! I promise :-). Make it a good one!

I Am Greatful For ...

Hi everyone! I just wanted to make a short little post to say what I am thankful for today :-)


1. My husband works so hard for our family and ALWAYS tries to do the right thing. He doesn't falter easy. He makes me laugh everyday and loves me for who I am.

2. Peyton has brought light into my life that I didn't even know I was missing. She is so excited about life and learning anything new she can. She is every dominate trait of Thong and I put together! And we love every part if her!

3. My mom has always been there for me. Even when she doesn't agree with my choices, she still loves me. She always makes me feel confident and loves to get crafty! It was definitely something I picked up from her and from her mother.

4. My family is crazy and fun! As we have gotten older we have learned how important it is to stay close. My nephews and niece are so much fun and I love them to pieces.

5. My dogs are full of never ending love. They are so happy to see us everyday without fail. I love smuggling with them on the couch and just having them around!

6. My craft room has become my own private space where I can escape life and just go create! I live to be in there and do what comes natural:-).

7. Red Velvet is my favorite dessert. Okay, and cheesecake. And key lime pie. And lemon squares made by Amber Lafata. And.....

8. Spring is here! I always say fall is my favorite season. But I think I have been mistaken all this time! I love the days getting longer. Starting to wear warmer clothes. Trees turning green again. Flowers starting to bloom. Spring and summer themed scrapbook products. Being able to spend mire and more time outside.

9. My Nook and my books. I love reading. I love how books allow me to escape reality for just a bit and live a little in someone else's shoes. Good books make me happy - even the sad ones!

10. Okay, you may laugh at these next things, but I can't help myself! My ipod, cell phone and all the electronics in my life. I love music and I have been able to learn all kinds of new artists that I wouldn't have been able to discover without the help of my computer and even itunes. Ha! I am making myself laugh! I am such a dork! I love how I can stay connected to the world so much easier and all within my palm. I'm even writing this post on my phone.

And there you have it. Isn't life grand!

Friday, March 18, 2011

Finally, The Rest Of The Valentine's Cards

Hey everyone! I will keep my typing short and sweet to get to the goodstuff tonight! Here are the rest of the Valentine's I made. Hope you guys like them :)

XOXO Card:
Cards (used on all the cards shown) - Stampain' Up!
Cardstock - Chocolate Chip Stampin' Up!
Patterned Paper - Fancy Pants
Punches - Scallop border, Pinking Hearts border Stampin' Up!
Bling - jewels Stampin' Up!; Red liquid glitter Martha Stewart
Bookplate - Very Vanilla Hod Podge Hardware Stampin' Up!
Ribbon - Tempting Turquoise grosgrain Stampin' Up!
From My Heart To Yours With Love:
Card - Stampin' Up!
Glitter Cardstock - American Crafts
Patterned Paper - Fancy Pants
Punches - Dotted Ribbon border, Scallop Ribbon border, Scallop Trim border Stampin' Up!; Lace border Martha Stewart
Gems - Stampin' Up!
Ribbon and Twine - Red Grosgrain Packaging from Christmas pajamas a few years back!!!; Banker's Twine my stash


Happy Valentines Day:
Card - Stampin' Up!
Cardstock - Whisper White Stampin' Up!
Patterned Paper - Fancy Pants
Punches - Lace border Martha Stewart; Dotted Ribbon border, 4 petal Itty Bitty Stampin' Up!
Bling and Glitter - half pearlies Stampin' Up!; Red Liquid Glitter Martha Stewart
Ribbon - My Stash

My Heart Is With You:
Card - Stampin' Up!
Patterned Paper - Fancy Pants
Punches - Word Window, Scallop border, Scallop Circle, 4 Petal Itty Bitty flower Stampin' Up!; Fancy Flower border EK Success
Ink - Crushed Curry Stampin' Up!
Stamp - Stampin' Up!
Bling - green candy dots, yellow gems Doodlebug Creations
Ribbon - Brown Gingham Making Memories

I'm Glad You're Mine, Valentine:
Card - Stampin' Up!
Cardstock - Chocolate Chip Stampin' Up!
Patterned Paper - Fancy Pants
Punches - Fancy Flower border EK Success; 4 Petal Itty Bitty Flower, Multi Petal Itty Bitty Flower, Scallop border Stampin' Up!
Ribbon - My Stash

Won't You Please Be Mine:
Card - Stampin' Up!
Cardstock - Chocolate Chip, Whisper White Stampin' Up!
Patterned Paper - Fancy Pants
Stamp - American Crafts
Ink - Chocolate Chip Stampin' Up!
Punches - Scallop border, 4 petal Itty Bitty flower Stampin' Up!
Ribbon - Regal Rose Stampin' Up!
Brad - Doodlebug Designs


Happy Valentine's Day Zebra:
Card - Stampin' Up!
Patterned Paper - Fancy Pants
Glitter Cardstock - American Crafts
Stamp - Studio G
Ink - Real Red, Chocolate Chip Stampin' Up!
Twine - Baker's Twine My Stash
Punches - Itty Bitty Flower, Scallop border Stampin' Up!
Bling - pearl and jewels Stampin' Up!


Fishy Amour:
Card - Stampin' Up!
Cardstock - Whisper White Stampin' Up!
Patterned Paper - Fancy Pants
Ribbon - My Stash
Ink - Chocolate Chip, Real Red Stampin' Up!
Punches - Scallop Oval, Oval, Itty Bitty Flower,Scallop border, Pinking Hearts Stampin' Up!; Fancy Flower border EK Success
Eyelet Brad - Pebbles, Inc.

Everything Grows Better With Love:
Card - Stampin' Up!
Cardstock - Chocolate Chip Stampin' Up!
Patterned Paper - Fancy Pants
Glitter Cardstock - American Crafts
Punches - Itty Bitty flowers, Scallop border, Scallop Dotted Ribbon border
Bling - Half pearls Stampin' Up!

Stupid blurry picture! Sorry!!
Head Over Heels Owl:
Card - Stampin' Up!
Cardstock - Real Red, Whisper White Stampin' Up!
Patterned Paper - Fancy Pants
Ribbon - Old Olive, Stampin' Up!; Baker's Twine My Stash
Stamp - American Crafts
Ink - Baja Breeze, Early Espresso, Riding Hood Red markers Stampin' Up!
Punches and Die - Itty Bitty flowers and tags die Stampin' Up!; Lace Trim Martha Stewart
Bling - Half Pearls and Jewels Stampin' Up!


Happy Spring! Yay! I  am so glad it is almost here!

Monday, March 7, 2011

My Short Little Break From Blogging Turned Into A Long One!

Hi Everyone! Hope you are all good! I can't believe how long it's been since I have posted anything. In my defense I have been super busy. I went from quiting my job, to going to Disneyland 2 days after my last day, taking a week to recover from my 5 days there, to starting my new job! Then it was Peyton's birthday and a few days after that it was mine! Wow, February sure went by fast...

Back to Disneyland - it was so much fun! It was Peyton and I, while Thong stayed home with the pup's, worked, played poker and watched movies. He called it his Bachelor week :). In the mean time, Peyton and I went with my sister and her husband; my brother, his wife and 4 kids; and last but not least, my parents. We stayed in a motel across the street, within walking distance and spent 5 WARM and funfilled days in the

 Happiest Place On Earth.

Peyton fell in love with a Cinderella tutu, and then of course I had to get her princess ears to go with it! I love this pic of her. What you don't see though is what a total princess diva she was being while I was trying to snap it! :)

This is one of the first pictures taken on our first day. We had to get a picture of "Cinderella's Castle"! Yes, I know it's Aurora's Castle, but Peyton LOVES Cinderella, so she dubbed it Cinderella's Castle. She stayed certain of it until close to the end when she finally got to venture inside.

My parents got Peyton this Tiana dress. It's absolutely darling! She fell in love when she saw her in real life too! Even though Cinderella is her favorite princess, she told me that Tiana is now her 2nd favorite! Ha! Too funny! Tiana was so sweet and so great! And so pretty!

Card No. 1:


Stampin Up, American Crafts, Studio G, Martha Stewart

Card No. 2:


Stampin' Up!, Fancy Pants, Studio G, Martha Stewart, my stash

Card No. 3:

Stampin' Up!, Joanne's, My Mind's Eye, Darice, my stash

Card No. 4:

My Mind's Eye, Stampin' Up!, Studio G, American Crafts, my stash (sorry the pic is blurry! I don't have the card anymore, so I can't take another pic of it :()

Card No. 5:


Stampin' Up!, My Mind's Eye, Doodlebug Designs, American Crafts, my stash (sorry this pic is blurry too. I was in a hurry when I took the pictures :()


So when I was just about ready to post, I was doing spellcheck and I am not sure how, but I somehow erased this whole post! :(. I had gone into detail of all the supplies. And then because it auto saved right after, I lost everything for good! Ugh!!!! Unfortunately I am not going to be able to do that tonight again. So here is my post without all of those. But I hope you like it just the same. So if you are wanting to know any of the precise details, just leave a comment on what you would like to know, and I will let you know. Sorry!!!
And there you have it. Well, actually there are 10 more! But I will save them for another time :). Hope you all are well. I promise I won't be such a stranger!